Showing posts with label CSS. Show all posts

How to Change Width of Body, Post and Sidebar in Blogger

Changing  the width of  body, post and sidebar in Blogger blog is a must in order to make some changes that would be advantageous to your part. First in line is you can put a  wider stuffs/widgets on your sidebar  especially for  your Adsense ad to increase its click through rate (CTR). Secondly, you can add a  larger image size  in your posts which gives your blog a better and professional looks.
change width of body post and sidebar


I had tried to search the tag like " #Outer-Wrapper " ,  "#main-wrapper " and  " #sidebar-wrapper" but none of these code is present in my Blogger's Template so I decided to use the most easy way in changing the width of  my blog's body  and sidebar through  Blogger Template Designer. This technique is safe and more comfortable to use. Without much words to say let us now follow the very simple steps below.

Changing Width of Body and Sidebar in Blogger


Step 1. Go to your Blogger Dashboard >> Template >> Back-up
Step 2. Click Customize
Step 3. Hit  the Adjust widths button. Here, you can adjust the width of your entire blog and its sidebar depending upon your likeness.
change width of post body snd sidebar

Step 4.  Now hit the Apply to Blog button
change width of blog post body snd sidebar


Adjust the width of post by putting CSS


Copy the code below and paste it above the code ]]></b:skin>

.post { background: #fff; margin: 0px 0px 35px;
width:680px;
padding: 10px 15px 10px 10px;
-webkit-border-bottom-right-radius: 10px;
-moz-border-radius-bottomright: 10px;
border-bottom-right-radius: 10px;
box-shadow: 1px 3px 4px rgb(188, 188, 188);
}
Note: 
In my own blog which has an entire width of 1100px and a sidebar of 320px, the most  fit post width is 680px. Just change the value 680px depending upon your entire blog's width. You can immediately see the effect since the preview page is located  in the bottom part of it.

Let me hear your thoughts about this article on how to change width of body, post and sidebar in your blog?
Happy Blogging Buddies ;-)

How To Add Responsive Slider Widget For Blogger Blog

Adding responsive slider widget for your Blogger blog is necesssary especially if you want to have a better user experience. They can use the silder button (next-previous) to select the image with a corresponding post that link on it. This slider is easy to use and to customize so that you can adjust it according to your likeness.
add responsive image slider for blogger

Also read:

Add Responsive Slider Widget For Blogger Blog


Step 1. Go to your Blogger Dashboard >> Layout >> Add A Gadget, then choose HTML/JavaScript
Step 2. Paste the code below inside it.

<style type='text/css'>
.btt-slider {  margin: 30px auto;  max-width: 850px;  padding: 0 20px;  }
.rslides {  list-style: none outside none;  margin: 0 auto;  max-height: 400px;  max-width: 800px;    overflow: hidden;  padding: 0;  position: relative;  width: 100%; }
.rslides li {  -webkit-backface-visibility: hidden;  position: absolute; border: 5px solid #555; display: none;  left: 0;  top: 0; margin: 0; padding: 0; list-style: none; }
.rslides img {  display: block;  height: auto;  float: left;  width: 100%;  border: 0; margin: 0; max-width: 100%; }
ul.rslides .rslides_nav {  height: 30px;  position: absolute;  text-indent: -99999px;  top: 45%;  width: 30px;  z-index: 9999;  display: none; }
ul.rslides:hover .rslides_nav {  display: block;  }
.prev {  background: url("http://3.bp.blogspot.com/-2R8tmOI8om8/U3HrZJmrzPI/AAAAAAAAC_U/-ye9JkB8uQg/s1600/arrows.png") repeat scroll 0 0 transparent;  float: left;  left: 15px;  }
.next {  background: url("http://3.bp.blogspot.com/-2R8tmOI8om8/U3HrZJmrzPI/AAAAAAAAC_U/-ye9JkB8uQg/s1600/arrows.png") repeat scroll right 0 transparent;  float: right; right: 15px;  }
</style>
<script type='text/javascript'>
/*<![CDATA[*/
  $(function() {
    $(".rslides").responsiveSlides({
      auto: true,
      speed: 500,
      timeout: 3000,
      nav: true,
      pause: true,
      prevText: "Previous",
      nextText: "Next",
      navContainer: "ul.rslides",
    });
  });
/*]]>*/</script>
<script src="http://ajax.googleapis.com/ajax/libs/jquery/1.9.1/jquery.min.js"></script>
<script src='https://googledrive.com/host/0B-P4_Fs3S76yQ1RVNnl0bVlLMXM' type='text/javascript'>
</script>
<div class="btt-slider">
<ul class="rslides">
<li><a href="http://bloggingtipsandtrix.blogspot.com/"><img alt="" src="http://img-url.com/" /></a></li>
<li><a href="http://bloggingtipsandtrix.blogspot.com/ "><img alt="" src="http://img-url.com/" /></a></li>
</ul>
</div>

Note: If your blog already have a jQuery Plugin then remove the highlighted code.
(<script src="http://ajax.googleapis.com/ajax/libs/jquery/1.9.1/jquery.min.js"></script>)

Customization:


Replace http://bloggingtipsandtrix.blogspot.com/ with your  own link.
Then Replace http://img-url.com/ with the image link you want to show in the slider. Click here how to get the image link.
Step 3. Save the widget and you're done buddies. See now  your blog with its responsive image slider.( =D
Hope you learned something with this tutorial and Stay tuned with our coming posts!
Reference: btnt

Create a CSS Image Slider with Thumbnails for Blogger

Hey guys, are you having a problem on how to make image galleries/sliders for your blog? This tutorial is the answer for it. Photoblogs  need this kind of trick in order to show their images in a nice and professional manner but not only for those kind of blogs since we need photos occasionally to present some ideas in our readers.  In this tutorial, I will show you  the steps on how to make it. An overview of this is tweak is  having a mini blocks of images at the top which will enlarged at the bottom each time an image is selected  upon hover of the mouse on the  thumbnail and that was acquired through adding some CSS on it.
image slider for bloggger
See demo here.

How to Add A CSS Image Slider with Thumbnails to Blogger


Step 1. Log in to your Blogger Dashboard >> Template >> Edit HTML
Step 2. Click anywhere inside the code area and press the CTRL + F keys to open the Blogger search box
Step 3.  Look for the code below by  pasting it inside the search box and hit Enter.
</head>
Step 4. Just above/before the  tag above, paste the css code below:

<style type='text/css'>
.bttimage-container {
position: relative;
width: 620px;
height: 610px;
margin: 0 auto;
text-align:center;
overflow: hidden;
}
.bttimage-container a {
display: inline;
text-decoration: none;
}
.post-body img {
max-width: 600px;
-moz-border-radius: 5px;
-webkit-border-radius: 5px;
border-radius: 5px;
}
/* Mini-thumbnails style */
.mini-thumbnail {
width: 18%; /* mini-thumbnails width */
margin:1px;
opacity: 1;
-webkit-box-shadow: 0px 0px 3px rgba(0,0,0,0.5);
-moz-box-shadow: 0px 0px 3px rgba(0,0,0,0.5);
box-shadow: 0px 0px 3px rgba(0,0,0,0.5);
}
/* Style for the main thumbnail */
.large-thumbnail {
position: absolute;
width: 100%;
top: 800px;
margin:0 auto;
text-align: center;
display: block;
-webkit-transition: top 1.5s ease;
-moz-transition: top 1.5s ease;
-o-transition: top 1.5s ease;
-ms-transition: top 1.5s ease;
transition: top 1.5s ease;
}
.feature {
top: 110px;
width: 100%;
opacity: .3;
}
/* style for the selected mini-thumbnail */
a:hover .mini-thumbnail {
opacity: .5;
-webkit-box-shadow: 0px 0px 10px rgba(0,0,0,0.5);
-moz-box-shadow: 0px 0px 10px rgba(0,0,0,0.5);
box-shadow: 0px 0px 10px rgba(0,0,0,0.5);
}
/* transition effects for the selected image */
a:hover .large-thumbnail {
top: 110px;
width: 100%;
z-index:3;
opacity: 1;
-webkit-transition: top 1.5s ease;
-moz-transition: top 1.5s ease;
-o-transition: top 1.5s ease;
-ms-transition: top 1.5s ease;
transition: top 1.5s ease;
}
</style>

Step 5. Save template button.

Step 6. Go back to Blogger Dashboard and select any of the post you have published or you may choose a New Post where you will add the add the HTML code  inside a post or page by clicking the HTML section/button.

Hint:

Another way of putting the  HTML codes is thorough going ether to Lay -out and choose Add a new Gadget buttom then click HTML/Javascript.

<div class="bttimage-container">
<a href="http://bloggingtipsandtrix.blogspot.com/">
<img class="mini-thumbnail" src="MINI-THUMB-URL1" />
<img class="large-thumbnail" src="BIG-THUMB-URL1" />
</a>
<a href="http://bloggingtipsandtrix.blogspot.com/">
<img class="mini-thumbnail" src="MINI-THUMB-URL2" />
<img class="large-thumbnail" src="LARGE-THUMB-URL2" />
</a>
<a href="http://bloggingtipsandtrix.blogspot.com/">
<img class="mini-thumbnail" src="SMALL-THUMB-URL3" />
<img class="large-thumbnail" src="BIG-THUMB-URL3" />
</a>
<a href="http://bloggingtipsandtrix.blogspot.com/">
<img class="mini-thumbnail" src="SMALL-THUMB-URL4" />
<img class="large-thumbnail" src="BIG-THUMB-URL4" />
</a>
<a href="http://bloggingtipsandtrix.blogspot.com/">
<img class="mini-thumbnail" src="SMALL-THUMB-URL5" />
<img class="large-thumbnail" src="BIG-THUMB-URL5" />
</a>
<a href="http://bloggingtipsandtrix.blogspot.com/">
<img class="large-thumbnail feature" src="LARGE-THUMB-URL1" />
</a>
</div>

Customization:


  • Replace http://bloggingtipsandtrix.blogspot.com/ with the url of your page/post where you want to land a certain link.

  • To add pics inside the image slider just replace MINI-THUMB-URL and LARGE-THUMB-URL texts with the URL of your image.

  • The URL for the SMALL-THUMB-URL and BIG-THUMB-URL in every set or box is the same. See blockquote below for an example. Or you can do it separately depending on your preferences.

<a href="http://bloggingtipsandtrix.blogspot.com/">
<img class="mini-thumbnail" src="http://1.bp.blogspot.com/-ispDhJV3UqI/UvOfxiWF_DI/AAAAAAAACFM/pYfePxYyqUU/s1600/photo+slider+in+blogger.png" />
<img class="large-thumbnail" src="http://1.bp.blogspot.com/-ispDhJV3UqI/UvOfxiWF_DI/AAAAAAAACFM/pYfePxYyqUU/s1600/photo+slider+in+blogger.png" />
</a>

Note:

The last LARGE-THUMB-URL1 should be replaced with the URL of the default image that will appear on your slider.

Read this post to know how to get the image URL from your uploaded photo in Blogger.

Also read:

How To Show Or Hide/Cover Blog Content With Images Using CSS

Step 7. Finally, save your widget/gadget or publish your page/post and that's it! Enjoy Buddies :-)
Credits: helplogger.blogspot.com

How to Add Social Networking Buttons With CSS3 Style in Blogger

Sharing widgets help bloggers to expand there exposure in the web since it makes our articles viral in the internet. I would share you another example of sharing widget where it is very customizable in your part. This is from one of my circle of friends from G+ and I woul shre it to you coz I believe that you will really like it. This sharing widget uses   CSS to make it more attractive than others.This include zooming hover effects. You can check right here in my blog sidebar for the demo.
add sharing widget

Social Network Buttons With CSS3 (Metro) Style


Step 1. Go to Blogger Dashboard >> Template >> Back-up your template  for your reference.
Step 2. Click Edit HTML
Step 3. Click anywhere in the code section and search the code below
]]></b:skin>
Step 4. Above the code in step 4, paste the css code below
/* Bloggingtipsandtrix.blogspot.com  */
.bubblewrap{
list-style-type:none;
margin:0;
padding:0;
}
.bubblewrap li{
display:inline;
width: 60px;
height:60px;
}
.bubblewrap li img{
width: 48px; /* width of each image.*/
height: 38px; /* height of each image.*/
border:0;
margin-right: 4px; /*spacing between each image*/
-webkit-transition:-webkit-transform 0.1s ease-in; /*animate transform property */
-o-transition:-o-transform 0.1s ease-in; /*animate transform property in Opera */
}
.bubblewrap li img:hover{
-moz-transform:scale(1.1); /*scale up image 1.1x*/
-webkit-transform:scale(1.1);
-o-transform:scale(1.1);
}
Step 5.  Save your Template and you're halfway done!
Step 6. Go back to Blogger Dashboard >> Click Lay-out (or anywhere in blog pages).
Step 7. Scroll down and select HTML/Javascript.
Step 8. Inside the empty box, place the HTML code below
<ul class="bubblewrap">
<li><a href="googleplus URL here"><img src="http://4.bp.blogspot.com/-8iulyWrFHT4/Ut6UFpAeKGI/AAAAAAAACC4/WaGeDKsNnac/s1600/bloggingtipsandtrix.blogspot.com-google-icon.png" title="Google pus" /></a></li>
<li><a href="facebook fun page URL or Username here"><img src="http://1.bp.blogspot.com/-C0K3F8wrv7c/Ut6TkyV-yuI/AAAAAAAACCw/k-yLSUzUNIc/s1600/bloggingtipsandtrix.blogspot.com-facebook-icon.png" title="Add to Facebook" /></a></li>
<li><a href="Digg Username URL Here"><img src="http://2.bp.blogspot.com/-cl3HYfosZ1s/Ut6Te6bHSeI/AAAAAAAACCo/NJ83Ob3paEA/s1600/bloggingtipsandtrix.com-digg-icon.png" title="Add to Digg" /></a></li>
<li><a href="Your Twitter URL Here"><img src=" http://2.bp.blogspot.com/-GjtWtoeMmnM/Ut6TY9gqR-I/AAAAAAAACCg/AOd02ILh2uo/s1600/bloggingtipsandtrix.blogspot.com-twitter-icon.png" title="Add to Twitter" /></a></li>
<li><a href="Your Feedburner URL Here"><img src="   http://4.bp.blogspot.com/-Xnu7zD1g8JE/Ut6Ss_rlBCI/AAAAAAAACB4/Ha5a8q6YfRc/s1600/bloggingtipsandtrix.blogspot.com-rss-icon.png" title="Add RSS Feed" /></a></li>
</ul>

Note: Simply replace the corresponding four URLs with yours.
Also Read:

 Step 9. Save your template and Bravo!
Peace on EARTH Bro!

How to Add a Tiny jQuery Circle Slider to Blogger

Jquery  puts reality on our imaginations, today in this tutorial I will show one trick that  shows how  this plug-in works.  This is called " tiny circleslider" .When dragging on the red dot, the images will  move from right to the left and the succedding set of images will slide out respectively.
add tiny jquery circleslider
See Demo Here

Adding the Tiny Circleslider to the Blog


In order to make it work, first task is to add the javascript jQuery library in our template:
Step 1. Go to Blogger's dashboard
Step 2. Click Template >> Edit HTML button:
Step 3. Click anywhere on the code area and search by using the CTRL + F keys for the tag below:
</head>

Step 4. Just above/before the tag above, add the following scripts below:
<script src='http://ajax.googleapis.com/ajax/libs/jquery/1.10.2/jquery.min.js' type='text/javascript'/>
<script src="http://bloggingtipsandtrix.googlecode.com/svn/jquery.circleslider.js"/>
Step 5.  Now, we are going to add the CSS styles above the </head> tag or just put it  above the scripts that you put in step 4:
<style>
  #rotatescroll { /* is the rectangle container */
    height: 300px;
    position: relative;
    width: 300px;
  }
  #rotatescroll .viewport { /* is the rectangle containing the images */
    height: 300px;
    position: relative;
    margin: 0 auto;
    overflow: hidden;
    width: 300px
  }
  #rotatescroll .overview { /* is the list with the images */
    left: 0;
    list-style: none;
    margin: 0;
    padding: 0;
    position: absolute;
    top: 0;
  }
  #rotatescroll .overview li { /* each item of the list */
    float: left;
    height: 300px;
    position: relative;
    width: 300px;
  }
  #rotatescroll .overlay { /* the image with the circle overlapping the list */
    background: transparent url(http://4.bp.blogspot.com/-Ot8KEdqWA58/Um59McoG1bI/AAAAAAAAEgY/ZzK7Qidizrg/s1600/bg-rotatescroll.png) no-repeat 0 0;
    height: 300px;
    left: 0;
    position: absolute;
    top: 0;
    width:300px;
  }
  #rotatescroll .thumb { /* the red circle that allows us to navigate */
    background:transparent url(http://1.bp.blogspot.com/-SY8PG9E-_ZQ/Um59McKv1vI/AAAAAAAAEgc/tEDJm6soGfE/s1600/bg-thumb.png) no-repeat 0 0;
    cursor: pointer;
    height: 26px;
    left: 137px;
    position: absolute;
    top: -3px;
    width: 26px;
    z-index: 200;
  }
  #rotatescroll .dot { /* the points indicating the position of each image */
    background: transparent url(http://3.bp.blogspot.com/-O0kN8rvZGSE/Um59MRdOpHI/AAAAAAAAEgQ/XCiipR_fCKM/s1600/bg-dot.png) no-repeat 0 0;
    display: none;
    height: 12px;
    left: 155px;
    position: absolute;
    top: 3px;
    width: 12px;
    z-index: 100;
  }
  #rotatescroll .dot span { /* are hidden by default */
    display: none;
  }
</style>

Step 6. Save the changes by clicking the Save Template button
Now here's the HTML that has to be added to where we want to display the circle slider

To add it inside a post:


  • Click the New post or select a post from your previous  publish articles,
  • Then switch your Blogger Editor's page on HTML mode.
  • And finally, paste the code below:


<div id="rotatescroll">
  <div class="viewport">
    <ul class="overview">
      <li><img src="imageURL" /></li>
      <li><img src="imageURL" /></li>
      <li><img src="imageURL" /></li>
      <li><img src="imageURL" /></li>
      <li><img src="imageURL" /></li>
    </ul>
  </div>
  <div class="dot"></div>
  <div class="overlay"></div>
  <div class="thumb"></div>
</div>

<script type="text/javascript">
$(document).ready(function(){ $('#rotatescroll').tinycircleslider(); });
$('#rotatescroll').tinycircleslider({ interval: true, snaptodots: true });
</script>


Note: Replace the image URL text with the URL of your images

and here are other options that could be added, separated by commas:

snaptodots - false if you want no dots to be shown when dragging them
hidedots - false if you want to display the internal points (by default is true)
intervaltime - is the time between slides (by default 3500)
radius - defines the size of the circle (by default is 140)

If you want to add it to your sidebar, simply go to Layout, click the Add a Gadget link > from the popup window, choose HTML/Javascript and paste the code inside the empty box.
Credit: I would like to say thanks to helplogger for the script above!

How to Create Magazine Style with Post Summaries and Thumbnails on Blogger

Hello dear! I am now back with the race and time to share another tutorial which  I have learnt from one of my favorite sites whom I've learned so many things in web developing i.e. helplogger. I know that template designing is now flooding in the web and one of the best styles now is the magazine or newspaper style template which  displays the posts summaries in the homepage by stacking the columns on top of each other. This kind of templates is now very  popular, it may a news or technology blog, everyone needs a fresh magazine style layout for their blogs.
create magazine style in blogger


Live Demo

Here in this tweak, we will  use the Read More script in order  to display a summary of the posts and add a conditional tag and a different style to the first post so that it will have a larger width than the other older posts. Without so much adieu, you can now change your previous and simple Blogger template to become an attractive and stylish magazine looks.

How to Add a Magazine Style in Blogger


Step 1.  Go to Blogger Dashboard >> Template (Back- up your template for  your reference).
Step 2. Click Edit HTML button.
Step 3. Click anywhere inside the code area and search by using CTRL + F keys for this line:
<data:post.body/>
Note: You'll find the above code in two occurrences,  please choose the second.

Step 4. Remove that line  above in step 3 and replace it with code below:
<b:if cond='data:blog.pageType != &quot;item&quot;'>
<b:if cond='data:blog.pageType != &quot;static_page&quot;'>
 <span class='post-comment-link'><b:if cond='data:blog.pageType != &quot;item&quot;'><b:if cond='data:post.allowComments'><a class='comment-link' expr:href='data:post.addCommentUrl' expr:onclick='data:post.addCommentOnclick'><data:post.numComments/></a></b:if></b:if></span>
<div expr:id='&quot;summary&quot; + data:post.id'><data:post.body/></div>
  <script type='text/javascript'>createSummaryAndThumb(&quot;summary<data:post.id/>&quot;);</script>
<span class='readmorebutton' style='float:right'><a expr:href='data:post.url'>Continue Reading >></a></span></b:if></b:if>
<b:if cond='data:blog.pageType == &quot;item&quot;'><data:post.body/></b:if>
<b:if cond='data:blog.pageType == &quot;static_page&quot;'><data:post.body/></b:if>

Note: You may replace the Continue Reading text, by changing the code in orange

Step 5. Now find (CTRL + F) this line:
<b:include data='post' name='post'/>

Step 6. Remove that code in step 5 and  replce it with code below:

<b:if cond='data:post.isFirstPost'>
<b:if cond='data:blog.homepageUrl == data:blog.url'>
<div id='first'>
<b:if cond='data:post.title'>
<h3 class='post-title entry-title'>
<b:if cond='data:post.link'>
<a expr:href='data:post.link'><data:post.title/></a>
<b:else/>
<b:if cond='data:post.url'>
<a expr:href='data:post.url'><data:post.title/></a>
<b:else/>
<data:post.title/>
</b:if>
</b:if>
</h3>
</b:if>
<div class='first-body'>

<b:if cond='data:blog.pageType != &quot;item&quot;'>
<b:if cond='data:blog.pageType != &quot;static_page&quot;'>
<div expr:id='&quot;summary1&quot; + data:post.id'><data:post.body/></div>
  <script type='text/javascript'>createSummaryAndThumb1(&quot;summary1<data:post.id/>&quot;);</script>
<span class='post-comment-link'><b:if cond='data:blog.pageType != &quot;item&quot;'><b:if cond='data:post.allowComments'><a class='comment-link' expr:href='data:post.addCommentUrl' expr:onclick='data:post.addCommentOnclick'><data:post.numComments/></a></b:if></b:if></span>
<span class='readmorebutton' style='float:right'><a expr:href='data:post.url'>Continue Reading >></a></span>
</b:if></b:if>
<b:if cond='data:blog.pageType == &quot;item&quot;'><data:post.body/></b:if>
<b:if cond='data:blog.pageType == &quot;static_page&quot;'><data:post.body/></b:if>

</div>
</div>
<b:else/>
<b:include data='post' name='post'/>
</b:if>
<b:else/>
<b:include data='post' name='post'/>
</b:if>

Step 7. Now find the </head> tag and paste the following script before/above it:
<script type='text/javascript'>
posts_no_thumb_sum = 290;
posts_thumb_sum = 240;
img_thumb_height = 80;
img_thumb_width = 80;
first_no_thumb_sum = 600;
first_thumb_sum = 540;
img_thumb_height1 = 145;
img_thumb_width1 = 165;
</script>

<script type='text/javascript'>
//<![CDATA[
function removeHtmlTag(strx,chop){
if(strx.indexOf("<")!=-1)
{
var s = strx.split("<");
for(var i=0;i<s.length;i++){
if(s[i].indexOf(">")!=-1){
s[i] = s[i].substring(s[i].indexOf(">")+1,s[i].length);
}
}
strx = s.join("");
}
chop = (chop < strx.length-1) ? chop : strx.length-2;
while(strx.charAt(chop-1)!=' ' && strx.indexOf(' ',chop)!=-1) chop++;
strx = strx.substring(0,chop-1);
return strx+'...';
}

function createSummaryAndThumb(pID){
var div = document.getElementById(pID);
var imgtag = "";
var img = div.getElementsByTagName("img");
var summ = posts_no_thumb_sum;
if(img.length>=1) {
imgtag = '<span class="posts-thumb" style="float:left;"><img src="'+img[0].src+'" width="'+img_thumb_width+'px" height="'+img_thumb_height+'px"/></span>';
summ = posts_thumb_sum;
}

  var summary = imgtag + '<div>' + removeHtmlTag(div.innerHTML,summ) + '</div>';
div.innerHTML = summary;
}

function createSummaryAndThumb1(pID){
var div = document.getElementById(pID);
var imgtag = "";
var img = div.getElementsByTagName("img");
var summ = first_no_thumb_sum;
if(img.length>=1) {
imgtag = '<span class="first-post-thumb" style="float:left;"><img src="'+img[0].src+'" width="'+img_thumb_width1+'px" height="'+img_thumb_height1+'px"/></span>';
summ = first_thumb_sum;
}

var summary1 = imgtag + '<div>' + removeHtmlTag(div.innerHTML,summ) + '</div>';
div.innerHTML = summary1;
}

//]]>
</script>


Step 8. And below the script above add these CSS styles:
<b:if cond='data:blog.pageType != &quot;static_page&quot;'>
<b:if cond='data:blog.pageType != &quot;item&quot;'>
<style type='text/css'>
.first-post-thumb {
margin-right: 10px;
border: 1px ridge #ff8000;
overflow:hidden;
border-radius:74px;
-webkit-box-shadow: 2px 2px 5px rgba(0,0,0,0.3);
-moz-box-shadow: 2px 2px 5px rgba(0,0,0,0.3);
box-shadow: 2px 2px 5px rgba(0,0,0,0.3);
}
.first-post-thumb hover {
 -webkit-filter: opacity(50%);
  }
.post-body img, .post-body .tr-caption-container, .Profile img, .Image img, .BlogList .item-thumbnail img {
background: none;
border: none;
box-shadow: none;
padding: 0;
}
#first { /* Styles for the First Post Container */
width: auto;
height: 250px;
float: left;
margin-bottom:10px;
background-color: #F4F4F4; /* background color for the first post */
border: 1px solid #E5E5E5; /* border for the first post */
}
.first-body { /* Style for the First Post summary */
color: #545454;
font-size: 13px;
text-align: justify;
padding: 5px 10px;
line-height:1.5em;
}
#first h3 a, #first h3 a:visited { /* Style for the First Post Title*/
border-bottom: 2px solid #DFDFDF;
color: #515151;
font-size: 20px;
display:block;
margin: 10px auto;
width: 95%;
font-size: 20px;
padding: 0px 0px 4px 0px;
font-weight: bold;
text-align:left;
line-height: 1.4em;
background: none;
}
#first h3 a:hover { /* Color on mouseover for the First Post Title */
color: #1061A1;
}
.post { /* Styles for the small posts container */
float:left;
margin-right: 10px;
width: 290px;
height: 210px;
padding: 0px 5px 5px 5px;
background: #FCFCFC; /* background color for the small posts */
border: 1px solid #E5E5E5; /* border for the small posts */
overflow: hidden;}
.posts-thumb { /* Style for the small posts thumbnails */
margin-right: 5px;
background: #ddd;
padding: 3px 3px 0px;
border: 1px solid #158aee;
border-radius: 52px;
overflow:hidden;

}
h3.post-title a{ /* Style for the small posts titles */
font-size: 14px;
color: #747474;
background-color: #F4F4F4; /* Background color for the small posts titles */
width: 95%;
font-weight: bold;
font-family: &#39;Arial Narrow&#39;, sans-serif;
padding: 5px;
}
h3.post-title a:hover { /* Color on mouseover for the Small Posts Title */
color: #005B77;
}
h2.date-header { /* Hide the post date */
display:none;
}
.post-footer { display: none;}
h3.post-title {margin: 0px;}
.readmorebutton { margin-top: 5px;}

.readmorebutton a { /* Styles for the Read More link */
color: #158aee;
border: 1px ridge #ff8000;
background: #EAEAEA; /* Background color for the Read More link */
text-decoration:none;
padding: 3px 5px;
font-weight: bold;
font-size: 11px;
}
.post-comment-link { /* Style for the comment bubble of posts below */
float: right;
display: inline;
margin: -35px 0px;
border: 1px solid #E1E1E1; /* border for the comment bubble */
background: #EAEAEA; /* background color for the comment bubble */
font-size: 11px;
position: relative;
-webkit-border-radius: 100px;
-moz-border-radius: 100px;
border-radius: 100px;
}
#first .post-comment-link { /* Style for the comment bubble of first post */
margin: -200px 10px;
}
.post-comment-link a{ /* Link color for the comments bubble*/
padding: 10px;
color: #6A6A6A;
text-decoration:none;
font-weight: bold;
}
#blog-pager {clear:both;}
</style>
</b:if>
</b:if>

Customization: This is Optional


1) At the beginning of the script from step 7, we have this set of codes:

posts_no_thumb_sum = 290;
posts_thumb_sum = 240;
img_thumb_height = 80;
img_thumb_width = 80;
first_no_thumb_sum = 600;
first_thumb_sum = 540;
img_thumb_height1 = 145;
img_thumb_width1 = 165;

  • The first number (290) is the number of characters that will show for the small posts when there will be no image available
  • The second number (240) will be the number of characters that will show when the small posts will have an image
  • The third and the forth line (80) is for the height and width of the small posts thumbnails (images).


2) The CSS styles. That final thing we  had added is a code that determines how the posts are going to look on the homepage (and archive pages as well, except for the first post).

If you want to change the width an height, respectively the size for the first post container, look for these lines:
width: auto
height:250px


Below the first post are the values for the other posts, just look for this part:

width: 290px;
 height: 210px;
Set the number of posts to show on the homepage so that there will never be any empty space.
1.Go to Settings >> Posts and comments >> Show at most and select the number of posts that you want to appear.

Finally, you have to set the width of your blog lay -out in order to fix this new settings  exactly  to the code that we have inserted in your template.
1.Go to Template >> Click Customize >> Adjust Width of the entire blog (preferably 1040px)
2. Hit the Apply to Blog button.

How to Add Sticky Bar In Blogger

add sticky bar in blogger
One way of replacing your Blogger navigation bar is through adding a sticky bar on it.You can also add sicky bar in your blogger blog  if you want to show or notify  visitors of  recent and upcoming posts, offers, coupons or even  latest news and happenings. You can even add your RSS link there and ask you visitors to subscribe to your blog. Today, in this tutorial  we will create such a sticky bar widget with simple texts and image. See the demo first above to have an overview of what we are trying to accomplish.
add sticky bar in blogger


Make a Sticky Bar In Blogger


Step 1. Go To Blogger > Template > Edit HTML (have a back-up of it)
Step 2. Search for the code below,
]]></b:skin>
Step 3. Just above that code in Step 2, paste the CSS code below,
#btt-stickybar{
background:#158aee url('http://3.bp.blogspot.com/-zQeUG7PU9Uw/TmkiptyZ1eI/AAAAAAAAE98/At4tRBC9HQc/s400/stickybar.png') repeat-x;
width:100%;
margin:0 auto;
text-align:center;
padding:0px 0;
border-bottom: 1px solid #888888;
  -moz-box-shadow: #666666 0px 1px 3px;
  -webkit-box-shadow: #666666 0px 1px 3px;
  box-shadow: #666666 0px 1px 3px;
  z-index: 999;
height: 28px; position:fixed;
line-height: 1.85em;
vertical-align: baseline;
letter-spacing: 1px;
}
#btt-stickybar a{
text-decoration:none;
color:#fff;
font-size:13px;
font-weight:bold;
font-family: arial,"Helvetica",sans-serif;
line-height: 24px;
}
#btt-stickybar a:hover{
text-decoration:underline;
}
#btt-stickybar p {margin:0; list-style:none;}
#btt-stickybar img {vertical-align: middle;
      margin-right: 6px;}


Short Customization:


  • To change the background color of your stickybar, simply change 158aee with your desired hexadecimal color. You may use our color code generator.

Step 4. Now look for the code below,
</head>

Step 5. And just below that code in step 4, place the code below,
<div id='btt-stickybar'><a href='http://www.bloggingtipsandtrix.blogspot.com' style='margin-top:1px; margin-left:7px; color:#666666; float:left;' target='_blank'><img src=' http://4.bp.blogspot.com/-D7pGcSyvGyk/UmYnJTV8WzI/AAAAAAAAB2g/e31HeDy3evw/s1600/blogger+sticky+bar.png  '/></a>
<strong><font color='#F906AC'>Recent Event: </font></strong>
<a href='#'>HOME </a>
<strong><font color='#DF013A'>Upcoming Post: </font></strong>
<a href='#'>Contact Us</a>
<strong><font color='#FFFF00'>Stay Connected: </font></strong>
<a href='# '>See My Sitemap</a>
</div>


Short Customization:


  • Replace the image link in bold blue text with your own logo image link. Click here on how to get the  URL of your uploaded image in Blogger.
  • F906AC, DF013A and FFFF00 are the colors of the "Recent Event", "Upcoming Post" and Stay Connected". You may change the hexadecimal colors by clicking this link and the words respectively.

Step 6. Save your Template and Congrats! : =)
Thank You and hope that you like this little innovation from the codes of MBT.

How To Add Numbers To Blogger Threaded Comments

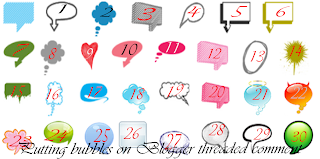
Customizing your comment box is somewhat tricky in order to let your readers drop a comment to your post.One of my previous post features on how to customize author's comments background  comments box but it doesn't contain any numbers to distinguish how comments being dropped in that particular post.  Today I will share to you  a  simple CSS tweak which will add numbers to your threaded comments inside a comment bubble.It will add numbers like this way 3,3.a,3.b & 4 here 3,4 are the main comments and 3.a,3.b are the replies. In order to apply this trick in your threaded comments, you just simply follow the simple steps below!

blogger threaded comment bubble


Add Numbers To Blogger Threaded Comments


Step 1. Go to Blogger Dashboard
Step 2. Hit the Template buttom (have  a copy of your template and save it in a safe place)
Step 3. Click On Edit HTML
Step 4. Now search or Control F for the code below
]]></b:skin>
Step 5. Just above that code in step 4 place the following code below
.comment-thread ol {
    counter-reset: countcomments;
}

.comment-thread li:before {
    content: counter(countcomments,decimal);
    counter-increment: countcomments;
    float: right;
    font-size: 22px;
    color: #555555;
    padding-left: 10px;
    padding-top: 3px;
    background: url(http://3.bp.blogspot.com/-f6ByQfbwApQ/T4x_8p1FGpI/AAAAAAAAB2A/WJKf-ybmvQk/s1600/comment+bubble2.png) no-repeat;
    margin-top: 7px;
    margin-left: 10px;
    width: 50px;
 /*image-width size*/
    height: 48px;
 /*image-height size*/
}

.comment-thread ol ol {
    counter-reset: contrebasse;
}

.comment-thread li li:before {
    content: counter(countcomments,decimal) "." counter(contrebasse,lower-latin);
    counter-increment: contrebasse;
    float: right;
    font-size: 18px;
    color: #666666;
}

Step 6. Save your template and congrats! Enjoy ;-)

Customization:


  • To adjust the position of text (number) from left position, edit the value (padding-left: 10px)
  • By editing the value ( padding-top: 3px ) you can adjust the position of text (number) inside bubble from top position.
  • By editing the value attributes ( margin-top: 7px ) you can adjust the position of bubble from the  top position.
  • Increase or decrease the value ( margin-left: 10px ) as per your requirements in order to adjust the position of the bubble from the left position.
  • If you want to change the bubble image then simply replace image URL with yours. Or you choose one of the url below to replace your comment bubble image.

http://2.bp.blogspot.com/-Vy5WHSIbFgg/UlLHm3htRRI/AAAAAAAABy4/zXoEOxZXCuk/s1600/devil+comment+bubble.png
http://4.bp.blogspot.com/-RANNDG7T4wQ/UlLH8mnV8KI/AAAAAAAABzA/tmIMNU-28KI/s1600/text_comment_bubble_comments.png
http://4.bp.blogspot.com/-ylkeWmNehg4/UlLILVGnEFI/AAAAAAAABzI/ceBTnn8b9lQ/s1600/comment_bubble.png
http://4.bp.blogspot.com/-wN_NTEKKE84/UlLImYlOTrI/AAAAAAAABzQ/4hzM7OgDASQ/s1600/bubble+comment.png
http://2.bp.blogspot.com/-XKAGzqMO0_Q/UlLIywev4CI/AAAAAAAABzY/Db_tmfbXC3c/s1600/comment+bubble+red.png
http://3.bp.blogspot.com/-_wFTlxVUMyY/UlLPIxfijdI/AAAAAAAABzw/z3GOBgQ7ZaA/s1600/heart+1.png
http://2.bp.blogspot.com/-JaUL6mI0oSU/UlLPeezQuNI/AAAAAAAABz4/j4JaQ-f0zVQ/s1600/pink+bubble+icon.png

I would say thanks  to helperblogger for the initial codes in this tutorial.


Customize Cloud Labels Into Bricks Using CSS

Having  a label(s) in our posts is a vital part in order to let our readers be easily directed to what tutorials they want to read in our blog. In order to  make your labels  be presentable we need to add CSS on it. In this tutorial, I will show you on how to style your label in a form of bricks like appearance. The code below can be customized in several manner to create exciting label designs. You can also add background images to them.
Live Demo

customize cloud labels


Customize Cloud Label Into Bricks Using CSS


Check Also:
How to Customize Labels in Blogger (Another Version Using CSS3!)
Follow the easy steps below:
Step 1. Go to Blogger > Settings> Layouts
Step 2. Click add a gadget and choose Labels                  
Inside the settings make sure to choose the cloud display. You may set other options as per your requirement. See the screenshot below as example
brick label in blogger
Note: Too much labels on homepage look awkward. Showcase your best categories only.
Step 3. Now save the widget and go back to Blogger Dashboard settings
Step 4. Click Template ( have a backup of your template for your reference)
Step 5. Click Edit HTML
Step 6. Search for the code below
]]></b:skin>
 Step 7.   Just above the code in Step 6, paste the following CSS code:
/*-----Bricks Style Labels Cloud Widget by Bloggingtipsandtrix.blogspot.com----*/
.label-size{
margin:0 2px 6px 0;
padding: 3px;
text-transform: uppercase;
border: solid 1px #C6C6C6;
border-radius: 3px;
float:left;
text-decoration:none;
font-size:10px;
color:#666;
}

.label-size:hover {
border:1px solid #6BB5FF;
text-decoration: none;
-moz-transition: all 0.5s ease-out;
-o-transition: all 0.5s ease-out;
-webkit-transition: all 0.5s ease-out;
-ms-transition: all 0.5s ease-out;
transition: all 0.5s ease-out;
-moz-transform: rotate(360deg);
-o-transform: rotate(360deg);
-webkit-transform: rotate(360deg);
-ms-transform: rotate(360deg);
transform: rotate(360deg);
filter: progid:DXImageTransform.Microsoft.Matrix(
                    M11=0.9961946980917455, M12=-0.08715574274765817, M21=0.08715574274765817, M22=0.9961946980917455, sizingMethod='auto expand');
zoom: 1;
}

.label-size a  {
text-transform: uppercase;
float:left;
text-decoration: none;
}
.label-size a:hover  {
text-decoration: none;
}


Optional Customization:


  • If in case you want the label boxes to be of random sizes depending on the post-count then simply delete font-size:10px; from the above code.
Step 8.  Save your template and you are  done!
Visit your blogs and look your new  labels  with a new professional looks.
Hope you find this tutorial a helpful one and if you have some questions regarding this post, feel free to leave it in our comment box. I will try my best to answer your queries.