Showing posts with label basic blogging tutorials. Show all posts

Flash Animated Label Cloud Widget For Blogger

add animated  label cloud
Hello there! I was thinking to change the way I presented my labels and finally found  a way to make it. This is called flash animated label cloud  for blogger and this is awesome compared to show blogger  labels in alternatively. This widget works on  Word Press, and now it is available for Blogspot blog.

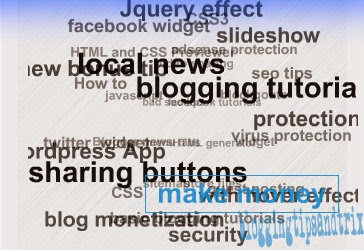
In this widget, we access label tags randomly by your mouse hover in flash mode to see the animation begin, the labels are animated around a sphere.  And the beauty of this widget is you can customize very easily.

 Have a glance of  my sidebar to see the live demo!

Flash Animated Label Cloud Widget For Blogger 


Go to Blogger Dashboard >> Lay-out
Click the Add a Gadget button
Select HTML/Javascript button
Inside the box, paste the code below
<script type="text/javascript">
/*<![CDATA[*/
var bloggingtipsandtrixFlashLabelSettings = {
    blogurl        : "http://codes2tipsandtricks.blogspot.com/",
    color          : "000000",
    hoverColor     : "333333",
    backgroundColor: "FFFFFF",
    size           : 12,
    speed          : 100,
    width          : 250,
    height         : 300,
    transparency   : true
};
/*]]>*/
</script>
<script type="text/javascript" src="https://bloggingtipsandtrix.googlecode.com/svn/flash-label-cloud.js"></script>

You can customize the above code only those highlighted one like the blog URL (replace it with your blog url), color of the text, background color, size of the text, speed, width and its height.

Click Save and you're done!

How to Add Hover Effect to Images in Posts

Hi guys!, Today, I will share you  a simple trick on how to add hover effect to all blog images by  adding/putting only a simple css to your template. I know images will add life to your posts and help your article to rank more in search engine result page. And to be more professional, we will add a soft touch on it.
Have your mouse cursor touch the image below for the live demo.
add hover effect on post images

Also Read:
How to Add Different Hover Effects on Blogger Images
How to Put Alt Tag In Blogger Images-Increase Traffic

Putting Hover Effect To All Post Images


Step 1. Go to your Blogger Dashboard >> Template >> Edit HTML
Step 2. Look or find the code below
]]></b:skin>
Step 3. Just above or after the code above, paste the code below

.post-body img {
opacity:0.7;
-webkit-transition: all 0.2s;
-moz-transition: all 0.2s;
-ms-transition: all 0.2s;
-o-transition: all 0.2s;
transition: all 0.2s;
border:5px solid #ddd;
border-radius:10px;
background: #ffffff;
}
.post-body img:hover {
opacity:1.0;
}

Customization (Optional)


  • Change the opacity (0.7) of the image (in no hover effect state).  You can set it as "0" which is completely transparent and "1" is not tranparent.
  • Change the transition speed of the hover effect ( 0.2s). The bigger the value(.5, .6, .7, .8, .9, 1 and so on) the slower it will undergo the hover effect and the lower the value (.4, .3, .2, .1,) the fastest the hover effect is.
  • You can also edit the value of the border which are:
    5px- The bigger the value the bigger is the its border
    solid- There are different border styles  where you can choose here
    #ddd- This the color of your image border. You can select here other (hexadecimal) colors
  • And finally, change the opacity "opacity:1.0" of the opacity  of the post image when the mouse hover is applied on it.
Step 4. Save your template and Congratulations!

Your comments and suggestions are always welcome. Please drop it at our comment box below.
Peace! #: )

How To Customize Blogger Blog Using Template Designer

Adding css to our template makes our blog more pretty to look but sometimes we face encounter especially if we are new in using the new Blogger template design. We find difficulty in searching this
code ]]></b:skin>.  But don't worry because there is still another and more easy way of putting the css code in your template and that this through Template Designer.

Also Read: How to Use the New Blogger Template

(Supposing that you are going to add borders to your sidebar and below is the set of code).

.sidebar h2 {

border-top:1px solid #000000;
border-right :1px solid #000000;
border-bottom :1px solid #000000;
border-left :5px solid #000000;

margin- top;0
margin- right;0
margin- bottom;0
margin- left;0
padding:0 0.2em;
line-height:1.5em;
}
Simply follow the steps below.
Step 1. Go to your Blogger Dashboard >> Customize
add css through template designer

Step 2. Click Advanced then scroll down and select  Add CSS

Step 3. At the right side is a blank field, this is intended for the css area. Paste the css code above in this place.

Step 4. And finally click the Apply to Blog button

Note:

  • You can only access or edit those CSS using this technique whom you added manually in your Blogger Template,meaning not the default one.
  • There's  no need to put the tag <style> you css here</style>.
  • If you replace or change a new template on your blog, all the css that you  have added will be automatically be deleted.

Hope  this tutorial is helpful to you in some other ways. God Bless Pal!

How to Add Author's Profile Picture Below Post In Blogger

adding author profile picture below post title
Having a problem on how to add your (author) profile picture beside the line "Posted By"in your Blogger blog? You are not wrong in landing this page since I will tell you you the details on how to do that. Just follow the four steps below.Click here for the demo first.

Note:

This tutorial will not take effect if you uncheck your blog post to have a "Posted By". See the screenshot shot below to know what  I mean.


Adding Author's Profile Picture Below Post In Blogspot


Step 1. Go to Blogger Dashboard >> Template >> Edit HTML (Back-up your Template)

Step 2. Find the code below using the Control F. Please select the second occurrence of that code.
<div class='post-footer-line post-footer-line-1'>
Step 3. After finding the code in step 2, please paste the code below just  after it.
<b:if cond="data:post.author == &quot;Cerwenlloyd Gefjun&quot;">
<span class="author"><a href="https://plus.google.com/110772451841046895789/about"><img src="http://4.bp.blogspot.com/-s7omNra0EFc/Ur2GWB60gYI/AAAAAAAAB9E/To8_ASb-O1A/s1600/cerwen+profile+pic.png" style="border: 1px solid #d0d0d0; height: 28px; margin-top: -12px; margin-bottom: 0px; margin-right: -13px; padding: 2px; width: 28px;" /></a></span>
</b:if>


Customization:


  • Replace the red bold text with your own profile name. It must be the EXACT name of your profile name  as it appears in the Blogger profile.

  • Replace the orange bold texts with your Google  plus profile ID.

  • Replace the pink bold texts with your image URL. Click here for help in getting your  image link.

  • And lastly adjust the css which is responsible of the appearance of picture.

         border size and color- increase in number will make your border bigger also.
         height- this your image size
        margin- I set it with top 10px, bottom 0, and right 13px
        padding- which set by 2px
        width- this is the image width

Step 4. Save your Template and you're done.
If you have some questions regarding this post , try to drop some comments at the comment box below.
Thanks for the your valauble time with us!

How to Add Borders to Images in Blogger

add borders to images in blogger
Inserting or adding  images  to Blogger  is necessary to emphasize more of what we are going to deliver to  our rreaders. And in order to make this photo more proffessional in looks and be different from others, we will add borders on it.  Here, in this article I will share to you how to add border(s) to an individual image using HTML .
Before we will go to the steps, let me show you first the different border attributes or styles namely: dotted, dashed, solid, double, groove, ridge, inset and outset. See the demo below:

Dotted
Dashed
Solid
Double
Groove
Ridge
Inset
Outset

Now you have seen those different border styles, it is now time to proceed to the tutorial. Please follow the steps below:

How to Add Borders to Inserted Images in Blogger


Note:

You must have to know first how to get the  image link (url) of your uploaded images  in Blogger before you can apply this trick. Please click this link for assistance.

Step 1. Go to Blogger Dashboard
Step 2. Select a certain post or  you may choose some published posts with images that you want to add borders on it.
Step 3.  Copy the HTMLcode below and paste it in your Blogger Post Editor page. (Your page editor must be switched to HTML Mode).
<img src="http://2.bp.blogspot.com/-YfeHiEQ9oTQ/UxiIwApRJ9I/AAAAAAAACH8/KXBGtzcNT2g/s1600/add+borders+to+blog.png" style="background-color: white; border: 3px dashed orange; margin-left: auto; margin-right: auto; padding: 1px;" />

Customizations:


- Replace the black bolded texts w ith image link (url) of your photo.
- Background color is white, you may change it according to your blog's color.
- Border attributes here are 3px which the size, greater numerical value will mean a larger size also. Dashed is the border style, you can change it with the different border styles as  shown in the demo above.  And orange for the color of the border.
- For the padding, greater numerical value will make your borders to pull out from your image. See the demo below


Note:

The first image has a padding of 10px while the second one has only 1px.

Step 4. Publish or update  your post and you are done. Congrats! :-)
Peace Buddies!!!

Create a CSS Image Slider with Thumbnails for Blogger

Hey guys, are you having a problem on how to make image galleries/sliders for your blog? This tutorial is the answer for it. Photoblogs  need this kind of trick in order to show their images in a nice and professional manner but not only for those kind of blogs since we need photos occasionally to present some ideas in our readers.  In this tutorial, I will show you  the steps on how to make it. An overview of this is tweak is  having a mini blocks of images at the top which will enlarged at the bottom each time an image is selected  upon hover of the mouse on the  thumbnail and that was acquired through adding some CSS on it.
image slider for bloggger
See demo here.

How to Add A CSS Image Slider with Thumbnails to Blogger


Step 1. Log in to your Blogger Dashboard >> Template >> Edit HTML
Step 2. Click anywhere inside the code area and press the CTRL + F keys to open the Blogger search box
Step 3.  Look for the code below by  pasting it inside the search box and hit Enter.
</head>
Step 4. Just above/before the  tag above, paste the css code below:

<style type='text/css'>
.bttimage-container {
position: relative;
width: 620px;
height: 610px;
margin: 0 auto;
text-align:center;
overflow: hidden;
}
.bttimage-container a {
display: inline;
text-decoration: none;
}
.post-body img {
max-width: 600px;
-moz-border-radius: 5px;
-webkit-border-radius: 5px;
border-radius: 5px;
}
/* Mini-thumbnails style */
.mini-thumbnail {
width: 18%; /* mini-thumbnails width */
margin:1px;
opacity: 1;
-webkit-box-shadow: 0px 0px 3px rgba(0,0,0,0.5);
-moz-box-shadow: 0px 0px 3px rgba(0,0,0,0.5);
box-shadow: 0px 0px 3px rgba(0,0,0,0.5);
}
/* Style for the main thumbnail */
.large-thumbnail {
position: absolute;
width: 100%;
top: 800px;
margin:0 auto;
text-align: center;
display: block;
-webkit-transition: top 1.5s ease;
-moz-transition: top 1.5s ease;
-o-transition: top 1.5s ease;
-ms-transition: top 1.5s ease;
transition: top 1.5s ease;
}
.feature {
top: 110px;
width: 100%;
opacity: .3;
}
/* style for the selected mini-thumbnail */
a:hover .mini-thumbnail {
opacity: .5;
-webkit-box-shadow: 0px 0px 10px rgba(0,0,0,0.5);
-moz-box-shadow: 0px 0px 10px rgba(0,0,0,0.5);
box-shadow: 0px 0px 10px rgba(0,0,0,0.5);
}
/* transition effects for the selected image */
a:hover .large-thumbnail {
top: 110px;
width: 100%;
z-index:3;
opacity: 1;
-webkit-transition: top 1.5s ease;
-moz-transition: top 1.5s ease;
-o-transition: top 1.5s ease;
-ms-transition: top 1.5s ease;
transition: top 1.5s ease;
}
</style>

Step 5. Save template button.

Step 6. Go back to Blogger Dashboard and select any of the post you have published or you may choose a New Post where you will add the add the HTML code  inside a post or page by clicking the HTML section/button.

Hint:

Another way of putting the  HTML codes is thorough going ether to Lay -out and choose Add a new Gadget buttom then click HTML/Javascript.

<div class="bttimage-container">
<a href="http://bloggingtipsandtrix.blogspot.com/">
<img class="mini-thumbnail" src="MINI-THUMB-URL1" />
<img class="large-thumbnail" src="BIG-THUMB-URL1" />
</a>
<a href="http://bloggingtipsandtrix.blogspot.com/">
<img class="mini-thumbnail" src="MINI-THUMB-URL2" />
<img class="large-thumbnail" src="LARGE-THUMB-URL2" />
</a>
<a href="http://bloggingtipsandtrix.blogspot.com/">
<img class="mini-thumbnail" src="SMALL-THUMB-URL3" />
<img class="large-thumbnail" src="BIG-THUMB-URL3" />
</a>
<a href="http://bloggingtipsandtrix.blogspot.com/">
<img class="mini-thumbnail" src="SMALL-THUMB-URL4" />
<img class="large-thumbnail" src="BIG-THUMB-URL4" />
</a>
<a href="http://bloggingtipsandtrix.blogspot.com/">
<img class="mini-thumbnail" src="SMALL-THUMB-URL5" />
<img class="large-thumbnail" src="BIG-THUMB-URL5" />
</a>
<a href="http://bloggingtipsandtrix.blogspot.com/">
<img class="large-thumbnail feature" src="LARGE-THUMB-URL1" />
</a>
</div>

Customization:


  • Replace http://bloggingtipsandtrix.blogspot.com/ with the url of your page/post where you want to land a certain link.

  • To add pics inside the image slider just replace MINI-THUMB-URL and LARGE-THUMB-URL texts with the URL of your image.

  • The URL for the SMALL-THUMB-URL and BIG-THUMB-URL in every set or box is the same. See blockquote below for an example. Or you can do it separately depending on your preferences.

<a href="http://bloggingtipsandtrix.blogspot.com/">
<img class="mini-thumbnail" src="http://1.bp.blogspot.com/-ispDhJV3UqI/UvOfxiWF_DI/AAAAAAAACFM/pYfePxYyqUU/s1600/photo+slider+in+blogger.png" />
<img class="large-thumbnail" src="http://1.bp.blogspot.com/-ispDhJV3UqI/UvOfxiWF_DI/AAAAAAAACFM/pYfePxYyqUU/s1600/photo+slider+in+blogger.png" />
</a>

Note:

The last LARGE-THUMB-URL1 should be replaced with the URL of the default image that will appear on your slider.

Read this post to know how to get the image URL from your uploaded photo in Blogger.

Also read:

How To Show Or Hide/Cover Blog Content With Images Using CSS

Step 7. Finally, save your widget/gadget or publish your page/post and that's it! Enjoy Buddies :-)
Credits: helplogger.blogspot.com

How to Add Borders to Sidebar Titles in Blogger

Putting border(s) around  your sidebar title is one way of catching eyes attention to your readers. It drives readers to grab attention on it  and see some links  in that area. I know this is  basic in blogging yet useful  in some other ways. Below are the simple steps on how to customize (putting borders) to  your blog sidebar  title.
add borders in sidebar titles
Demo here

Adding Borders to Sidebar Titles in Blogger


Step 1. Go to your Blogger Dashboard
Step 2. Click Template then have a back on it by clicking the Back-up button
Step 3. Hit the Edit HTML button
Step 4.  Find the code below by clicking anywhere inside the Template code then in your mouse use the  Control F. Place the code below inside the box.
]]></b:skin>
Step 5. Just above that code in step 4, place the code below

.sidebar h2 {

border-top:1px solid #000000;
border-right :1px solid #000000;
border-bottom :1px solid #000000;
border-left :5px solid #000000;

margin- top;0
margin- right;0
margin- bottom;0
margin- left;0
padding:0 0.2em;
line-height:1.5em;
}


Customization:


  • To change the border size in each corner, simply change 1px in line 2 to 4 and 5px in line 5. The greater the value the bigger its appearance.
  • To change the border style which is solid, replace it with dotted, ridge, dotted, dashed, double,groove, inset or outset. Click here to see the appearrance of these diffrent border styles.
  • To change the color of your border style, replace #000000 (black) with other hexadecimal colors
  • The margin is set to zero but you can adjust it. You can experiment this one according to your preferences. Don't forget t o add px after the numerical value like 1px,2px etc.
  • The padding is the distance of your sidebar title form your sidebar border
  • And finally, the line height speaks on the position of your sidebar title inside the borders.


Step 6. Save your Template and you're done buddy!

Try to read:

How to add Background Image in every Sidebar Title
Adding Webkit- Box-Shadow to Menu Tabs and Side Bar Title
How to Animate Borders in Blogger Sidebar
How To Customize Labels In Blogger Using CSS3

How to Add a Widget Below First Post in Blogger

Another way of  making  a gadget/widget to appear  below the first snippet in your first read more post is through applying the Blogger conditional tag (<b:if cond='data:post.isFirstPost'>.....Some codes here....</b:if>). Furthermore, if you want to show or hide this widget gadget in a specific page in your blog, you can also use the other Blogger conditional tags.

See Demo Here.

Adding A Gadget or Widget Below First Post Snippet in Blogger


Step 1. Go to your  Blogger dashboard
Step 2. Click  Template and have a back-up of it for your reference.
Step 3.  Hit the Edit HTML button
Step 4. Search the line below  inside the search box and hit Enter to find it
<b:include data='post' name='post'/>
Step 5. Just below it add this code:
<b:if cond='data:post.isFirstPost'>
<div align="center" style="margin:10px auto;">
Your widget that you want to show or hide
</div>
</b:if>

Note:


The code that you are going to put must be parsed properly using a parsing tool.
If you want that the widget that you have added  will appear only in home page of your blog, use the code below:
<b:if cond='data:blog.url == data:blog.homepageUrl'>
<b:if cond='data:post.isFirstPost'>
<div align="center" style="margin:10px auto;">
Your widget that you want to show or hide
</div>
</b:if>
</b:if>

How to Add Social Networking Buttons With CSS3 Style in Blogger

Sharing widgets help bloggers to expand there exposure in the web since it makes our articles viral in the internet. I would share you another example of sharing widget where it is very customizable in your part. This is from one of my circle of friends from G+ and I woul shre it to you coz I believe that you will really like it. This sharing widget uses   CSS to make it more attractive than others.This include zooming hover effects. You can check right here in my blog sidebar for the demo.
add sharing widget

Social Network Buttons With CSS3 (Metro) Style


Step 1. Go to Blogger Dashboard >> Template >> Back-up your template  for your reference.
Step 2. Click Edit HTML
Step 3. Click anywhere in the code section and search the code below
]]></b:skin>
Step 4. Above the code in step 4, paste the css code below
/* Bloggingtipsandtrix.blogspot.com  */
.bubblewrap{
list-style-type:none;
margin:0;
padding:0;
}
.bubblewrap li{
display:inline;
width: 60px;
height:60px;
}
.bubblewrap li img{
width: 48px; /* width of each image.*/
height: 38px; /* height of each image.*/
border:0;
margin-right: 4px; /*spacing between each image*/
-webkit-transition:-webkit-transform 0.1s ease-in; /*animate transform property */
-o-transition:-o-transform 0.1s ease-in; /*animate transform property in Opera */
}
.bubblewrap li img:hover{
-moz-transform:scale(1.1); /*scale up image 1.1x*/
-webkit-transform:scale(1.1);
-o-transform:scale(1.1);
}
Step 5.  Save your Template and you're halfway done!
Step 6. Go back to Blogger Dashboard >> Click Lay-out (or anywhere in blog pages).
Step 7. Scroll down and select HTML/Javascript.
Step 8. Inside the empty box, place the HTML code below
<ul class="bubblewrap">
<li><a href="googleplus URL here"><img src="http://4.bp.blogspot.com/-8iulyWrFHT4/Ut6UFpAeKGI/AAAAAAAACC4/WaGeDKsNnac/s1600/bloggingtipsandtrix.blogspot.com-google-icon.png" title="Google pus" /></a></li>
<li><a href="facebook fun page URL or Username here"><img src="http://1.bp.blogspot.com/-C0K3F8wrv7c/Ut6TkyV-yuI/AAAAAAAACCw/k-yLSUzUNIc/s1600/bloggingtipsandtrix.blogspot.com-facebook-icon.png" title="Add to Facebook" /></a></li>
<li><a href="Digg Username URL Here"><img src="http://2.bp.blogspot.com/-cl3HYfosZ1s/Ut6Te6bHSeI/AAAAAAAACCo/NJ83Ob3paEA/s1600/bloggingtipsandtrix.com-digg-icon.png" title="Add to Digg" /></a></li>
<li><a href="Your Twitter URL Here"><img src=" http://2.bp.blogspot.com/-GjtWtoeMmnM/Ut6TY9gqR-I/AAAAAAAACCg/AOd02ILh2uo/s1600/bloggingtipsandtrix.blogspot.com-twitter-icon.png" title="Add to Twitter" /></a></li>
<li><a href="Your Feedburner URL Here"><img src="   http://4.bp.blogspot.com/-Xnu7zD1g8JE/Ut6Ss_rlBCI/AAAAAAAACB4/Ha5a8q6YfRc/s1600/bloggingtipsandtrix.blogspot.com-rss-icon.png" title="Add RSS Feed" /></a></li>
</ul>

Note: Simply replace the corresponding four URLs with yours.
Also Read:

 Step 9. Save your template and Bravo!
Peace on EARTH Bro!

Add Guest Poster Profile Below Every Post Titles

One of the most common problems of blog authors in their blog is the lack of time to make some quality posts and often have to rely on Guest posters to do the job. In return we offer them with quality back links and advertisement of their blog too. In order to better compensate them in their untiring job, it is important to display some info about them in a polite, attractive and professional manner. In return, this will encourage more and more people to write quality articles for you blog.  Furthermore, you can also use this widget to show your own info below the posts you have published. See screenshot for below an the example .


View Guest Poster Info Below Post Titles


There are two parts of this tutorial, the adding of the CSS and the the second part deals with the inserting of the HTML in your Blogger post editor's page.
So then Lets jump straight to the first part!
Step 1. Go To Blogger > Design > Edit HTML Back up your template
Step 2. Search for the code below
]]></b:skin>
Step 3. Just above it paste the code below,
/*----------Guest Poster --------*/
.btt-gp img {
margin:0;
border:2px #158aee ridge;
}
.btt-gp-about {
font-size:15px;
margin:0 auto;
padding:3px;
width:560px;
background:#edf6ff;
border:red solid 1px;
min-height:130px;
}
.btt-gp {
padding-top:10px;
margin:0;
font-size:12px;
float:left;
width:17%;
text-align:center;
border-right:#93C0F9 solid 1px;
}
.btt-gp-text {
float:right;
width: 80%;
padding:5px;
text-align:left;
font:14px arial,sans-serif;
text-align:justify;
margin:0;
padding:0;
}
 Step 4. Save your template and jump to the second part of the tutorial below which is the adding of the HTML in your Blogger Post Editor's page.

Now whenever you publish a Guest post at your blog, simply switch to the Edit HTML Mode of your Blogger Editor's page. And drag to the bottom of the HTML codes and just at the end/buttom of it add the code below,
<div class="btt-gp-about">
<div class="btt-gp">
<img height="70" src=" http://2.bp.blogspot.com/-br3fiteNA_k/UooqFQES1GI/AAAAAAAAB50/yaJFPa92h9U/s1600/blogger+pic.png " width="80" />Princess Gainess </div>
<div class="btt-gp-text">
<strong>About the Guest Author:</strong>
      <br />
Princess Gainess is a passionate proffessinal blogger who enjoys writing articles on Technology, Make Money Online and Blogging niche. She is our No. 1  Contributor and co-author of all blogs under our network.<br />
Follow him @ <a href="https://twitter.com/blogtipsandtrix">Twitter</a> | <a href="https://www.facebook.com/pages/Bloggingtipsandtrix/533310753378603">Facebook </a></div>
</div>

    Customization:
  • Change the bold orange text with the image url of the Guest Poster.
  • Replace Princess Gainess with the name of your guest poster.

  • Replce the text in pink with your title of your Guest Poster Info widget.

  • Replace the texts in blue with a short  profile of your  guest poster.

  • Change the bold text in bold black (twitter link) and italic (facebook fan page link) with the necessary informations. 
The image size would fit perfectly if it is 200px by 125px.

I just hope you find it useful and worth trying. Take care of families  buddies. :>
Happy Blogging To All Of Us!!!

Blogger Notification Bar With Up and Down Closeable Button

For the past few days, I was not able to update my blog! And now in order to cover- up those times with out touching my computer, I will share to you some tricks which I have learnt from MBT.  Today, I will share to you on how to  add Blogger notification with up and down arrow which when you click it the bar will interact accordingly. Personally, I love to share it with my readers since it will add beauty to their blogs.
  
                                                       See the live demo here.


Adding Blogger Notification Bar With Up and Down Closeable Button


Please follow the  simple steps  below in order to add the widget to your blogger blogs.
Step 1. Go To Blogger > Template > Backup your template
Step 2. Click Edit HTML  button
Step 3. Search for the code below Paste the following scripts just below it:
]]></b:skin>
Step 4. Just above that code paste the code below
 /* ----Blogger Notification bar by www.Bloggingtipsandtrix.blogspot.com----- */
#bloggernotificationWrap{
    display: none;
    margin: 0;
    padding: 0;
    position: fixed;
    margin-top: -41px;
    z-index: 999999;
    width: 100%;
    height: 41px;
}
#bloggernotification {
    width: 100%;
    height: 28px;
    margin: 0px;
    padding-top: 7px;
    text-align: center;
    background: none repeat scroll #158aee;
    position: relative;
    box-shadow:0px 1px 3px #666;
    z-index: 9998;
    text-decoration: none;
    color: #dddddd;
    font-family: arial,sans-serif;
    font-size: 13px;
    font-weight: bold;
    text-shadow: 1px 1px 1px #000;
    border-bottom:2px solid #fff;
}

#bloggernotification a{
    text-decoration: none;
    color:#000000;
     font-family: arial,sans-serif;
    font-size: 13px;
    font-weight: bold;
    text-shadow: 1px 1px 1px #000;
    outline: none;
}
#bloggernotification a:hover{
    text-decoration: underline;
}
#bloggernotificationWrap #closebloggernotification{
    display: block;
    position: absolute;
    top: 0;
    right: 23px;
    height: 40px;
    width: 21px;
    background: url(http://4.bp.blogspot.com/-vtzv7UVG0ro/UN2vJXK7WII/AAAAAAAAIX8/KqX3rdH4g8Q/s400/light.png) no-repeat 0 center;
    cursor: pointer;
}
#bloggernotificationWrap #closebloggernotification:hover{
    background-position: -21px 50%;
}
#bloggernotificationWrap.bottomPosition #closebloggernotification{
    background-position: right 50%;
}
#bloggernotificationWrap.bottomPosition #closebloggernotification:hover{
    background-position: -42px 50%;
}
#bloggernotificationWrap #openbloggernotification{
    display: block;
    position: absolute;
    top: -6px;
    right: 15px;
    padding: 0 7px;
    background: #158aee;
    border-left: 3px solid #fff;
    border-right: 3px solid #fff;
    border-bottom: 3px solid #fff;
    cursor: pointer;
    z-index: 1;
    -webkit-border-bottom-right-radius: 5px;
    -webkit-border-bottom-left-radius: 5px;
    -moz-border-radius-bottomright: 5px;
    -moz-border-radius-bottomleft: 5px;
    border-bottom-right-radius: 5px;
    border-bottom-left-radius: 5px;
       box-shadow:0px 1px 3px #666;
}
#bloggernotificationWrap #openbloggernotification span{
    display: block;
    width: 21px;
    height: 34px;
    background: url(http://4.bp.blogspot.com/-vtzv7UVG0ro/UN2vJXK7WII/AAAAAAAAIX8/KqX3rdH4g8Q/s400/light.png) no-repeat right 50%;
}
#bloggernotification img{
display:none;
}  

Customization:
  • If you want to change the background color of the bar simply change 158aee. You can use our color code generator to select a wide variety of hexadecimal colors.
  • To change the text color, replace dddddd.
  • To change hyperlink color edit 000000.
Step 5. Finally to make the bar appear just add the following code below </head>
<div class='openbloggernotification' id='bloggernotificationWrap' style='display: block; margin-top: 0px;'><div id='bloggernotification'>
Write Your Notification Message Here Write Your Notification Message Here
<span id='closebloggernotification'/></div><span id='openbloggernotification' style='top: -6px;'><span/></span></div>
<br/><br/>
Step 6. Now look for the code below
<head>
Step 7. And paste the script below just  after or below that code in step 6.
<script src='http://ajax.googleapis.com/ajax/libs/jquery/1/jquery.min.js' type='text/javascript'></script>
<!--Blogger Notification Bar by www.Bloggingtipsandtrix.blogspot.com-->
<script language='JavaScript'>
//<![CDATA[
var _0x519b=["\x6A\x51\x75\x65\x72\x79","\x62\x6C\x6F\x67\x67\x65\x72\x6E\x6F\x74\x69\x66\x69\x63\x61\x74\x69\x6F\x6E","\x66\x6E","\x74\x6F\x70","\x6C\x69\x6E\x65\x61\x72","\x65\x78\x74\x65\x6E\x64","\x65\x61\x73\x69\x6E\x67","\x73\x77\x69\x6E\x67","","\x74\x6F\x74\x61\x6C\x48\x65\x69\x67\x68\x74","\x68\x65\x69\x67\x68\x74","\x62\x6F\x72\x64\x65\x72\x53\x69\x7A\x65","\x64\x75\x72\x61\x74\x69\x6F\x6E","\x73\x68\x6F\x77\x41\x66\x74\x65\x72","\x23\x62\x6C\x6F\x67\x67\x65\x72\x6E\x6F\x74\x69\x66\x69\x63\x61\x74\x69\x6F\x6E","\x66\x69\x6E\x64","\x2E\x6C\x69\x6E\x6B","\x23\x63\x6C\x6F\x73\x65\x62\x6C\x6F\x67\x67\x65\x72\x6E\x6F\x74\x69\x66\x69\x63\x61\x74\x69\x6F\x6E","\x23\x6F\x70\x65\x6E\x62\x6C\x6F\x67\x67\x65\x72\x6E\x6F\x74\x69\x66\x69\x63\x61\x74\x69\x6F\x6E","\x61\x6E\x69\x6D\x61\x74\x65","\x6F\x70\x65\x6E\x62\x6C\x6F\x67\x67\x65\x72\x6E\x6F\x74\x69\x66\x69\x63\x61\x74\x69\x6F\x6E","\x72\x65\x6D\x6F\x76\x65\x43\x6C\x61\x73\x73","\x61\x62\x73","\x61\x64\x64\x43\x6C\x61\x73\x73","\x6D\x61\x72\x67\x69\x6E\x54\x6F\x70","\x74\x6F\x70\x5F\x66\x69\x78\x65\x64","\x62\x6F\x74\x74\x6F\x6D","\x62\x6F\x74\x74\x6F\x6D\x5F\x66\x69\x78\x65\x64","\x70\x6F\x73\x69\x74\x69\x6F\x6E","\x64\x65\x74\x61\x63\x68","\x62\x6C\x6F\x63\x6B","\x63\x73\x73","\x62\x6F\x64\x79","\x70\x72\x65\x70\x65\x6E\x64\x54\x6F","\x6C\x65\x6E\x67\x74\x68","\x2E\x6D\x75\x6C\x74\x69\x4D\x65\x73\x73\x61\x67\x65\x73","\x69\x6E\x69\x74","\x6D\x75\x6C\x74\x69\x70\x6C\x65\x4D\x65\x73\x73\x61\x67\x65\x73","\x6B\x65\x65\x70\x48\x69\x64\x64\x65\x6E","\x63\x6C\x6F\x73\x65\x61\x62\x6C\x65","\x63\x6C\x69\x63\x6B","\x70\x6F\x73\x74","\x63\x6C\x69\x63\x6B\x3D\x74\x72\x75\x65","\x61\x6A\x61\x78","\x3C\x61\x20\x73\x74\x79\x6C\x65\x3D\x22\x6D\x61\x72\x67\x69\x6E\x2D\x74\x6F\x70\x3A\x35\x70\x78\x3B\x20\x6D\x61\x72\x67\x69\x6E\x2D\x6C\x65\x66\x74\x3A\x37\x70\x78\x3B\x20\x63\x6F\x6C\x6F\x72\x3A\x23\x36\x36\x36\x36\x36\x36\x3B\x20\x66\x6C\x6F\x61\x74\x3A\x6C\x65\x66\x74\x3B\x22\x20\x74\x61\x72\x67\x65\x74\x3D\x22\x5F\x62\x6C\x61\x6E\x6B\x22\x20\x68\x72\x65\x66\x3D\x22\x68\x74\x74\x70\x3A\x2F\x2F\x77\x77\x77\x2E\x4D\x79\x42\x6C\x6F\x67\x67\x65\x72\x54\x72\x69\x63\x6B\x73\x2E\x63\x6F\x6D\x22\x3E\x3C\x69\x6D\x67\x20\x73\x72\x63\x3D\x22\x68\x74\x74\x70\x3A\x2F\x2F\x34\x2E\x62\x70\x2E\x62\x6C\x6F\x67\x73\x70\x6F\x74\x2E\x63\x6F\x6D\x2F\x2D\x36\x44\x37\x6D\x2D\x69\x74\x57\x64\x6E\x6F\x2F\x55\x4E\x32\x77\x30\x54\x54\x33\x5A\x6C\x49\x2F\x41\x41\x41\x41\x41\x41\x41\x41\x49\x59\x63\x2F\x43\x4A\x78\x64\x73\x4C\x72\x57\x6B\x51\x67\x2F\x73\x34\x30\x30\x2F\x6D\x62\x74\x2E\x70\x6E\x67\x22\x2F\x3E\x3C\x2F\x61\x3E","\x70\x72\x65\x70\x65\x6E\x64","\x65\x61\x73\x65\x4F\x75\x74\x42\x6F\x75\x6E\x63\x65","\x68\x61\x73\x4F\x77\x6E\x50\x72\x6F\x70\x65\x72\x74\x79","\x23\x62\x6C\x6F\x67\x67\x65\x72\x6E\x6F\x74\x69\x66\x69\x63\x61\x74\x69\x6F\x6E\x57\x72\x61\x70","\x72\x65\x61\x64\x79"];;;(function (_0xd41ax1){_0xd41ax1[_0x519b[2]][_0x519b[1]]=function (_0xd41ax2){var _0xd41ax3={duration:500,position:_0x519b[3],closeable:true,showAfter:0,keepHidden:false,borderSize:3,height:40,easing:_0x519b[4]},_0xd41ax4=_0xd41ax1[_0x519b[5]]({},_0xd41ax3,_0xd41ax2);if(_0xd41ax4[_0x519b[6]]==_0x519b[7]){_0xd41ax4[_0x519b[6]]=_0x519b[8];} ;_0xd41ax4[_0x519b[9]]=parseInt(_0xd41ax4[_0x519b[10]],10)+parseInt(_0xd41ax4[_0x519b[11]],10);_0xd41ax4[_0x519b[12]]=parseInt(_0xd41ax4[_0x519b[12]],10);_0xd41ax4[_0x519b[13]]=parseInt(_0xd41ax4[_0x519b[13]],10)*1000;var _0xd41ax5=_0xd41ax1(this),_0xd41ax6=_0xd41ax5[_0x519b[15]](_0x519b[14]),_0xd41ax7=_0xd41ax6[_0x519b[15]](_0x519b[16]),_0xd41ax8=_0xd41ax6[_0x519b[15]](_0x519b[17]),_0xd41ax9=_0xd41ax5[_0x519b[15]](_0x519b[18]),_0xd41axa={},_0xd41axb=_0x519b[8],_0xd41axc={},_0xd41axd=_0x519b[8],_0xd41axe=function (){_0xd41axc[_0xd41axd]=_0xd41ax4[_0x519b[9]];_0xd41ax9[_0x519b[19]](_0xd41axc,(_0xd41ax4[_0x519b[12]]/2),_0xd41ax4[_0x519b[6]]);_0xd41ax5[_0x519b[21]](_0x519b[20]);} ,_0xd41axf=function (){_0xd41axc[_0xd41axd]=-Math[_0x519b[22]](34-_0xd41ax4[_0x519b[10]]);_0xd41ax9[_0x519b[19]](_0xd41axc,(_0xd41ax4[_0x519b[12]]/2),function (){_0xd41ax10();} );} ,_0xd41ax10=function (){_0xd41axa[_0xd41axb]=0;_0xd41ax5[_0x519b[19]](_0xd41axa,_0xd41ax4[_0x519b[12]],_0xd41ax4[_0x519b[6]],function (){_0xd41ax5[_0x519b[23]](_0x519b[20]);} );} ,_0xd41ax11=function (){_0xd41axa[_0xd41axb]=-_0xd41ax4[_0x519b[9]];_0xd41ax5[_0x519b[19]](_0xd41axa,_0xd41ax4[_0x519b[12]],function (){_0xd41axe();} );} ,_0xd41ax12=false;switch(_0xd41ax4[_0x519b[28]]){case _0x519b[3]:_0xd41axb=_0x519b[24];_0xd41axd=_0x519b[3];break ;;case _0x519b[25]:_0xd41axb=_0x519b[3];_0xd41axd=_0x519b[3];break ;;case _0x519b[27]:_0xd41axb=_0x519b[26];_0xd41axd=_0x519b[26];break ;;} ;_0xd41ax5[_0x519b[29]]();_0xd41ax5[_0x519b[33]](_0x519b[32])[_0x519b[31]]({display:_0x519b[30]});if(_0xd41ax6[_0x519b[15]](_0x519b[35])[_0x519b[34]]){bloggernotificationExtras[_0x519b[37]][_0x519b[36]]();} ;if(_0xd41ax12&&_0xd41ax4[_0x519b[38]]&&_0xd41ax4[_0x519b[39]]){setTimeout(function (){_0xd41axe();} ,_0xd41ax4[_0x519b[13]]);} else {setTimeout(function (){_0xd41ax10();} ,_0xd41ax4[_0x519b[13]]);} ;_0xd41ax8[_0x519b[40]](function (){_0xd41ax11();setCookie();} );_0xd41ax9[_0x519b[40]](function (){_0xd41axf();setCookie();} );_0xd41ax7[_0x519b[40]](function (){_0xd41ax1[_0x519b[43]]({type:_0x519b[41],data:_0x519b[42],success:function (_0xd41ax13){} });return true;} );} ;} )(window[_0x519b[0]]);jQuery(document)[_0x519b[49]](function (_0xd41ax1){_0xd41ax1(_0x519b[14])[_0x519b[45]](_0x519b[44]);if(!_0xd41ax1[_0x519b[6]][_0x519b[47]](_0x519b[46])){_0xd41ax1[_0x519b[5]](_0xd41ax1[_0x519b[6]],{easeOutBounce:function (_0xd41ax14,_0xd41ax15,_0xd41ax16,_0xd41ax17,_0xd41ax18){if((_0xd41ax15/=_0xd41ax18)<(1/2.75)){return _0xd41ax17*(7.5625*_0xd41ax15*_0xd41ax15)+_0xd41ax16;} else {if(_0xd41ax15<(2/2.75)){return _0xd41ax17*(7.5625*(_0xd41ax15-=(1.5/2.75))*_0xd41ax15+0.75)+_0xd41ax16;} else {if(_0xd41ax15<(2.5/2.75)){return _0xd41ax17*(7.5625*(_0xd41ax15-=(2.25/2.75))*_0xd41ax15+0.9375)+_0xd41ax16;} else {return _0xd41ax17*(7.5625*(_0xd41ax15-=(2.625/2.75))*_0xd41ax15+0.984375)+_0xd41ax16;} ;} ;} ;} });} ;_0xd41ax1(_0x519b[48])[_0x519b[1]]({position:_0x519b[3],showAfter:0,keepHidden:true,duration:300,closeable:true,height:40,borderSize:1,easing:_0x519b[7]});} );

//]]>
</script>


Creating Links Inside your Notification Bar


In order to create links inside the notification bar use the code below:
<a class='link' href='ADD-URL-HERE' target='_blank'>Link Text Here</a>

Step 8. Save your template! Bravo!!!!!
Take care your loved ones and yourself too!
Happy Blogging Pal!!!!!!

How to Add Sticky Bar In Blogger

add sticky bar in blogger
One way of replacing your Blogger navigation bar is through adding a sticky bar on it.You can also add sicky bar in your blogger blog  if you want to show or notify  visitors of  recent and upcoming posts, offers, coupons or even  latest news and happenings. You can even add your RSS link there and ask you visitors to subscribe to your blog. Today, in this tutorial  we will create such a sticky bar widget with simple texts and image. See the demo first above to have an overview of what we are trying to accomplish.
add sticky bar in blogger


Make a Sticky Bar In Blogger


Step 1. Go To Blogger > Template > Edit HTML (have a back-up of it)
Step 2. Search for the code below,
]]></b:skin>
Step 3. Just above that code in Step 2, paste the CSS code below,
#btt-stickybar{
background:#158aee url('http://3.bp.blogspot.com/-zQeUG7PU9Uw/TmkiptyZ1eI/AAAAAAAAE98/At4tRBC9HQc/s400/stickybar.png') repeat-x;
width:100%;
margin:0 auto;
text-align:center;
padding:0px 0;
border-bottom: 1px solid #888888;
  -moz-box-shadow: #666666 0px 1px 3px;
  -webkit-box-shadow: #666666 0px 1px 3px;
  box-shadow: #666666 0px 1px 3px;
  z-index: 999;
height: 28px; position:fixed;
line-height: 1.85em;
vertical-align: baseline;
letter-spacing: 1px;
}
#btt-stickybar a{
text-decoration:none;
color:#fff;
font-size:13px;
font-weight:bold;
font-family: arial,"Helvetica",sans-serif;
line-height: 24px;
}
#btt-stickybar a:hover{
text-decoration:underline;
}
#btt-stickybar p {margin:0; list-style:none;}
#btt-stickybar img {vertical-align: middle;
      margin-right: 6px;}


Short Customization:


  • To change the background color of your stickybar, simply change 158aee with your desired hexadecimal color. You may use our color code generator.

Step 4. Now look for the code below,
</head>

Step 5. And just below that code in step 4, place the code below,
<div id='btt-stickybar'><a href='http://www.bloggingtipsandtrix.blogspot.com' style='margin-top:1px; margin-left:7px; color:#666666; float:left;' target='_blank'><img src=' http://4.bp.blogspot.com/-D7pGcSyvGyk/UmYnJTV8WzI/AAAAAAAAB2g/e31HeDy3evw/s1600/blogger+sticky+bar.png  '/></a>
<strong><font color='#F906AC'>Recent Event: </font></strong>
<a href='#'>HOME </a>
<strong><font color='#DF013A'>Upcoming Post: </font></strong>
<a href='#'>Contact Us</a>
<strong><font color='#FFFF00'>Stay Connected: </font></strong>
<a href='# '>See My Sitemap</a>
</div>


Short Customization:


  • Replace the image link in bold blue text with your own logo image link. Click here on how to get the  URL of your uploaded image in Blogger.
  • F906AC, DF013A and FFFF00 are the colors of the "Recent Event", "Upcoming Post" and Stay Connected". You may change the hexadecimal colors by clicking this link and the words respectively.

Step 6. Save your Template and Congrats! : =)
Thank You and hope that you like this little innovation from the codes of MBT.

How To Add Numbers To Blogger Threaded Comments

Customizing your comment box is somewhat tricky in order to let your readers drop a comment to your post.One of my previous post features on how to customize author's comments background  comments box but it doesn't contain any numbers to distinguish how comments being dropped in that particular post.  Today I will share to you  a  simple CSS tweak which will add numbers to your threaded comments inside a comment bubble.It will add numbers like this way 3,3.a,3.b & 4 here 3,4 are the main comments and 3.a,3.b are the replies. In order to apply this trick in your threaded comments, you just simply follow the simple steps below!

blogger threaded comment bubble


Add Numbers To Blogger Threaded Comments


Step 1. Go to Blogger Dashboard
Step 2. Hit the Template buttom (have  a copy of your template and save it in a safe place)
Step 3. Click On Edit HTML
Step 4. Now search or Control F for the code below
]]></b:skin>
Step 5. Just above that code in step 4 place the following code below
.comment-thread ol {
    counter-reset: countcomments;
}

.comment-thread li:before {
    content: counter(countcomments,decimal);
    counter-increment: countcomments;
    float: right;
    font-size: 22px;
    color: #555555;
    padding-left: 10px;
    padding-top: 3px;
    background: url(http://3.bp.blogspot.com/-f6ByQfbwApQ/T4x_8p1FGpI/AAAAAAAAB2A/WJKf-ybmvQk/s1600/comment+bubble2.png) no-repeat;
    margin-top: 7px;
    margin-left: 10px;
    width: 50px;
 /*image-width size*/
    height: 48px;
 /*image-height size*/
}

.comment-thread ol ol {
    counter-reset: contrebasse;
}

.comment-thread li li:before {
    content: counter(countcomments,decimal) "." counter(contrebasse,lower-latin);
    counter-increment: contrebasse;
    float: right;
    font-size: 18px;
    color: #666666;
}

Step 6. Save your template and congrats! Enjoy ;-)

Customization:


  • To adjust the position of text (number) from left position, edit the value (padding-left: 10px)
  • By editing the value ( padding-top: 3px ) you can adjust the position of text (number) inside bubble from top position.
  • By editing the value attributes ( margin-top: 7px ) you can adjust the position of bubble from the  top position.
  • Increase or decrease the value ( margin-left: 10px ) as per your requirements in order to adjust the position of the bubble from the left position.
  • If you want to change the bubble image then simply replace image URL with yours. Or you choose one of the url below to replace your comment bubble image.

http://2.bp.blogspot.com/-Vy5WHSIbFgg/UlLHm3htRRI/AAAAAAAABy4/zXoEOxZXCuk/s1600/devil+comment+bubble.png
http://4.bp.blogspot.com/-RANNDG7T4wQ/UlLH8mnV8KI/AAAAAAAABzA/tmIMNU-28KI/s1600/text_comment_bubble_comments.png
http://4.bp.blogspot.com/-ylkeWmNehg4/UlLILVGnEFI/AAAAAAAABzI/ceBTnn8b9lQ/s1600/comment_bubble.png
http://4.bp.blogspot.com/-wN_NTEKKE84/UlLImYlOTrI/AAAAAAAABzQ/4hzM7OgDASQ/s1600/bubble+comment.png
http://2.bp.blogspot.com/-XKAGzqMO0_Q/UlLIywev4CI/AAAAAAAABzY/Db_tmfbXC3c/s1600/comment+bubble+red.png
http://3.bp.blogspot.com/-_wFTlxVUMyY/UlLPIxfijdI/AAAAAAAABzw/z3GOBgQ7ZaA/s1600/heart+1.png
http://2.bp.blogspot.com/-JaUL6mI0oSU/UlLPeezQuNI/AAAAAAAABz4/j4JaQ-f0zVQ/s1600/pink+bubble+icon.png

I would say thanks  to helperblogger for the initial codes in this tutorial.


Adding Expandable Recent Comments Widget In Blogger

It's been a couple of days when  I was out in my blogging career and now I'm back with my computer's table to make another great post. Today, I will share to you a trick on how to make your recent comments more attractive and professional in its looks. I would say that the code that I am going to share with you is credited to helplogger and I made some sort of innovations in order to present it in a more unique manner.

This Expandable Recent Comments widget is a very accessible  for it can be collapsed or expanded through  your user's interaction, so that now, we don't have to click on the commenter or post title link in order to see the content of a comment.

The expanding content  of the comment can be shown or hidden by clicking on the plus/minus icon or by hitting the "Show all" or "Hide all" button at run time.
expadable recent comment widget


How To Add The Expandable Recent Comments Widget to Blogger


Step 1. Log in to your Blogger dashboard
Step 2. Hit the  Layout  button
Step 3. Click on "Add a Gadget" link
Step 4. In the pop-up window, scroll down and click on the HTML/JavaScript widget
Step 5. Copy and paste the code below and paste it inside the empty box
<style type="text/css" media="screen">
.row-aa {        background: #f2f2f3; }
.row-bb {        background: #F8F5F1; }
.row-div {
  margin:0px;
  padding:5px;
}
.comment-header {
  font-size:0.9em;
//  border:1px solid #E0E0E0;
//  background-color:#F3F3F3;
  padding:4px;
  margin-top:10px;
  margin-bottom:5px;
}
.comment-box {
  margin:0px;
  padding:0px;
  font-size:0.9em;
  height:500px;
  overflow:auto;
}
.comments1  {
//  background: #F3F3F3;
  padding:3px;
  border-left:1px dashed #A6A6A6;
  color: #888888;
  font-style: italic;
  padding-top:4px;
  margin-bottom:5px;
}
.comment-footer {
  text-align:center;
  font-size:0.9em;
  padding:4px;
  margin-top:5px;
}
</style>

<div style="text-align: center" class="comment-header"><input class="comment-button" id="commshowall" type="button" onclick="if (this.value == &#39;Show all&#39;) { unfold_all(this); this.value=&#39;Hide all&#39;; } else { fold_all(this); this.value=&#39;Show all&#39;; }" style="width:8em;font-size:1em;font-family:Verdana,sans" value="Show all" /></div>

<div class="comment-box">
<script type="text/javascript" src="http://helplogger.googlecode.com/svn/trunk/expandable-recent-comments.js"></script>
<script type="text/javascript"  src="http://bloggingtipsandtrix.blogspot.com/feeds/posts/default?start-index=1&max-results=999999&alt=json-in-script&callback=showrecentposts">
</script>
<script type="text/javascript"  src="http://bloggingtipsandtrix.blogspot.com/feeds/comments/default?start-index=1&max-results=999999&alt=json-in-script&callback=showrecentcomments">
</script>
</div>


Customizations:


  • Replace http://bloggingtipsandtrix.blogspot.com with your blog/site address.
  • Replace 1px  (font size) with your own desired font size, bigger number means bigger size of the font
  • Replace dashed  with your desired border styles, click link to see different border styles.
  • Replace #A6A6A6 with another hexadecimal color that would most fit your blog's theme.
  • And lastly, change the phrase Hide all and Show all with another synonyms related to that phrase. 


  • Step 6. Save your widget and you're done!
    Happy Blogging Buddies!!!

How to Upload New Template to Blogger

Blog customization to the professional bloggers will take a month depending on his desires and experiences to fully design his blog/site. For a newbie blogger, it is quiet impossible to do that within a short period of time since you need to understand and apply the basic of blogging language like HTML (Hypertext Mark-up Language), CSS (Cascading Style Sheet), Javascript, etc. However , there is a remedy on that problem since Blogger allows us to upload template from the external source and replace the Blogger default template. Furthermore, it is also necessary in restoring our previous template for  sometimes we did some mistakes or didn’t like the customization that we have done in our blog.
There are many sites like Rocking Template, Btemplates, etc. that could help you  choose the best template styles.
Before proceeding to the steps below be sure that you had already downloaded a template that would replace your old template  that you’re using now.

How to Upload New Template to Blogger


Also check:
How to use the new Blogger template

Step 1. Go to Blogger Dashboard >> Hit the  Template button
how to upload template

Step 2. Upon clicking the Template button, you will see a pop –up dialog box wherein you can choose to Back- up/Restore, CustomizeEdit HTML and close it if you want. Click first the Back-up/Restore button.

replace template in blogger

Step 3. Upon clicking the Backup/Restore button you will see a pop-up dialog box like in the screenshot below. Choose the  Download template button to have a back-up of your  current (being used) template and store it in a safe place. This is important for your reference.
change template in blogger


Step 4. Click the Choose File button and you will be directed to the document panel of your PC.
how to replace template

Choose from that panel where you  had stored your template which you had downloaded from the other sites. In  my case, I stored it in the download section of  that panel. See the screenshot below
how to upload template


Then click the template that you want to replace to your current template and hit the Open  and you will be directed back to  the dialog box in Blogger. Click now the Upload button  and wait for few seconds until you see the note Uploaded Successfully.
how to back up template


View your blog and see its new look. Enjoy!

How to Add 123 Contact Form for FREE in Blogger


Having  a contact form is a vital part of every blog/website. It  enables your readers to have an indirect link with you regarding your  products or services. In such manner this gives all visitors a path in which to open a good communication with you and to your clients. There are many types of  contact forms that can  be used  in variuos  occasions like survey questions, polling visitors on various topics, or allowing visitors to join your newsletter. In this tutorial, I will show you on how to add contact form via 123contact form since I used this also in my contact page.


How to Add 123 Contact Form in Blogger


Step 1. Go to 123 contact form.
Step 2. Create an account there for free.
Step 3. Then follow  all the steps that the  requested from you.
Step 4. Get or copy the codes for your contact form. The codes may look like this:
<!-- 123ContactForm.com script begins here -->
<script type="text/javascript">var servicedomain="www.123contactform.com"; var frmRef=window.top.location.href; var cfJsHost = (("https:" == document.location.protocol)  Some Codes Here.................................................; </script>
Report it!">Report abuse
<!--123ContactForm.com script ends here-->
Step 5. Go to your Blogger Dashboard >> Click New Post or you may use New Page (static page).
Step 6. In your Blogger Post Editor's Page, paste the code that you have got from 123contact form (in step 5). You may put a title (Contact Us or Contact).

Note: In putting the contact form codes, your Blogger Post Editor's Page must be in HTML mode.

Step 7. Publish it in an earlier period of time so that it will not appear at your home page but if you're using a new page, just simply hide it.

Bonus Tip


If you want to appear your contact page like mine in a manner that it occupies the whole page of your blog. Please follow the steps below:
1. Go to Blogger Dashboard >> Click Template (have a backup of  it as  your reference)
2. Hit the Edit HTML buttom
3. Locate or Control F the tag below
]]></b:skin>

4. Just below the code  "]]></b:skin>", you paste the code below
<b:if cond='data:blog.url == "
http://bloggingtipsandtrix.blogspot.com/2012/12/about-me.html"'><style>
.main-inner .columns {
padding-left: 0px !important;
padding-right: 0px !important;
}
.main-inner .fauxcolumn-center-outer {
left: 0px !important;
right: 0px !important;
}
.main-inner .fauxcolumn-left-outer, .main-inner .fauxcolumn-right-outer, .main-inner .column-left-outer, .main-inner .column-right-outer {
display: none !important;
}
</style>
</b:if>

Customization:


  • Replace the URL (red bold text) with the URL of your Contact page.
5. Since we make your post (contact page) occupies the entire portion of your page, there is already a little problem on its margin, that is your contact form lies at the left side of your page and in order to solve this one, please paste the code below and paste it just above the codes that you have got from 123contact form as shown in the screen shot below:
adding contact form


<center><style>#sidebar-wrapper, #midsidebar-wrapper, .gapad2, .blog-pager, .post-header-line-1, .post-footer { display:none !important;} #main-wrapper { width:900px!important;} .post { width:900px!important; }
</style></center>

6. Save your template and you are done!

If you some questions regarding this post,feel free to leave it at the comment box below or please contact me. I will try to answer it as time allows.
Thank you and have peace in your heart and mind!  Enjoy!!!


How to Add Hover Effect in Your Blockquote- The Heart Shape!

add hover effect in blockquote
This post is the answer of my  promised when I make an article on "How to Make Blockquotes Styles". If you found it interisting. This time, I will tell you that it will be more than interisting since  a hover effect is added to the  CSS codes. Have an overview  by clicking the live demo  below.


Live Demo

How to Add Hover Effect in Your Blockquote- The Heart Shape!


Step 1. Go to your Blogger Dashboard
Step 2. Hit the Template button (have a back-up of your template)
Step 3. Click the Edit HTML button
Step 4. Find or Control the code below
]]></b:skin>
Step 5. Just above it paste the code below
blockquote {
background: #000 url(http://1.bp.blogspot.com/-F2518Ek6xZs/UfvEzEVQ0mI/AAAAAAAABaw/z6cmQnIzC6E/s1600/love+fireworks.jpg2.png) no-repeat right bottom ;
margin: 0 20px;
padding: 20px 70px 20px 20px;
color:#ff00ff;
font: bold 1.1em "Vivaldi", "Times New Roman", Times, serif;
border:1px ridge #ff0000;
}
blockquote:hover {
background: #000 url(http://4.bp.blogspot.com/-wBGupuuOUkk/UfvFQ4ONT_I/AAAAAAAABa4/YgyF0YYHppQ/s1600/love+fireworks.png) no-repeat right bottom ;
color:#01DFD7;
font: bold 1.1em "Vivaldi", "Times New Roman", Times, serif;
-webkit-box-shadow: 0px -2px 35px #0101DF;
box-shadow: 0px -2px 35px #0101DF;
border: 1px ridge #0000ff;
}

blockquote p {
margin: 0;
padding-top:10px;

There are two set of CSS codes responsible for this tutorial:
  • Blockquote - This is default setting of your blockquote. Click here for its customization.
  • Blockquote:hover - This is the result of your blockquote when a you hover the mouse over it.
  • The explanation with regards to its border, background,  etc. is almost the same.
Step 6.  After customizing the above codes you may now save your template and you're done!

Also check these post:

Hope you like this tutorial buddies. If you have some questions, feel free to leave at the comment section below...
Peace and More Blessings to Your Family!!!