Showing posts with label seo tips. Show all posts

8 Great SEO Tips to Rank your Post in Google SERP

SEO Tips are the most welcome elements over in the blogosphere on the grounds that each one needs it to travel his/heer place in SERP (Search Engine Results Page). Yet huge numbers of articles on SEO tips are effortlessly disposable over the web. Any plans appear beneficial both may wage imitative result. Fortunately, these SEO tips show dependably its position, and on the off chance that you aren't executing them as a segment of your procedure for change in  rankings then your instrument be passed up a major opportunity.
BEST SEO TIPS TO RANK IN SERP

1. Make an HTML Sitemap For Your Readers


A HTML Sitemap is a general page on your site that holds an accumulation of connections planned to help both people and inquiry creepy crawlies explore your site. Since web crawlers use connections to explore starting with one page then onto the next, having a HTML sitemap in the footer of each page of your site permits the inquiry arachnid to enter your webpage at any page and after that, from that page, deliberately find a critical parcel of your different pages rapidly through the Sitemap. Human clients additionally reference the HTML Sitemap and use it to explore your site, so human-accommodating presentation and association is proposed.

Learn how to create  HTML Sitemaps to your readers .

2. Make an XML Sitemap


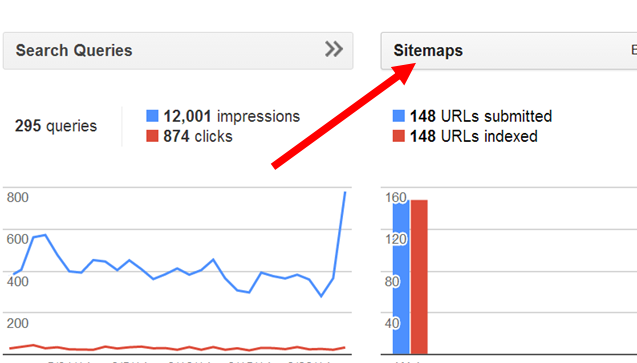
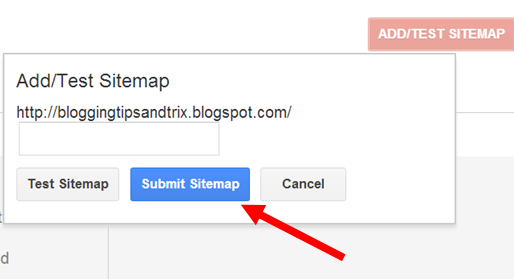
A XML Sitemap records the greater part of the pages on your site that you need a crawler (e.g. spider) to creep and record. The XML Sitemap is just for inquiry, so it doesn't need to be beautiful; it can actually simply be an one URL for every line arrangement of connections spared as a content record. To help guarantee that all the essential pages on your site get crawled and ordered, its critical that you stay up with the latest. While a XML Sitemap doesn't ensure that all yours pages will be crawled or ordered, it's most likely can offer assistance.

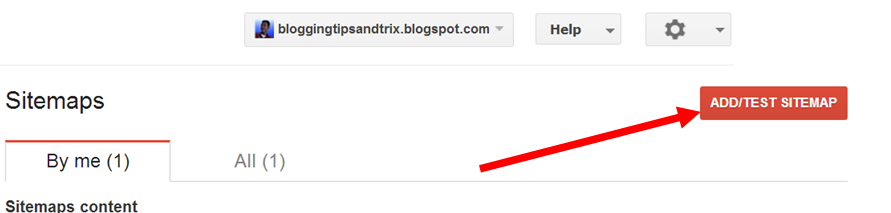
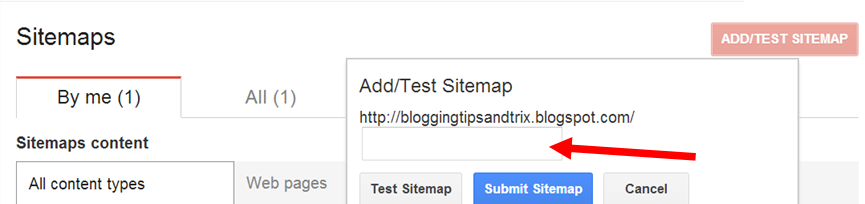
Figure out how to submit an XML Sitemap to Webmastertools.

3. Make Your Site Speedy


Since Spring 2010 Google has been utilizing site speed as a known positioning component. Google affections rate; Google Senior Vice President Amit Singhal has said it himself ordinarily. One approach to make your site speedier is to clean up your code, since less code implies more diminutive document sizes and quicker load times.

Take in more about how to enhance your site's velocity  or dissect your site's rate with the Google Pagespeed Insights instrument.

4. Right Choice of Words in Making Post Titles 


Having your choice of essential keywords in your blog post is one of the prime SEO techniques to get wise achievement in Google SERP. Be sure to write the most targeted and highly competitive keywords which is not more than six (6) words.

Recommended: How to customize the post title in Blogger

5. Keep Blog Code Clean and Host Javascript and CSS Files Externally


Look arachnids just invest a restricted measure of time slithering your site pages, so you would prefer not to waste that time having the insect creep several lines of futile disarray code. To make your site's underlying code more arachnid benevolent consider minimizing inline markup, putting Javascript code in an outer .js record, and externalizing configuration situated CSS.

Take in more about how to host js (javascript) files and css codes in Googlecode

6.  Proper Utilization of  the Heading tags (H1-H5) 


Utilize your imperative key expression that you require to get hierarchal for in the H1 tag for the exact order. Advert Investigate Engines gives most elevated anteriority to H1 labels so withdraw its welfare as overmuch as possible. Don't ever utilize statesman than one H1 labels on a just delicate on the off chance that you are doing this research motors blessing belike attempt to treat your sites or destinations.

Additionally, utilize your H2 tag for essential word varieties or sub-key expressions inside your journalist proportionality. H2 tag could be old as umteen times as you comparative on an essayist, however ought to be old e'er underneath H1 tag to rundown sub subjects.

Don't utilize H2 labels for gadget headers let them be rarified for indicating out your focused on decisive words.

See how to Use Heading Tags Properly in Blogger

7. Incorporate a Robots.txt File


A Robots.txt record is a publically open content document that aides seek spiders crawling mandates. It is set at the foundation of a site have, and is normally used to prevent  robots from indexing particular registries and assigned records. It's paramount this record exists, regardless of the fact that its void. Approach your Robots.txt record with alert and verify you don't coincidentally avoid any imperative records!

Note: I will elaborate this point sooner.

8. Insufficient Content is Sin 


Be tactful enough to write sufficient and meaningful content to let robot "dance" as it passes your site. But always remember also that your not writing for the robots but for your real consumers which is human. Be balance in your writing since you will robot to rank your post in the maximum level and at the same time surprise your visitors with charming words. Your substance ought to be 500+ words overnight.

Good Luck Pal!
Hope We Will See Your Posts at the Rank 1 of the Google SERP!

5 Easy Tips to Contribute Online Networking For SEO

There's no instability that in the people of advanced advertising, Google is always the King. In any case, when Google chose to apply new upgrades to its equation this season, the whole online circle located. Time both sites lucked out, little  and medium-size organizations altogether dropped in their Google rankings bringing about a quick takeoff of activity and benefits.
easy tips for seo

A greater amount of what we've learned dynamic the current redesigns to the consecrated calculation is that if Google is Businessman then proportionality is his exemplification. Precious, affable, instructive accumulation is the thing that Google is alluring into reason as significantly as gathering engagement and connections. Presently numerous than any other time, social media is an understudy member in SEO as Google keeps on considering your organization's computerized foot shaped impression overall, instead of essentially your main site.

1. Arriving at The Crowds 


Social networking is  a lot of people headed beast, and it may take an entire armed force to ace it. So in what capacity can an organization adapt to present circumstances and able to manage the monster? Take these five tips as a thrust off point. In the event that you have executed some, praise yourself and begin executing the rest. There's no telling what the silver shot will be for your social method with regards to satisfying the King.

2. Add social networking connections to your site or web journal. 


This one is a recognized, however a lot of  organizations neglect to connect their site to their social pages and the other way around, needing out on coercive connection juice. In the event that your stores is B2c (business to consumers), it is advisable to  add social connectivity to your consumers whom  catches to your amount page impressions. The Like, Tweet and g+1 catches are the most attractive.

Recommended for you: Add Sharing Buttons to Your Blogger Blog

3. Cross-fertilize. 


To tap the force of your social locales, attaching your friendly media pages unitedly: Facebook ought to join to Twitter, Google+, Pinterest, your web journal and writer. Ignoring of which social medium your meeting terrains on distinctions, they ought to be sensible that you are in else social spaces as ascent. Celebrate  this action as the part of history – Flier web journals to your Facebook chaperon, Sound about your new Facebook pic medium and +1 your diary circumstance.

Recommended for you: How to Add Social Networking Buttons with CSS3 Style

4. Optimize your blog's methodology


On the off chance that you don't change an online journal, modify one. Let your official body website, feel interim bloggers, and let the janitor indite a Haiku, or utilize marketing specialists and get business data from new sources. There is extensiveness of phenomenal noesis available however the one activity missing from numerous go hand in hand with web journals is people. You're a human not a golem, so address what your meeting needs to focus and sparge in some amicable sort.

5. Email 


My Goodness! Netmail standout amongst the most winning advanced promoting techniques to engagement. With cell phones and tablets, netmail is quick and permits substance to be pushed to an incidental buyer pack speedier than any Facebook post or Tweet can. Oblige social connections into each worker's telecommunication style. Along  these  lines, you are act your social pages to clients without pushing it on them.

6. Representative work 


Tongued of representatives, they adjust real call advocates. Urge them to begin your social pages, offer with companions and family, and communicate them when suitable. Also, if your representatives journal, request that they talk almost of the time to  your organization or your blog in a positive way and consequently the blog traffic most  directed  to your site.Good, isn't it? Each short connectedness makes a difference. A well-known location states that an organization is selective as sincere as the gathering tardy it, and at your partner that respect ought to hold a long-term loyalty.

Final Words:


My challenge is that you dare to execute a couple of these fundamental measures to help your social procedure and SEO exertions. Simply recall that in all that you do in online networking, remember the King of Online Marketing which is Google!
Good Luck pal!

Top Video Uploading Sites And Make Money On It

Hello dear! I know you want to earn money with your own videos through online marketing, isn't it? You are not wrong in visiting this article since I will enumerate below the top video uploading sites and make vast  money out from them!

The following websites will be your partner in generating money through your uploaded videos. The list is based accordingly to  their alexa rank when I write this article.

Note: Please upload videos only which follow copyright laws and be sensitive enough with the culture of other people.


1. YouTube.com


Alexa Rank: 3
Google Pagerank: 9

Among the list, Youtube.com rank first. This is a giant video sharing website that allows you to upload your own videos, view and share it to the whole world. The good thing is you can place Google ads and earn massive income through it.
top video uploading sites

2. Dailymotion.com


Alexa Rank: 96
Google Pagerank: 8

According to Wikipedia, Dailymotion.com has over 19 million unique visitors a month.As of November 2012, the site was the 31st most visited website in the world with over 116 million unique visitors accessing the site each month.This is an  another video uploading website that  let you upload your own videos and allows sharing other videos from their website and  of course let you make money.
top video sharing sites

3. Vimeo.com  


Alexa Rank: 102
Google Pagerank: 9

As of December 2013, Vimeo.com attracts over 100 million unique visitors per month and more than 22 million registered users. Fifteen percent of Vimeo’s traffic comes from mobile devices. As of February 2013, Vimeo accounted for 0.11% of all Internet bandwidth, following fellow video sharing sites YouTube and Facebook.The community of Vimeo includes indie filmmakers and their fans. The Vimeo community has adopted the name "Vimeans", meaning a member of the Vimeo community, usually one who is active and engaged with fellow users on a regular basis.
free video uploading sites

4. Metacafe.com


Alexa Rank: 1,495
Google Pagrank: 6

Metacafe.com is a video-sharing website with more than 40 million unique viewers every month. Here you can find short videos in the categories of video games, sports, music, movies and TV. The website features a special ranking algorithm that ensures that the uploaded videos are of high quality. Besides, unlike YouTube, Metacafe doesn’t host duplicate videos. Each video can be uploaded only once. One more advantage of Metacafe is that it pays people for posting videos. If your content is popular among users and your video hit 20.000 views, Metacafe will pay you $5 for every 1,000 views. Good motivation for making cool videos, isn’t it?

5. Break.com


Alexa Rank: 1,595
Google Pagerank: 6

Break.com makes you earn money by posting videos and pictures on their website. you can earn up to $2000 for your videos if they make it to the front page.
uplaod video for free

6. Vevo.com


Alexa Rank: 3,144
Google Pagerank: 7

The third among the list is Vevo.com. It is a better place for all musicians, be a simple music lover or a professional one. Unfortunately, the availability of watching vevo videos are restricted in some regions of the world.

7. Veoh.com


Alexa Rank: 4,278
Google Pagerank: 6

Veoh.com is an Internet television service that allows users to search and watch major studio content, independent productions and user-generated material.  Once you made and an account to Veoh you can now  upload videos of any length and embed or put them on your site or blog.
free video sharing site


8. Flixya.com


Alexa Rank: 11,314 
Google Pagerank:  4

Flixya.com is another great website that you can share your videos and yet make some cash. This website also allows you to use videos that are not yours.

Reference: Wikipedia, freemake.com and vampirestat.com

how to submit sitemap to Google Webmaster tools

Submitting sitemap  is one of the best SEO tactics to be successful in your blogging career. This is your gateway   to generate  organic traffic to your blog via   search engines like Google.  As a guide through it, you must have to  submit a sitemap to Google Webmaster Tools because this time Google is the best search engine company followed by Bing, Yahoo, Ask.com and AOL . This is a great tool that would  help you maximize the full potential of your site. It is useful for bloggers and webmasters to get their blog or website easily index by the Google. Everytime you update your blog/site with a new posts, your sitemap helps to index it easily in search engines.

submit sitemap to google webmastertools

Recommended For You!

Submitting Sitemap to Google Webmasters Tool


Step 1. Login to your Google account and go to Google webmaster tools.
Step 3. Click on the blog title for which you want to add sitemap.
submit sitemap to google webmastertools

Step 3. Click Sitemaps button as shown in the screenshot below.


Step 5. Click on the Add/Test Sitemap button

Step 6. Then   fill in the blank  field the code below.
atom.xml?redirect=false&start-index=1&max-results=500

Step 7. Finally, click the Submit Sitemap button then refresh the page and Congratulations!


Note: The above sitemap will work only for 500 posts. Now if you have a posts  published which is more than 500 in your blog, then you have to add one more sitemap. Don't worry because the whole process is just the same but at this time you have to add another set of  code specifically in step no. 7 above. Please copy the code below,
atom.xml?redirect=false&start-index=501&max-results=500


Google will check the sitemap you have submitted and begin indexing your site as soon as it determines the sitemap has no errors. For additional informations, please visit Google Support on how to submit sitemap to Google Webmastertools.

That's all pal and don't forget to drop your comments below to further enhance this article.
Peace And Have A Blissful Day!

3 Basic SEO Tips for a Newly Launched Blog - Personal Advice

This article is intended for newbie bloggers like me who wants to be guided  with the basic principles in the world of blogging. I know how it feels to be a newbie in the first place and want to gain popularity and respect in the blogosphere. Blogging is not just about looking for  an online space for yourself, putting up content there and earn money through it. You have to survive among the fittest or  manage changes in order to trample down your opponents. In this post,  I will give my personal advice to newbie bloggers who want to success  through  applying the basic SEO process - things they should or MUST implement on their own blogs.
basic seo tips for newly launched blog

Use and Optimize Google Webmaster tools


If you want to be more exposed in the internet, don't ever missed this friendly Google Webmaster Tools! You should have to sign up first to  Google Webmaster Tools (GWT). GWT is basically a dashboard where you can not only get yourself verified as an official owner of your site/blog, but also get access to a lot of tools, features, and reports. With GWT, you can change how Google sees your website, and even receive messages from Google regarding updates, and errors found on your website or any critical issues found in your blog. Furtheremore, through GWT, you can view crawl errors, crawl stats, blocked URLs index,
Fetch as Google - Pretty handy for fetching data for your website and submitting it to index to ensure that it's indexed more quickly,view search queries, and internal/external links. And we will not forget this one of the most important thing about GWTs which you can  submit sitemap to make your article visible in the web.


Submitting Sitemap


 As I have said  a while ago that one way   to make your written articles visible in the web is you need to submit it  to Google.  Creating a sitemap is the  first thing to do after making a proper website or blog   and submit it to Google. A sitemap is basically a listing of the contents of your blog, sort of like a table of contents. It needs to be submitted to search engines so they know what content to find on your blog.  It is advisable to make aat least 10 to 20 articles  first before creating and submitting a sitemap.

As what Bro Qasim Zaib said in one of his post in MBT that "when you submit a sitemap, search engines use the data on that sitemap to locate your site and your data, and index it. You might have noticed that your site didn't appear on Google after you created it. Well, to get it into search results, Google first needs to index it. And to make Google index it soon, you submit a sitemap". I believe he has the point with his statement because that was  I have experienced long before in this blog long time ago!


Keep monitoring your rank and statistics


When  I was new in blogging and read many advises from the web about  stastistics, they often said that it is better not to monitor it since I will be little frustrated of my rank.But now that I'm in the middle of growth and development as  a blogger and have started generating good content, it's time for me to start monitoring my success. Keeping  track of  my PageRank, which comes out every three months.   I should also keep a check on  my Alexa Toolbar ranking. For monitoring my website statistics, I should use Google Analytics.
This steps should also be your moves buddies. Everybody wants to succeed easily that's why we want to take shortcuts. And it's easy to do so, but we  can never take away the effort of hard work and discipline and sacrifice.


 Consolidated Basic SEO Tips Just For You!


 So far we have compiled many SEO tips with our readers before. Here is a short lists among  of the posts we've written. Click them out!


You might also like reading a couple of BAD SEO  tips guides in order to avoid them!
These basics tips and guides should get anyone oriented with optimizing their website to the fullest. If you suggestion or any clarifications, please contact the admin or  feel free to ask in the comments section below.  Peace Buddies and Thank you :)

8 Great SEO Tips For Startups In Under 10 Minutes by Google

Site optimizition is the King of your  blogging career next to writing quality  and unique content to your customers. This is what makes your site's framework tough in order to stand against your competitors.  But researchers doesn't stop just to make this things more refine as you could imagine! Furthermore, site owner and other big companies across these online environment spend a lot of time, effort and money on SEO to rank their blog. Some of them even indulge in black hat technique which is not allowed by Google. But many of us webmasters don't realize that  proper SEO can be as simple as to be learnt it in below 10 minutes. They spent hours and days researching. But if  only they looked in the right place for the start perhaps they will not spent more time and money for  their SEO plan. Google had  uploaded some videos teaching some basics of these SEO.  The informations being discussed apply to small websites that have like less than 50 pages or so but larger sites can benefit too. In the other hand, websites like news agencies or eCommerce and other related sites might need to spend more time and effort,  and  some money of course because optimizing a website with thousands of pages and even more keywords might be an difficult task.
SEO Tips For Startups In Under 10 Minutes

SEO Tips in under 10 minutes


The following are list of SEO Tips for your start ups which can be learnt in under 10 minutes!

1. Use Webmaster Tools and their email forwarding


This is first thing to do in your blog/site is to verify your  ownership on it through Google Webmaster Tools. It is a very useful service granted to  us by Google. This tools provide you a lot of features. One of that  is email forwarding. If you enable it, Google will send you emails informing you of any problems it found on your site, such as site inaccessibility, malicious content, malware (virus), crawl errors, and a large number of 404s (not found errors, or broken links). Having this kind of information can be extremely useful, so that you can troubleshoot and correct any errors that might harm your website's reputation.

2. Have a background checks on your domain


If it happens that you are not the first owner of your domain and  you bought it  from someone else, then you should better run a  background investagation on your domain to see if it's clean and safe. One good way to do this task is , go to Webmaster Tools, and look for the keywords listed there for your domain. It might cause harm  to your site if the keywords are irrelevant to your domain name or niche.  Another better way, is  to look into the  past information  by going to  DomainTools and look up your domain. You'll see information of your blog domain if it is available or not. See the screenshot below.

3. Use some Analytics program


Webmasters should always do some sort of  statistical data in their respective site like Alexa in order to have a grasp of their audience . It is also  advisable that you set up some Analytics program, the best of all is Google Analytics. which is very helpful and reliable.  Don't wait for tomorrow for your BIG start. Do it NOW!

4. Fetch As GoogleBot


Fetch as GoogleBot is another great feature provided by Google Webmaster Tools (GWTS) . You can submit a specific URL of your blog  to GWTs, and it will tell you whether it was redirected appropriately, and what information it downloaded. In that way, you can see what information Google looks for. You can also tell Google to not just crawl, but also submit to index or that URL. That way, whenever you update your site, you can trigger that entire process to happen by Google, and have it available to searchers even faster. Sounds good buddies, isn't it?

5. A user-friendly site design


As  I have wrote earlier in my article "Why Webmasters Fail to Make Money Online" is a bad site design. A great site design is one of  the keys to your success in the race online. As others say "First impression is lasting" , always count.  To understand this point, put yourself as a visitor of  ones blog and try to ask these questions to your self. Can I navigate easily enough to all parts or pages of this blog? Can I figure out easily where I am, and Did I  get easily to my  desired content? Am I satisfied? These set of questions are important and  must be answered with a positive one. Try to make  an article which is not too lengthy in order to save time making articles.This might save yours, but pushing away your readers' since they will jump for another site. Avoid merging topics in one post!  Separate your content if necessary.

6. Relevant calls to action


This is related to Blog Design but I intend to write it separately for emphasis. Be sensitive to the call of your customers. Others feel bored because of  poor blog design in its pages. For example, you could put an subscribe for email newsletters widget on one page, share your service on another and so on. Since there are different types of customers with different wants, that way, you can target them all according to their needs. Not all will buy your products, for example. Nor will everyone share your services or subscribe for newsletters. So keep all these calls to action.

Recommended For You:


7. Avoid link building schemes


Just follow the normal way of getting traffic on your site and everything will be fine! Never, ever engage in  buying  backlinks from link building schemes. They are always spam. You thought that this is the best way to rise your visibility in search engine results page but  they are cheap backlinks that will cause harm to  your site more than they'll help you. And even if they did start out as quality links, they won't be forever! It will pull down you back more than you could imagine. That's disgusting. Google don't want you to practice Black Hat SEO!

8. Site Load Time


Your real consumers is not those  robots (machine) that put your site in Google SERP but the people who will  land to your site and interact with your written articles. So, make them happy and of that way is your blog loading time which is user's friendly. Make it in  the range of 5-10 seconds which is considered fine. No more than 10, but anywhere under 10 to make your customers happy. If it goes more than 10sec, then don't worry. Just find other way to make your users experince great. However, if you can manage that, and still go under 5, then you are in good track.

 My Conclusion


The bottom line is  how well you connect with your audience matters most!.Be honest to your customers/visitors. Interact with them and answer their questions promptly. Make them feel part of your site. Share your content on social media to expand your exposure because the initial volume of your blog traffic will come from them. Hope you will apply even one of these tips to your blog. Good luck pal  :-)

Below is a less than 10 minute video  on all the SEO you should know as a start-up. It is a summary of what we had discussed in this post.

Optimize H1,H2 & H3 heading tags for better seo in Blogger


One of the basic SEO tips that a goal-oriented blogger must apply in his HTML document is the proper use of HEADER Tags. As we all know that there are six (6) heading tags namely: - H1, H2, H3,H4, H5 and H6. Among these six tags, H1 tag is the most important tag followed by H2, H3 and so on. By default (not yet customized) Blogger uses H1 tags for the blog title (ex. Bloggingtips and trix), H3 for post titles (ex. How To Add Hover Effect To Images In Posts) and H2 for sidebar titles (ex. Popular Posts!). Having proper weighted headings is really important from an SEO perspective since search engines use headings to get an idea  or summary of what your post is all about and this article will help you to assign heading tags based on its importance.
proper use of heading tags for better seo

How to use heading tags


The most important part of your article are the headings and it should be wrapped with the proper heading tags in order to be seo friendly. The most important heading on the page should we wrapped in an H1  tag. For your post page, the most important heading is  the title (post title) of the blog entry.


Observe the example below:


<h1>Your Blog Title (ex. Blogging Tips and Trix</h1>

<h2> Your post title (ex. How To Add Hover Effect To Images In Posts </h2>

<h2>Sidebar Gadget title (ex.Popular Posts!)</h2>

<h3>Second post's title (ex. Putting Hover Effect To All Post Images)</h3>

How to use the Blogger Post editor page in designating  Header tags


Step 1. Go to Blogger Dashboard >> Click Post
Step 2. Switch your Blogger Post editor's page in HTML mode.
Step 3.  Hit the button that shows Normal as shown in screenshot below and click on either “Heading” (<h2>), “Subheading” (<h3>), or  “Minor heading” (<h4>) in the toolbar depending the importance of your header. You can also verify if you had added the header tags correctly by switching Blogger Post editor's page in HTML mode.
optimize header tags in blogger

You can visit this link to view more on how to use Header tags in Blogger. 
Let me hear your feedbacks and experiences in using Header tags in Blogger. Peace Buddies!

How To Create Professional Image Slideshows with Jquery In Blogger


Having a stunning image  slideshow is not only for  the one who runs an image blog.  It can be also used to improve your user's experience and in return will increase blog traffic. Furthermore, it will boast your readers to discuss or comment since people will be more interactive if they will not only read texts but also see  images. Search engine robot will appreciate more to your post which lead to a better  position in search engine results page. I've learned this trick from MBT and do some changes on the script,css and the HTML to have a difference. Before we will go the tutorial, please see first the live demo.
image slideshow in blogger

Make Stunning Image Slideshow With Jquery For Your Blogger Blog


Step 1. Go to your Blogger Dashboard >>  Post  or any post you want
Step 2. Copy the  the code below and paste it in your Blogger Post editor page  ( be sureto  switch it to HTML mode).


<script src="http://ajax.googleapis.com/ajax/libs/jquery/1.4.2/jquery.min.js" type="text/javascript"></script>
<script src="http://s3slider-original.googlecode.com/svn/trunk/s3Slider.js" type="text/javascript"></script>
<script type="text/javascript">
    $(document).ready(function() {
   $('#BTT-slider').s3Slider({
      timeOut: 3000
   });
});
</script>
<style>
#BTT-slider {
   width: 590px; /* Keep it 20px-40 px greater than ACTUAL Image size */
   height: 335px;
   position: relative;
   overflow: hidden;
   margin-left: 0;
}
#BTT-sliderContent {
   width: 590px;
   position: absolute;
   top: 0;
   margin-left: 0;
}
.BTT-sliderImage {
   float: left;
   position: relative;
   display: none;  top: 0;
   border:1px solid #ddd;
}
.BTT-sliderImage span {
position: absolute;
    font: 10px/15px sans-serif,Arial, Helvetica;
    padding: 10px 10px;
    background-color: #000;
    color: #fff;
    filter:'alpha(opacity=70)';
    -moz-opacity: .5;
    -khtml-opacity: .5;
    opacity: .5;
    text-align:justify;
}
.BTT-sliderImage span a {
text-decoration:underline;
color:#FE6602;
}
.clear {
   clear: both;
}
.top {
    top: 0;
    left: 0;
    width: 570px !important;
    height: 70px;
}
.bottom {
    bottom: 100px;
    left: 0;
    width: 570px !important;
    height:70px;
}
.left {
    left: 0;
    top: 0;
    width: 100px !important;
    height: 335px;
}
.right {
    right: 30px;
    bottom: 90px;
    width: 100px !important;
    height: 335px;
}
</style>

<br />
<div id="BTT-slider">
<ul id="BTT-sliderContent">
<li class="BTT-sliderImage"> 
<a href="http://www.bloggingtipsandtrix.blogspot.com/"><img src="IMAGE URL HERE" /></a>
<span class="top"><h3>
FIRST HEADING HERE</h3>
DESCRIPTIONS HERE</span>
</li>
<li class="BTT-sliderImage">
<a href="http://www.bloggingtipsandtrix.blogspot.com/"><img src="IMAGE URL HERE" /> </a>
<span class="right"><h3>
SECOND HEADING HERE</h3>
DESCRIPTIONS HERE</span>
</li>
<li class="BTT-sliderImage">
<a href="http://www.bloggingtipsandtrix.blogspot.com/"><img src="IMAGE URL HERE" /></a>
<span class="bottom"><h3>
THIRD HEADING HERE</h3>
DESCRIPTIONS HERE</span>
</li>
<li class="BTT-sliderImage">
<a href="http://www.bloggingtipsandtrix.blogspot.com/"><img src="IMAGE URL HERE" /> </a>
<span class="left"><h3>
FOURTH HEADING HERE</h3>
DESCRIPTIONS HERE</span>
</li>
<div class="clear BTT-sliderImage">
</div>
</ul>
</div>
<br />


Note: Remove the (code in red bolded texts ) jQuery library in the first line of this set of code if you had already added a jQuery library in your template.


Customization


Replace the link "http://www.bloggingtipsandtrix.blogspot.com/"with your own URL.
Change "IMAGE URL HERE"with the URL of your image. See here how to get the image url of the image.
Replace the Italic bold texts "FOURTH HEADING HERE and DESCRIPTIONS HERE" with your heading and descriptions respectively.
If you want to see the appearance of the slider from left and so on , write it at the first span class and the next position as well.
Change the   timeOut: 3000 to your prefered lapse time of the slider to appear. The higher the number the slower it to appear and the lesser the time is the more fast the next image slide  to appear.


How to Add Another Image Slide to the Slider


Simply add the code below above the line <div class="clear BTT-sliderImage">
<li class="BTT-sliderImage">
<a href="http://www.bloggingtipsandtrix.blogspot.com/"><img src="IMAGE URL HERE" /> </a>
<span class="left"><h3>
FOURTH HEADING HERE</h3>
DESCRIPTIONS HERE</span>
</li>
Step 3. Save your work and cheers ;-)

How To Add Multiple Author Profile Image Below Post Title In Blogger

Previously, I have posted a tutorial about how to add an author profile image just below post title for a single author blog.  Today, I am going to show you how to add an author profile picture in a multi-author blog. This post is almost the same with that previous tutorial, the only difference is, we need another HTML code to make the profile pic of your co-members to appear just below your post title.  See the screenshot below and the live demo here.

This is necessary if you are running a blog with team of few members (i.e., multi-author blog), then you may get confused about adding an author box for each author or contributor. Displaying the author profile image  by adding the HTML code is a common practice followed by several bloggers. But it is a pretty irritating job to add  an author profile pic every time when they post the article on your blog. So, if you are looking for a solution for it, then today you are at right place. You can add an author bio widget for each team member to your blog by adding HTML code just once in your template.  Without so much word  to say, Let's check out by following the simple steps  below.

Also Check: How To Add Guest  Author Box In Blogger

Step 1. Go to Blogger Dashboard >> Template >> Edit HTML (back- up your template, this is necessary for your reference)
Step 2. Find the code below but choose the second one.
<span class='post-author vcard'>
Step 3. Below that code in step 2 is a code which may look like this:

<b:if cond='data:top.showAuthor'>
          <data:top.authorLabel/>
            <b:if cond='data:post.authorProfileUrl'>
              <span class='fn' itemprop='author' itemscope='itemscope' itemtype='http://schema.org/Person'>
                <meta expr:content='data:post.authorProfileUrl' itemprop='url'/>
                <a class='g-profile' expr:href='data:post.authorProfileUrl' rel='author' title='author profile'>
                  <span itemprop='name'><data:post.author/></span>
                </a>
              </span>
            <b:else/>
              <span class='fn' itemprop='author' itemscope='itemscope' itemtype='http://schema.org/Person'>
                <span itemprop='name'><data:post.author/></span>
              </span>
            </b:if>
        </b:if>
<span class='post-timestamp'>
        <b:if cond='data:top.showTimestamp'>
          <data:top.timestampLabel/>
        <b:if cond='data:post.url'>
          <meta expr:content='data:post.canonicalUrl' itemprop='url'/>
          <a class='timestamp-link' expr:href='data:post.url' rel='bookmark' title='permanent link'><abbr class='published' expr:title='data:post.timestampISO8601' itemprop='datePublished'><data:post.timestamp/></abbr></a>
        </b:if>
        </b:if>
      </span>
Step 4. Delete all that code in step 3.
Step 5. Next is find the code below but again please choose the second one.
.<div class='post-header-line-1'/>
Step 6. Just below that code, paste the code below.

<span class='post-author vcard'>
<b:if cond='data:post.author == &quot;AuthorName&quot;'>
<span class='author'><a href='Author-Profile-URL'><img src='http://4.bp.blogspot.com/-s7omNra0EFc/Ur2GWB60gYI/AAAAAAAAB9E/To8_ASb-O1A/s1600/cerwen+profile+pic.png' style='margin-bottom: -3px; margin-right: 1px; padding: 2px; height: 24px; width: 24px; border:1px solid #d0d0d0; '/></a></span>
</b:if>
        <b:if cond='data:top.showAuthor'>
          <data:top.authorLabel/>
            <b:if cond='data:post.authorProfileUrl'>
              <span class='fn'>
                <a expr:href='data:post.authorProfileUrl' itemprop='author' rel='author' title='author profile'>
                  <data:post.author/>
                </a>
              </span>
            <b:else/>
              <span class='fn'><data:post.author/></span>
            </b:if>
        </b:if>
      </span>

<span class='post-timestamp'>
        <b:if cond='data:top.showTimestamp'>
          <data:top.timestampLabel/>
        <b:if cond='data:post.url'>
          <meta expr:content='data:post.canonicalUrl' itemprop='url'/>
          <a class='timestamp-link' expr:href='data:post.url' rel='bookmark' title='permanent link'><abbr class='published' expr:title='data:post.timestampISO8601' itemprop='datePublished'><data:post.timestamp/></abbr></a>
        </b:if>
        </b:if>
      </span>

Customization of the above code:


1. Replace the blue bold text with your own image url. Click here on how to get the image url of your image.
2.To change your image size, just edit or replace 24 px

Step 7.
 Now, if you have another author(s) that contribute to your blog, simply add the code below just above <b:if cond='data:top.showAuthor'>

<b:if cond='data:post.author == &quot;junjun candol&quot;'>
<span class='author'><a href='https://www.blogger.com/profile/17436144636923330521'><img src='http://4.bp.blogspot.com/-q7Jq_uoMdl0/U2D63r9h87I/AAAAAAAACKQ/PSwgg5lFNeg/s1600/love.jpg' style='margin-bottom: -5px; margin-right: 3px; padding: 2px; height: 28px; width: 28px; border:1px solid #d0d0d0; '/></a></span>
      </b:if>

Note:

1. Replace jun-jun candol with the correct author profile of your co-member.
2. Change https://www.blogger.com/profile/17436144636923330521  with his author profile.
3. Replace http://4.bp.blogspot.com/-q7Jq_uoMdl0/U2D63r9h87I/AAAAAAAACKQ/PSwgg5lFNeg/s1600/love.jpg with his image link respectively.

Hope you liked this complete tutorial on 'how to add multiple author profile below post title'. Let me know your valuable feedbacks about this guide and also share this article with your friends. For more updates, like us on Facebook and subscribe us. Thank You pal!

How To Add More Authors In Your Blogger Blog


add more authors blogger
Adding more authors in one's blog aside from guest posting is sometimes necessary especially if  one who manages the blog ( the administrator) has found busy for  some other reasons. An advantage of the administrator/owner of a team blog is he/she has the only  access to the blog's settings and template which means he/her members task is only to  make post and publish the same. But if the administrator don't want to publish such posts, he/she has  the ability to edit and delete posts made by other members of the blog. Additionally, he/she has the power to add or to  remove other team members. Any number of members can be a part of a single blog which he can accept  to help him as he like.

Adding Multiple Authors to Blogger Blogs


In this tutorial, I will show you the steps on  how to "add more co-authors or guest authors to your Blogger blog". Simple steps are enumerated below, just follow them correctly to enable this feature in Blogger.

Step 1. Sign in to your Blogger Dashboard
Step 2. Click Settings and look the "Permissions" section
Step 3. Then click the “Add Authors” button to add  new author(s) who can write for your blog posts.

add new authors blogger blog

Step 4. Next is you are going to invite people to write a post in your blog by typing their email addresses (inside the box provided)  separating each address with a comma. Soon, they'll receive an email with a confirmation link. Note that they must have Google Accounts, and if they don't already, they'll be prompted to create one.
Step 5. When you are ready to send the invitations, click OK.

Blogger will  send an email invitation to each person you listed in Step 4. If they agree to participate you in writing to your blog, they will  respond to the email positivelyand  Blogger does the rest for you.

Changing The Permissions Of The Author


Once the author whom you invited accepts your invitation , he can  now start writing in your blog. But as i said earlier he has only limited privileges such as editing or deleting posts written by him. He can’t delete posts written by other authors.
But if  you want anyone of the author to edit others post , then you need to grant him admin privileges ( for me this is disgusting to the part of other authors). For granting Admin privileges , go to Settings page of your blog and navigate to Permissions sub-tab. Beside the author name you will see a button ” grant admin privileges “.

Happy blogging and always take care of your loved ones!

How to Get Free Do Follow Backlinks For My Site

Bloggers always dreamed to be successful in their works in the web that is why they keep on practicing (basic) SEO tips in order to receive huge amount of traffic.  One of the most effective among those  SEO tips is having quality backlinks on your site but how can we obtain that. In this article, I will  discuss its basic on how to get quality backlinks.
gain quality backlinks in blogger

What are Backlinks? 


According to Wikipedia, "backlinks are  also known as incoming links, inbound links, inlinks, and inward links, are incoming links to a website or web page. In basic link terminology, a backlink is any link received by a web node (web page, directory, website, or top level domain) from another web node". This  allows you  to keep track of other pages on the web that link to your posts. But in the other hand you can't just recieve quality backlinks in just a few days or months. It will take  years in order to let other site owners to link on your posts.  Therefore in order to gain reputation online and let others to let eastablish links on sites is to follow  some simple  but useful tips below, which I have also made for the last few months.

How to  Generate Quality Backlinks on Your Site(s)?


  • Write Comprehensive and Quality Articles
Writing comprehensive and quality  content/articles enjoy people while reading then they will definitely share it, like it and tweet it. You will get ranked for lot of keywords. Concentrate on this process first and do it  regularly.
  • Write Guest Posts on Other Blogs.
Try to be a guest poster in other high page ranking blogs in order to gain popularity since people always rush in to read articles on those type of blogs.
  • Blog Commenting.
Commenting may be crucial especially if you do it improperly. It means giving comments by just reading only the title of the post. Be patient and respective with other blog owners.Comment only after reading the entire article and do this on high page ranking blog related to your blog niche.
  • Submit Directories.
Submit your article regularly, it means that you should follow a certain pattern.
  • Share On Social Media.
Promote your article in social media outlet like facebook, twitter etc. You can't believe how this technique helps you spread your article in the web.
Also read: Bad Seo Tips A Blogger Must Not To Follow 

Happy blogging to everyone and GOD BLESS :-)

How To Add Meta Description to Blogger using Blogger Settings

Hello brothers! lately, I had published an article regarding adding  Meta Tag Description  via Blogger HTML editor's page. Today, we will show another way of putting it through Blogger Settings. Please follow the very simple steps below.

Also Read: How to Add Meta Tag Description Via Blogger HTML Editor's Page

Adding Meta Description In Your Template In Blogger


Step 1. Go to Blogger Dashboard
Step 2. Click Settings >> Search preferences
Step 3. In the Meta Tags area, click on  Edit then Yes .
Step 4. And then put you blog description inside the box provided and finally click on the "Save Changes" button.


To test if it works, you can use MetaChecker  tool, where you only have to introduce the url of a post or page, click Analyze and then it will show the results, including a complete analysis of keywords, on-page seo , meta tags, URLs, current server status and a rating bar that goes from Horror to Excellent.
If things go smoothly as you did, your blog would already be ready to face a good SEO.

Good Luck Bro ;-)

Useful Tips to Keep Your Readers Stay Longer on your Blog

tips to keep readers stay longerNaturally, all bloggers wanted to become  more popular in their written articles but doing this needs some tricky moves in order to win the hearts of the readers. I believed that high page rank and low bounce rate are the consequences if  we just follow rules on blogging. In this article, I will share to you some useful tips to make your readers busy and like more to your blog.


Tips To Make Readers Stay Longer In Your Blog:

1. Professional Looking Blog. 


A difficult to achieve especially if we are still newbie blogger, since we need to be equipped with using the languages of computer programming like HTML, Javascript and CSS, etc. But don't worry since there are many sites available that share free Blog Template with good looking features.

2. Thought Provoking Post Title


Well, the next thing comes just after the looks is the  post title. Your blog posts title is  the reason why  your readers try to click on it and read your article in the first place. So, it’s up to you  how would you make it catchy and thought provoking. Make your titles create thoughts on their mind.

Also Read: How To Optimize Post Titles to Increase Blog Traffic

3. Images.


Reading blog articles or even books without images attached is confusing since our imagination have no guide of what the author wanted to share with us. Through image content  article will be  completed. Add related and quality images along in your blog posts so that your reader  will know actually what are  you writing for them. But remember to alt  tag  in your images  because it will also  add your ranking in Google images and consequently increase blog traffic.

Recommended for you: How to Add Alt Tag in Blogger Images

4. Quality Video


 Since in our young age, we were fund of  watching TV in our homes and if it is not available, we tend to go our friends or near neighborhood  just to watch our beautiful TV program. In short we love watching videos than to read or hear it.  The same is true in  reading articles in our blog, readers  tend to   to stay more time if they  watch video along in reading our blog's article.  Youtube is the best answer in corporating videos for your sites but there are other sites as well   who can give you this opportunity

Recommended Post:How to Add Link to Your Video In Youtube

5.Internal Linking


Promoting  blog article which are not so high in terms of  pageviews is always part of blogging and to answer this, you should practice internal post linking. If you're writing on Best SEO TIps for Newbie Blogger, you can also connect this article with another post, let us say Bad SEO Tips A Blogger Must Not To Follow. In that way, your readers will be busy reading  more than one  article.  Linking to another posts on your blog is a  Seo practice and  improved page  impressions as well.
Don't Forget to Read: How to add Linkwithin or Related Post Widget in Blogger

6. Ask your Readers to Subscribe to your Regular Post


 This is one way of helping your readers to be updated with your blog post. Your blog subscribers will be notified by mail when you update or post a new article on your blog. Don’t forget to put this   subscribing widget on your blog. I have one on the right sidebar you can put your email address to be updated with my incoming post as well.

7. Be natural in writing


Try to establish an environment that you are just talking your readers in a manner that they will not feel bored or tired. You  can also add mode of being funny. You have to think  that humans will read  your article and therefore you should act  as human too in order to gain the love of your readers.

Hope you like this short article and Enjoy Your Day!

Adding alt Tag to Images to Increase Blog Traffic

In my previous tutorial on 10 Basic SEO Tips for Newbie Bloggers, I have mentioned there about adding alt tag to images in order to receive  a huge amount of traffic to your blog and I had  promised there to make a separate tutorial on how to add alt tag to images. 
seo tips for beginners


Reason Behind in Putting Tag in to your Images


The main reason why we need to put alt tag to the images being uploaded in our blog is to tell robots that the image she encountered is part of the  content and not a garbage one. Robots like human beings read our content, look for every detail and when they come across  to our image HTML code they do not recognize what the image is all about if it has no  tag. She can't judge if  that particular image  is all about  CSS or  Basic SEO Tips.  Now in order to let robots index each of our images  we must add an alt Tag on it.This type of Tag  is  special  because it let spiders to describe, categorize and even index as I have said above. In short, this type of Tag tells the robot about the reason of putting that kind of  image in that particular content or page.

Adding alt Tag to Images to Increase Blog Traffic


Note: This is via HTML Mode in Your Blogger Post Editor page
Step 1. Choose a Post or Create New Post
Step 2.  Add Image as you normally do
Step 3. After you have uploaded an image  to your post, switch you Blogger Post Editor page in HTML mode. You will see HTML code like the below:
<a href="http://3.bp.blogspot.com/-17cPWrJiEvI/UhrrZvz-G1I/AAAAAAAABpE/OslpFGjJGaE/s1600/lights.jpg" imageanchor="1" ><img border="0" src="http://3.bp.blogspot.com/-17cPWrJiEvI/UhrrZvz-G1I/AAAAAAAABpE/OslpFGjJGaE/s320/lights.jpg" /></a>
The code above may look like odd and yet  robot can't identify it since it has no Tag. Now In order to optimize the above image HTML code, we will add alt Tag on it after the red bold text. See the illustration below:
<a href="http://3.bp.blogspot.com/-17cPWrJiEvI/UhrrZvz-G1I/AAAAAAAABpE/OslpFGjJGaE/s1600/lights.jpg" imageanchor="1" ><img alt="add hover effects on images" border="0" src="http://3.bp.blogspot.com/-17cPWrJiEvI/UhrrZvz-G1I/AAAAAAAABpE/OslpFGjJGaE/s320/lights.jpg" /></a>

Step 3. After you have done your post you may now publish  or update  it.

Adding Alt Tag to Images to Increase Blog Traffic Via Compose Mode


An easy way to add alt tag to your uploaded images is through  putting it directly to the images in the Compose Mode
Step 1. Upload or add image to your post(s) as you normally do (be sure to switch your Blogger Post Editor page in the Compose Mode)
Step 2. Highlight the image by clicking it.
Step 3. Below the highlighted image you will see an option on what you are going to do with the image like transform it to smaller, mediun, large or x-large, original size, aligning, putting caption, adding properties or even removing it in your post. From among that choices, select PROPERTIES option. See the screenshot below,
add tag to images
Step 4. In the first blank space put a title on your image (still related to your content)
Step 5. In the second blank space, this is where you are going to put your alt tag (limit your tag to four rich targeted keywords, the lesser the better)
adding alt tag to images
Step 6. Publish or Update your post! And you are done
 Try to practice this habit of putting alt Tag to your images before it is too late for in the near future a huge traffic will come to your blog. Good Luck Bro!

10 Best Seo Tips for Newbie Bloggers

Having a beautiful and well customized blog is a vital part of every blogging task. It admires your visitors once they land to your blog pages. But this is not enough with  your  blogging career. You need to practice Search Engine Optimazation (SEO) in order to tell the world that you have this kind of blog and you’re happy to share it for free.
best seo tips for beginners
Below are some of the SEO tips that may help you to be on the right track of your blogging career.

1. Quality Content


  - It is most often said that “content is king”. As a blogger we should provide our readers with fresh, quality and reliable content. Robots will be happy if you create something new to the world or if you publish something that is already  known, present it in a unique and with more enhancements. Limits your words for at least 300- 500 characters.


2. Treat Post Title with H2-tag


   -Next to your blog content  that you are going to maximize is you post titles. By default, post titles are treated with an H-3 tag. You should change that H-3 tag to H-2 tag in order to increase your pagerank. To know more about treating post titles with H-2 tag, click here.


3. Adding alt tag to your Uploaded Images


   -We should also maximize our contents through putting images on it and in that images you will add an alt tag to tell robots that they are related with your contents. Click here for assistance.


4. Practice Blog Commenting


   -To a newbie blogger, it is quiet hard to let others to drop comments on your posts but I will tell  you that if you just take time to comment (a good one) on other blogs, those professional bloggers will also comment back on your posts. But the essence of commenting doesn’t evolve only with the two of you, others also will follow because you already started the ball rolling.
In blog commenting, you establish linkages with other people and most importantly the back links which are also a great source of traffic.


5. Add Sharing Widget to your Blog


   -Sharing widgets will help you spread your content throughout the web. Put this in every corner of your blog plus the email subscription box. I know the effect is slow but time will come that you will see its dramatic result.


6. Publish your Post at Regular Time Intervals


   -As an experienced, I tend to publish my post at exactly 10:51 (Philippine Standard Time) with an intensity of one post per day. You can schedule your post publishing as long as it follows  a certain pattern. You may publish one post per day at a specific time  or  two if you can but don’t publish too much, a maximum of three posts per day only. If ever you publish more than one post, say two post for example, wait for seven minutes to publish the second post.


7. Permalink Editing


  -If posts titles are important, so with your permalink.  Permalink is the link of your posts.  Edit  your permalink  with at least six (6) most targeted keywords. Click here to know more on permalink editing.

8. Guest Posting


  -In the first stage of our blogging career, guest posting is essential so that we will be exposed to the world of blogosphere an at the same time they will follow you. Try to win the heart and confidence in presenting your guest posts to them.


9. Putting Author's Image at the Search Engine Result Page


  -In statistics people will tend to click those post in SERP if they see an image right before the topic that they are searching. You can click here for the tutorial.

10. Link your Blog with other Sites related  to your Blog Niche!


  -Connect your Blog for at least four professional sites related to your blog. I believe this could also help.

Note: All the above SEO tips were being practiced by the author itself. No the same SEO will work in all  blogs.

Add Facebook Pop Like Box With Timer In Blogger

adding facebook pop up with timer
Having a problem on how to advertise your online business. Facebook is the answer as it is the largest social networking  site. And as  blogger you want also to spread your content because no matter how quality is your content is but it is not being talked by people around the globe, you are just like wearing new and beautiful dress but just sleep in your bed.
As of the moment (when I wrote this article) it is the no. 1 in Alexa Rank having a 963,574,340 (data taken  from web-site.org) . In connnection with this,  FACEBOOK has provided the facility in shape of many widgets and boxes through which the webmasters and bloggers can easily advertise their blog or website and circulate it on the FACEBOOK. And now, in this tutorial I am going to share with you the “FACEBOOK POPUP LIKE BOX WITH TIMER”, which you can easily install in your Blogger Blog and attract more visitors and build a better fan following on the Facebook. The codes that I'm going to share with  you are highly customizable.

Live Demo


Add Facebook Pop Like Box With Timer In Blogger


Step 1. Log in to your Blogger Dashboard.

Step 2. Go to Template (have a back-up of your template for your reference).

Step 3. Click “EDIT HTML”.

Step 4. Inside “HTML EDITOR”, press “CTRL+F” and find  tag </body>.

Step 5. Copy &paste the following code below just above/before  tag </body>.
<!-- Facebook Popup Like Box With Timer Starts by Bloggingtipsandtrix.blogspot.com -->

<script type='text/javascript'>
//<![CDATA[
    KNFBFansPRO='pages/Bloggingtipsandtrix/533310753378603?ref=hl'
 //]]>
</script>
<style>#fblikepop{background-color:#fff;display:none;position:fixed;top:200px;_position:absolute; /* hack for IE 6*/width:450px;border:10px solid #6F6F6F;z-index:200;-moz-border-radius: 9px;-webkit-border-radius: 9px;margin:0pt;padding:0pt;color:#333333;text-align:left;font-family:arial,sans-serif;font-size:13px;}
#fblikepop body{background:#fff none repeat scroll 0%;line-height:1;margin:0pt;height:100%;}
.fbflush{cursor: pointer;font-size:11px !important;color:#FFF !important;text-decoration:none !important;border:0 !important;}
#fblikebg{display:none;position:fixed;_position:absolute; /* hack for IE 6*/height:100%;width:100%;top:0;left:0;background:#000000;z-index:100;}
#fblikepop #closeable{float:right;margin:7px 15px 0 0;}
#fblikepop h1{background:#6D84B4 none repeat scroll 0 0;border-top:1px solid #3B5998;border-left:1px solid #3B5998;border-right:1px solid #3B5998;color:#FFFFFF !important;font-size: 13px !important;font-weight:normal !important;padding:5px !important;margin:0 !important;font-family:&quot;Lucida Sans Unicode&quot;, &quot;Lucida Grande&quot;, sans-serif !important;}
#fblikepop #actionHolder{height:30px;overflow:hidden;}
#fblikepop #buttonArea{background:#F2F2F2;border-top:1px solid #CCCCCC;padding:10px;min-height:50px;}
#fblikepop #buttonArea a{color:#999999 !important;text-decoration:none !important;border:0 !important;font-size:10px !important;}
#fblikepop #buttonArea a:hover{color:#333 !important;text-decoration:none !important;border:0 !important;}
#fblikepop #popupMessage{font-size:12px !important;font-weight:normal !important;line-height:22px;padding:8px;background:#fff !important;}
#fblikepop #counter-display{float:right;font-size:11px !important;font-weight:normal !important;margin:5px 0 0 0;text-align:right;line-height:16px;}</style>
<script src='https://googledrive.com/host/0B9e7eeKnhqEVUFBGNGVKRkdHV3M' type='text/javascript'/>
<script src='http://connect.facebook.net/en_US/all.js#xfbml=1' type='text/javascript'/>
<script src='https://googledrive.com/host/0B9e7eeKnhqEVM3ppcFdvWkZPUEE' type='text/javascript'/>
<script language='javascript'>
//<![CDATA[
    $(document).ready(function(){                      
        $().KNFBFansPRO({
           timeout: 30,
            wait: 0,
            url: 'http://www.facebook.com/pages/Bloggingtipsandtrix/533310753378603?ref=hl',
            closeable: true        });
    });
//]]>
</script>
<div id='fbtpdiv'/>
<!-- Facebook Popup Like Box With Timer ends by Bloggingtipsandtrix.blogspot.com -->

Customization:
  • Change the red highlighted texts with your facebook username or facebook fan page.
  • If you want to hide your facebook fan page name because it is odd to look especially if it contains many numbers, simply delete the 13px   in font size in the above code and change it to zero (0).
  • Set the  time-out  (in seconds) by replacing 30 with your own.
  • This widget will  reappear after few minutes. Simply change the  (0) with 1, 2, or any time you want.
 In my case my complete facebook fan page is https://www.facebook.com/pages/Bloggingtipsandtrix/533310753378603?ref=hl

Step 6. Click Preview to see the initial effect then hit the Save button.
As a token of this article please like my facebook fan page. Thank You!
Peace and more blessings to your family.
Enjoy!