How to Hide or Show Widgets in a Certain Page in Blogger

Many bloggers upon putting  widgets or gadgets in our sidebar, in header area and footer have  noticed that it will appear in  all our pages by default, consequently.  And it is very important as  blogger to hide that widgets/gadgets in our Contact Page  or Privacy Policy Pages  especially if we are applying for Adsense or if we have already an Adsense Account (see Adsense Program Policies here) . Therefore, it is very important to   know   how  to display  or  hide  elements inside your blog pages.


How to Hide or Show Widgets in a Certain Page in Blogger


Note. Be sure that the gadgets or widgets that you have add in blogger layout have a name that is different from other widget name  so that you will find  it easier to locate what  certain   widget that you want to hide or show in a certain page.

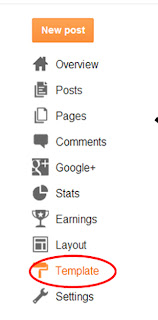
Step 1. Go to Blogger Dashboard >>  Click Template,
hide or show widgets in blogger


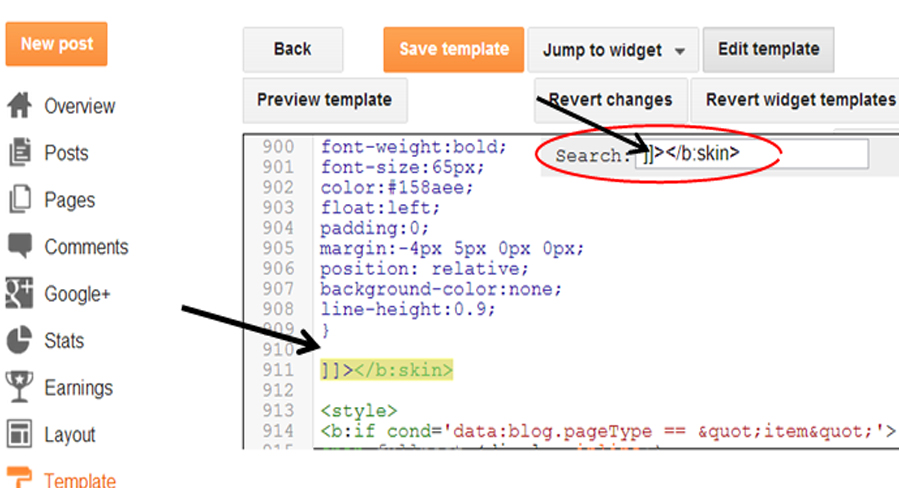
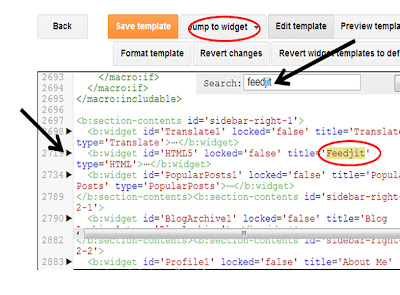
Step 2. Hit Edit HTML  then click  Jump to Widget, then select the widget that you  want  a certain page to hide or show or you can  simply click Control F and enter the widget's name in the search box,
hide or show widgets in blogger
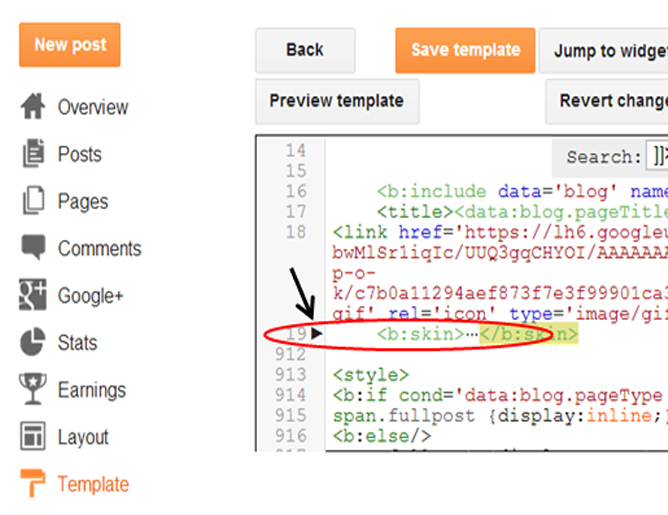
Step 3. Click the black arrow beside the widget that you are looking for in order to show its cascading style sheet (css).
For example I am looking for  the Feedjit widget in my template and after  clicking the arrow  I scrool down and found the set of code below.
<b:widget id='HTML5' locked='false' title='Feedjit' type='HTML'>
    <b:includable id='main'>
<b:if cond='data:blog.url != &quot;http://bloggingtipsandtrix.blogspot.com/2013/04/var-servicedomainwww.html&quot;'>
  <!-- only display title if it's non-empty -->
  <b:if cond='data:title != &quot;&quot;'>
    <h2 class='title'><data:title/></h2>
  </b:if>
  <div class='widget-content'>
    <data:content/>
  </div>

  <b:include name='quickedit'/>
</b:if>
</b:includable>
  </b:widget>
 Note: Please be aware of the opening and closing tags:

<b:widget id='HTML5' locked='false' title='Feedjit' type='HTML'>
<b:includable id='main'>

Closing tags:
</b:includable>
</b:widget> 


Step 4.
  The  following are tags/codes that you are going to put below  the opening tags in order to:

 1. Show  Blogger widget only in home page,
<b:if cond='data:blog.url == data:blog.homepageUrl'> 
 2. Show Blogger widget only in post pages
<b:if cond='data:blog.pageType == "item"'>
3. Show the widget in a specific page 
<b:if cond='data:blog.url == "URL of the page"'>
4. Hide widget on a particular page
<b:if cond='data:blog.url != "URL of the page"'>

5. Show only widget in a static pages
<b:if cond='data:blog.pageType == "static_page"'>
6. To hide widget in a static page
<b:if cond='data:blog.pageType ! = "static_page "'>
7. Show widget only in Archive pages
<b:if cond='data:blog.pageType == "archive"'>
8. Hide widget only in Archive pages
<b:if cond='data:blog.pageType ! = "archive"'>
9. Hide Blogger widget  in post pages or Show widget in home pages.
<b:if cond='data:blog.pageType != "item"'>
Note.
           1. Always put </b:if> above the closing tags so that code will parse correctly.
           2. For conditioned number three (3) and four (4) above, replace the red bolded texts with the URL of the page.
           3.  But for conditioned number one (1), two (2), five (5), six (6), seven (7), eight (8), and nine (9) just simply copy the code and paste it directly to the specific widget (no more editing)
           4. You can use our HTML parser to parse your code correctly.
       
Step 5. Click Preview and if things go correctly, hit Save Template and you are done.
Have a nice day pal and enjoy!

Adding Drop Cap to Each Blogger Post

Upon landing the viewers to your site sometimes needs another way for them to read articles of their need or just stay and read for there is  something that catch their attention and that is your  big capitalized letter in the beginning of  your post.
Adding drop cap to your post may  in the other way  increase traffic for  it  leads the readers eye to the start of an article or a chapter. You can find them in most magazines and newspapers articles.

In this tutorial, I will show you how to transform the first letter of the post into a drop cap.Once the code is added it automatically apply drop cap to all your existing and future posts.
For this code to work, TEXT  should occur first and not an image in  your blogger post.

 adding drop cap to post

Adding Drop Cap to Each Blogger Post


Step 1. Go to Blogger Dashbboard >>  Template >> Edit HTML
 adding drop cap to post
Step 2. Find the code </b:skin> and click the arrow beside it to show its css, then scroll down and look for the code   ]]></b:skin>. You can use Control F,
 adding drop cap to post

Step 3. Just above ]]></b:skin> paste the code below, the screenshot below could help you,
 adding drop cap to post


.post-body: first-letter, .post-body .dropcap:first-letter {
font-weight:bold;
font-size:65px;
color:#158aee;
float:left;
padding:0;
margin:-4px 5px 0px 0px;
position: relative;
background-color:none;
line-height:0.9;
}


Step 4. Save it. Have a nice day, friend!

Short Customization:


To change the font size of the  letter, replace the red bold text 65px with your own font size.
To change the font color of the letter, replace the blue bold text with your own color preference. You can choose it here.
To have a proper drop cap alignment with rest of the text in your  post, adjust the orange bold text -4px 5px 0px 0px  above.

If you have some questions regarding this post don't forget to drop your comment below.
HAVE  A NICE BLOGGING!

Credits goes to bloggersentral with some modification from me. 

changing main background color in blogger

One of the things that a blogger must have to change or customize in his blog is the background color of his blogger template according to his preferences.In this tutorial, I will show the very simple steps on how to change you background color via css in Edit HTML.


Changing Main Background Color in Blogger


Step 1. Go to Blogger Dashboard and hit Template. Click the number beside the code  <b:skin> in order to expand  or show its css,
changing background color in blogger

Step 3. Locate the code body {   and replace it with the code below. The screenshot below may help you,
changing background color in blogger


body {
  background: #158aee;

Step 4. Click preview and save it.  Enjoy!

Short Customization:

Change background color #158aee with  your  color preference. You can choose it here.
Hope you like this post and Happy blogging to all of us!

How To Customize The Comment Box In Blogger

One way of attracting the readers to give comment to your article is having a comment box more  unique and attractive to them. As bloggers we all know that comments are  vital part of a blog article  because  through it  the readers' can reflect their opinions regarding  the post or our blog, so it is very necessary to spend a little of our time to make this part looking more presentable, accessible and neat. In this tutorial, I will show very simple steps on how to customize the comment box.


customize comment box in blogger


How to Add Beautiful Customization with the Comment Box


Step1. Go To Blogger Dashboard
Step2. Click Layout >> Edit HTML
Step 3. Check “Expand Widget Templates”  box at the top right corner.


Step 4. Search  the code below,  use" Control F" to help you locate faster the code. (Select  the second occurrence of the code)

<div class='comment-form'>
Step 5. Replace it with code below
<div id='btt-form'>

 Step 6.   Now Search for the code: ]]></b:skin>,  again use  Control F

 Step 7.   Just above ]]></b:skin>, you paste the following  code below,

#btt-form iframe{
background:#ffffff url(http://3.bp.blogspot.com/_7wsQzULWIwo/Sx1aCAx_44I/AAAAAAAACeo/HZz8QQT0etM/s400/plz-do-not-spam1.gif) no-repeat bottom right;
border:7px solid #C7C7C7;
padding:5px; font:normal 12pt "ms sans serif", Arial; color:#7EB2AC; width:450px; }
#btt-form iframe:hover{
background:#ffffff url(http://1.bp.blogspot.com/_7wsQzULWIwo/Sx1Zs5rasXI/AAAAAAAACeg/0fBam5AkHS0/s400/plz-do-not-spam2.gif) no-repeat bottom right; border:7px solid #7EB2AC;
}
#btt-form a{
color:#7EB2AC;
}

Customization of the  three parts of the code:
Note: you can choose here your various types of hexadecimal colors.

1. First part of  the code (#btt-form iframe )
 >> Comment box in in active mode (not in hover effect)

  • To change the background of the comment box frame, change #ffffff 
  • To change the the background image , change the url with your own url image. You can place it in top left, top right,bottom left or bottom right position. In this blog , I position it in the bottom right.
  • To change the border size of the frame, change 7px 
  • To change the border styles, change the  solid with dotted or any border styles that you like. for more border styles, click here.
  • To change the  border color, change #C7C7C7
  • To change the distance between the comment form border and the text area, change 5px
  • To change style of the text,  bolness or normal, font size,font family, color and the width of the text "Comment as", change the attributes of the following code:
           font:normal 12pt "ms sans serif", Arial; color:#7EB2AC; width:450px

2. The second part of  the code (#btt-form iframe:hover)
 >> Comment box in hover effect mode

The explanation with regards to its border, background,  etc. is almost the same, the only difference is it will only affects the frame styles when the mouse will hover in it.

3. The third part of  the code (#btt-form a)

This part explains the color of these two links -> “Sign out” and “Subscribe by email” . These links appear at bottom right corner of every Blogger Comment Form.

To change the color of the text "Sign out" and "Subscribe by e-mail", change the  hexadecimal color code "#7EB2AC"


 Step 8. After customizing  the  CSS code above, save your  template and you are done. Enjoy!
credits goes to My bloggertricks with little modification by me.

How To Customize Linkwithin Related Post Widget

In this tutorial we will  add some background colors of the thumbnail images, change the font size and color text  of your Related Post titles, adjust the margin, add hover effects of your preferences, and if you want remove the  linkwithin credit and logo  link that appears  at the right bottom corner  of the widget.   In the  codes below ,we used a blue theme but as I said you can change it as you like or  add your creative new looks to match  perfectly with your blog looks and feel. Lets get the ball rolling!


 customize linkwithin related post


How To Customize Linkwithin Related Post Widget


If you have not yet installed this widget, please click here for assistance
Step 1. Go to Blogger >> Template (Backup your template)
Step 2. Click Edit HTML
Step 3. Find the Code (Control F) below
]]></b:skin>
Step 4. Just above that code, paste the  code below
/* -----Linkwithin Stylesheet by http://bloggingtipsandtrix.blogspot.com/----- */ #linkwithin_logolink_0 {
display:none!important;
}
#linkwithin_logo_0 {display:none;}
#lws_0 {
clear: both!important;        margin: 0 0 20px 0!important;  
}

.linkwithin_outer{
margin: 0 8 20px 0!important;  
}
.linkwithin_text {
color:black!important;
font-size:20px!important;
padding-bottom:5px!important;
}
.linkwithin_posts a {
background: blue  !important;
border:5px,5px,5px,5px solid #404040!important;
margin:0px,10px,0px,0px ;
}
.linkwithin_posts a:hover {
background: dark blue !important;
}
.linkwithin_img_0 {
 border: 3px solid #dddddd !important; padding:1px !important;  width:100px!important; height:100px!important;
margin:0px,10px,0px,0px ;
}
.linkwithin_img_0:hover {
border: 2px  solid #333333 !important; padding:2px !important;
}
.linkwithin_title {
color:#020202!important;
font-family:'tahoma', sans-serif !important;
font-size:11px !important;
line-height:14px !important;
text-decoration: none;
border-top:1px solid  #ddd !important;
}
.linkwithin_title:hover {
border-top:1px solid  #333 !important;
}
Step 5.  Preview first and if it is working then save your template


Short Customizations:

Tip.  Use this tool to make changes to the color theme
  • To change the color of the text "You May Also Like"  change the text black
  • To change the font size edit 20px
  • To change the container background color in active mode edit the text blue
  • To change the container background color in mouse hover mode edit the text  dark blue
  • To change the border across each thumbnail in active mode edit #dddddd image
  • To change the border in mouse hover mode edit #333333
  • To change the post title links color edit #020202
  • Remove the  text in red in the above code if you want that the credit and logo link of  linkwithin  will appear in the plug- in
See your blog and see if it matched perfectly!  Enjoy!
Credits goes to My bloggertricks with little modification by me

Adding Feedjit Widget to Blogspot

Another way of knowing who are those people who visit on your blog or website is through having a Feedjit Widget. Additionally, you will be able to  have a first hand knowledge to those people  who read about your latest posts.  Feedjit lets you know, right now, who is visiting your site. Simply add the Live Traffic Feed and instantly start seeing who is visiting your site as they arrive. In this tutorial, I will show how to add feedjit widget to your blog.

Adding Feedjit Widget to Blogspot


Step 1. Open your Blogger Account

Step 2. Go to Feedjit and fill- up the form (PERSONALIZE YOUR FEEDJIT Form)


Step 3. Click Install feedjit on my and hit the Go button. By clicking  it, you will be taken to the other page, the INSTRUCTIONS FOR INSTALLING ON BLOGGER page


adding fedjit widget to blogger


Step 4. In that page, click the box bearing the text [Click to open a new window and install on Blogger] and you will  brought to the Add page element page

adding fedjit widget to blogger

Step 6. In the Add Page Element page, click the Add Widget button as shown in the screenshot below. By clicking that button, you will be taken to your Blogger Layout page

adding fedjit widget to blogger

Step 7. Drag the Feedjit Button to the place where you want to fix it

adding fedjit widget to blogger


Step 8.  And finally hit Save Arrangement button and you are done. See your new widget and Enjoy!
If you have some questions, suggestions regarding this post, please leave it in the comment box. We are happy to hear your voice.
Enjoy!