Removing or Hiding Blogger Navbar In Your Blog

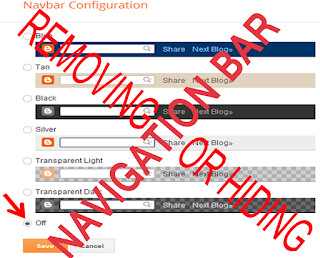
Customizing  one's template is part of  our blogging activity in order that the free default template  provided by us by Blogger will look attractive or beautiful  before the eyes of our readers and  advertisers. There are many things in the default template  that  we should take a look and one of that is the blogger navigation bar. Although this part is quite helpful for it allows us to sign- in to our blogger account, publish or update some posts or made  costumizations on it but this navigation bar doesn't add professional looks to our blog. In this tutorial, I will show you the process on how to remove or hide Blogger navigation bar in your blog.

hiding or removing navbar

How to Remove or Hide Blogger Navigation Bar In your Blog


Step 1. Go to Blogger Dashboard
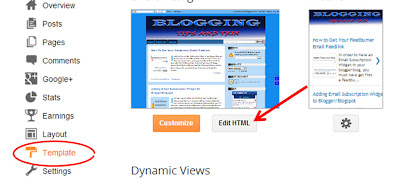
Step 2. Click Template
Step 3. Hit Edit HTML button
Step 4. Look for the  code ]]></b:skin and just above it, paste the code below,
#navbar { height: 0px; visibility: hidden; display: none;}
#navbar-iframe { height: 0px; visibility: hidden; display: none;}
Step 5. Finally, click the Save button.
 If you want to appear the blogger navigation bar in the future, just remove the above CSS and it will back to its position.

Another Way of Hiding or Removing Blogger Navigation Bar In Your Blog


Step 1. Go to Blogger Dashboard
Step 2. Click Lay-out
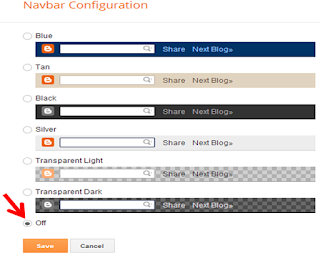
Step 3. Locate Navbar (navigation bar) button
Step 4. Switch it in OFF mode

how to remove navbar

Step 5. Save it.
I hope that you found this article helpful. You can leave your thoughts at the comment box below.
Happy Blogging Day!!!

How To Make Sitemap Page In Blogger

Just recently I have read an email from Google Adsense that one their main criteria of a certain blog to be approved as their ad publisher is to have a sitemap page in my blog, so I was researching and keep on experimenting on how to do it. But of course not only for that reason why should  I have that page in my blog but to let my readers to have an easy navigation and provide meaningful experiences on all my posts published.  Having a sitemap page also increases your page rank and consequently a bigger chance to boost organic traffic. In this tutorial I will show on how to make  a sitemap page that will automatically update each time you will create and publish a post(s) and the best  thing is that  you will not edit your blogger template anymore. Please take a look first in my blogger sitemap for a live demo.
making sitemap page in blogspot

Create A Sitemap Page  In Blogger/Blogspot


Step 1. Go to Blogger Dashboard
Step 2. Click New Pages >> New page >> Blank Page
Step 3. Switch the Blogger Page Editor page in the HTML mode
Step 4. Then copy the code below and paste it in your Blogger Post Editor page ( in Step 3)
<script>
var numposts = 1000;
var showpostdate = true;
var showpostsummary = false;
var numchars = 200;
</script>
<script>
function rp(json) {
document.write('<ul>');
for (var i = 0; i < numposts; i++) {
document.write('<li>');
var entry = json.feed.entry[i];
var posttitle = entry.title.$t;
var posturl;
if (i == json.feed.entry.length) break;
for (var k = 0; k < entry.link.length; k++) {
if (entry.link[k].rel == 'alternate') {
posturl = entry.link[k].href;
break;
}
}
posttitle = posttitle.link(posturl);
var readmorelink = "(more)";
readmorelink = readmorelink.link(posturl);
var postdate = entry.published.$t;
var cdyear = postdate.substring(0,4);
var cdmonth = postdate.substring(5,7);
var cdday = postdate.substring(8,10);
var monthnames = new Array();
monthnames[1] = "Jan";
monthnames[2] = "Feb";
monthnames[3] = "Mar";
monthnames[4] = "Apr";
monthnames[5] = "May";
monthnames[6] = "Jun";
monthnames[7] = "Jul";
monthnames[8] = "Aug";
monthnames[9] = "Sep";
monthnames[10] = "Oct";
monthnames[11] = "Nov";
monthnames[12] = "Dec";
if ("content" in entry) {
var postcontent = entry.content.$t;
} else if ("summary" in entry) {
var postcontent = entry.summary.$t;
} else
var postcontent = "";
var re = /<S[^>]*>/g;
postcontent = postcontent.replace(re, "");
document.write(posttitle);
if (showpostdate == true) document.write(' ' + cdyear + ' - ' + monthnames[parseInt(cdmonth,10)] + ' ' + cdday);
if (showpostsummary == true) {
if (postcontent.length < numchars) {
document.write(postcontent);
} else {
postcontent = postcontent.substring(0, numchars);
var quoteEnd = postcontent.lastIndexOf(" ");
postcontent = postcontent.substring(0,quoteEnd);
document.write(postcontent + '...' + readmorelink);
}
}
document.write('</li>');
}
document.write('</ul>');
}
</script>

<script src="http://www.yourwebsitenamehere.com/atom.xml?redirect=false&start-index=1&max-results=1000&orderby=published&alt=json-in-script&callback=rp"></script>

Customization:
1.  If you have published more than 1000 posts in your blog/site just change the number (1000 )  depending on your preferences.
2. If you want to hide the post date beside the post title change the text (true) with false.
3. The most important thing is you must replace the line (www.yourwebsitenamehere.com) with the URL of  your blog/site to make this trick work on your blog.

Step 5. Click the  Publish  button and get the url and paste it in your  in your sidebar or any part of your blog's body.
You are now done making a list of all posts in just a single page.

Another Version of Sitemap Page With Post Titles Separated by Month and Year


create sitemap page in blogger

Step 1. Repeat step 1-3 above.
Step 2. Copy the code below and paste it your Blogger Post Editor page (new post).
<script>
var numposts = 1000;
var showpostdate = true;
var showpostsummary = false;
var numchars = 200;
var lastDate ="";
</script>
<script>
function rp(json) {
document.write('<ul style=list-style-type:none;>');
for (var i = 0; i < numposts; i++) {
var entry = json.feed.entry[i];
var posttitle = entry.title.$t;
var posturl;
if (i == json.feed.entry.length) break;
for (var k = 0; k < entry.link.length; k++) {
if (entry.link[k].rel == 'alternate') {
posturl = entry.link[k].href;
break;
}
}
posttitle = posttitle.link(posturl);
var readmorelink = "(more)";
readmorelink = readmorelink.link(posturl);
var postdate = entry.published.$t;
var cdyear = postdate.substring(0,4);
var cdmonth = postdate.substring(5,7);
var cdday = postdate.substring(8,10);

var monthnames = new Array();
monthnames[1] = "Jan";
monthnames[2] = "Feb";
monthnames[3] = "Mar";
monthnames[4] = "Apr";
monthnames[5] = "May";
monthnames[6] = "Jun";
monthnames[7] = "Jul";
monthnames[8] = "Aug";
monthnames[9] = "Sep";
monthnames[10] = "Oct";
monthnames[11] = "Nov";
monthnames[12] = "Dec";
if ("content" in entry) {
var postcontent = entry.content.$t;
} else if ("summary" in entry) {
var postcontent = entry.summary.$t;
} else
var postcontent = "";
var re = /<S[^>]*>/g;
postcontent = postcontent.replace(re, "");


if (lastDate!=cdyear + monthnames[parseInt(cdmonth,10)])
{
    document.write('<li><h4>' + monthnames[parseInt(cdmonth,10)] + ' ' +cdyear +'</h4></li>');
    lastDate=cdyear + monthnames[parseInt(cdmonth,10)]
}
document.write('<li> ' + cdday +' ');
document.write(posttitle);

if (showpostsummary == true) {
if (postcontent.length < numchars) {
document.write(postcontent);
} else {
postcontent = postcontent.substring(0, numchars);
var quoteEnd = postcontent.lastIndexOf(" ");
postcontent = postcontent.substring(0,quoteEnd);
document.write(postcontent + '...' + readmorelink);
}
}
document.write('</li>');
}
document.write('</ul>');
}
</script>

<script src="http://www.yourwebsitenamehere.com/atom.xml?redirect=false&start-index=1&max-results=50000&orderby=published&alt=json-in-script&callback=rp"></script>
Please follow the customization above.
Step 3. Publish it in  an earlier date (step 5 above)
 I hope you guys like this little trick. Feel ease to drop comment/suggestions or even additional info below this article to hear your views and feedback. Enjoy!
Reference: Storiesofmaria

Customize Author's Comments Background In Blogger Comments Box

Wow, I'm back in my computer's table and now it's time make another quality post that was keep bothering me anytime someone comment my posts and made some replies on it. Want to ask what is it, that is  how to make my comments background different from my readers' comments. But thank God because I succeeded in customizing it and I will also acknowledge yoboy for the initial codes and I add it with another css to make it more attractive. So, let us go with the process!

customize author's comments  box


Customize Author's Comments In Blogger Comments Box


Step 1. Go to blogger Dashboard >> Template >> Edit HTML
Step 2.  Look for this tag </body> or (control F to be easier),
Step 3. Just above or before that tag place the code below,

<script src='http://code.jquery.com/jquery-latest.js'/>
<script>
$(function() {
function highlight(){
$('.user.blog-author').closest('.comment-block')
.css('border', '1px solid #FFA500')
.css('background' url("http://3.bp.blogspot.com/-zOV4vcUcaVo/UZhw48uI0MI/AAAAAAAAAuo/WL5euqHm-wk/s1600/comment-author.png")')
.css('color', '#444444')
.css('font-size', '12px')
.css('padding', '10px');
}
$(document).bind('ready scroll click', highlight);
});
</script>
Step 4. Look for the tag ]]></b:skin>, and just above it paste the CSS code below:

.comments .comments-content .icon.blog-author {
position: absolute;
top: -2px;
right: -2px;
margin: 0;
background-image: url(http://3.bp.blogspot.com/-zOV4vcUcaVo/UZhw48uI0MI/AAAAAAAAAuo/WL5euqHm-wk/s1600/comment-author.png);
width: 36px;
height: 36px;
}
Note: Your URL image (bolded pink text) must match with each other 
Please use our color code generator to select a wide variety of hexadecimal colors

Short Customization (Optional):
A.  Border
  • Change 1px to increase or decrease the border size of author's comment box. Greater value increases the border size and low value decreases the border also.
  • Replace solid with your own border styles. 
  • Replace FFA500 to change the border color of your (author's) comment box 
B. Background
  •  If you want to use your own background image, replace  the default background  url image http://3.bp.blogspot.com/-zOV4vcUcaVo/UZhw48uI0MI/AAAAAAAAAuo/WL5euqHm-wk/s1600/comment-author.png  with your's.
  • You may replace the background image above with image URL below:


    http://1.bp.blogspot.com/-AD8o3QP4LBE/UZjb-VjNiEI/AAAAAAAAAwg/gRtvasuIsa8/s1600/author-+comment.png
    For white/transparent background

    http://1.bp.blogspot.com/-gu6bAlPPE6I/UZjfyRpHWRI/AAAAAAAAAw8/3OiI5N0WsXc/s1600/white-author's+comment.png


    http://4.bp.blogspot.com/-FrMCKIejxr8/UeZuPvNXbhI/AAAAAAAABSM/vbqf8rol_RE/s1600/author+comment+box.png
    http://1.bp.blogspot.com/-3gXZR_kVp10/UeZxAFmVJkI/AAAAAAAABSc/wjH6HqG4aME/s1600/author+comment+box+2.png
C. Font Color and Font Size
  • Replace 444444 with your color preference, and change 12px to adjust its font size.

Step 5. Save your template and visit your new comment box background. Enjoy!

Sliding Recent Post Widget in Blogger

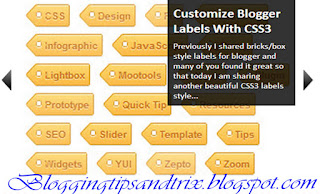
In my previous tutorial, I shared an article about automatic scrolling recent post widget in blogger wherein  you can customize on your likenss, Today  I will show you another trick of showing it and that is through a slide show. There is no need for you to add  text, images or  even links for it will work automatically. You can also customize  this according to your preferences. So let us now go to the tutorial.

automatic sliding recent post

Live Demo


Sliding Recent Post Widget in Blogger with Jquery


Note: Always back-up your template before editing
Step 1. Go to Blogger Dashboard >> Template >> Edit HTML

sliding recent post widget

Step 2. Look for the code ]]></b:skin> and just above it paste the code below,


#slide-container {
    height: 360px;
    position: relative;
    width: 480px;
}

#slider {
    height: 360px;
    left: 25px;
    overflow-x: hidden;
    overflow-y: hidden;
    position: relative;
    width: 480px;
    font-family: calibri;
}

.slide-desc {
    background: transparent url(http://i195.photobucket.com/albums/z105/dantearaujo/darkbg.png) repeat scroll 0 0;
    color: #FFFFFF;
    padding: 10px;
    position: absolute;
    right: 0px;
    text-align: left;
    top: 0;
    width: 200px;
    z-index: 99999;
}

.slide-desc h2 {
    display: block;
}

.crosscol .widget-content {
    position: relative;
}

#slider ul, #slider li,

#slider2 ul, #slider2 li {
    margin: 0;
    padding: 0;
    list-style: none;
}

#slider2 {
    margin-top: 1em;
}

#slider li, #slider2 li {
/*

define width and height of list item (slide)

entire slider area will adjust according to the parameters provided here

*/
    width: 480px;
    height: 360px;
    overflow: hidden;
}

#prevBtn, #nextBtn,

#slider1next, #slider1prev {
    display: block;
    width: 30px;
    height: 77px;
    position: absolute;
    left: -30px;
    text-indent: -9999px;
    top: 71px;
    z-index: 1000;
}

#nextBtn, #slider1next {
    left: 520px !important;
}

#prevBtn, #nextBtn, #slider1next, #slider1prev {
    display: block;
    height: 77px;
    left: 0;
    position: absolute;
    top: 132px;
    width: 30px;
    z-index: 1000;
}

#prevBtn a, #nextBtn a,

#slider1next a, #slider1prev a {
    display: block;
    position: relative;
    width: 30px;
    height: 77px;
    background: url(http://i195.photobucket.com/albums/z105/dantearaujo/prev.png) no-repeat 0 0;
}

#nextBtn a, #slider1next a {
    background: url(http://i195.photobucket.com/albums/z105/dantearaujo/next.png) no-repeat 0 0;
}

/* numeric controls */

ol#controls {
    margin: 1em 0;
    padding: 0;
    height: 28px;
}

ol#controls li {
    margin: 0 10px 0 0;
    padding: 0;
    float: left;
    list-style: none;
    height: 28px;
    line-height: 28px;
}

ol#controls li a {
    float: left;
    height: 28px;
    line-height: 28px;
    border: 1px solid #ccc;
    background: #DAF3F8;
    color: #555;
    padding: 0 10px;
    text-decoration: none;
}

ol#controls li.current a {
    background: #5DC9E1;
    color: #fff;
}

ol#controls li a:focus, #prevBtn a:focus, #nextBtn a:focus {
    outline: none;
}

/* END EasySlider By bloggingtipsandtrix.blogspot.com */

Step 3. Let us now install a Javascript in your template. Copy the code below and paste it above </body> tag,


<!-- Start easy content slider by bloggingtipsandtrix.blogspot.com -->
<script src='http://ajax.googleapis.com/ajax/libs/jquery/1.6/jquery.min.js' type='text/javascript'></script>
<script src='http://accordion-template.googlecode.com/svn/trunk/easySlider1.7.js' type='text/javascript'></script>
<script type='text/javascript'>
//<![CDATA[
$(document).ready(function(){
 $("#slider").easySlider({
 auto: true,
 continuous: true
 });
});
//]]>
</script>
<!-- End easy content slider by bloggingtipsandtrix.blogspot.com -->

Step 4. Save your template.  Your halfway  done!

Adding the Gadget in your Blogger Lay-out Page


Step 5. Again go to Blogger Dashboard >> Lay-out >> Add Gadget

Step 6.
 Scroll down and hit  HTML/Javascript. Inside the empty box, paste the code below


<div id="slider">
<script style="text/javascript" src="http://code.helperblogger.com/easySlider.min.js"></script>
<script style="text/javascript">
 var numposts_gal = 6;
 var numchars_gal = 150;
 var random_posts = false; // random posts
</script>
<!-- replace with your web address (marked with red color) -->
<script src="http://yourblog.blogspot.com/feeds/posts/default?orderby=published&alt=json-in-script&callback=showgalleryposts&max-results=999999"></script>
</div>

Step 7.  A.Replace  yourblog.blogspot.com with your own blog URL,
            B. Replace 6  to change the number of posts to show in the slider.
            C. Replace 150 to change the number of texts to appear in the description.
Step 8. Save your work and see your new widget.
If you have some suggestions queries  or additional information regarding this post, feel free to write it our contact page or to the comment box below.We will be glad to hear your side.
Good Day!
Source: Helperblogger 

Auto Scrolling Recent Post Widget in Blogger

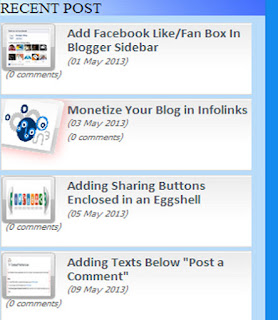
There are many recent post widgets shared by different bloggers  which are  only  moving when a mouse cursor touches it. It is very important to grab viewers' attention upon landing a certain page in our blog and see what is new on it so that they will have an idea if we are keep on  posting articles by which they could  also learn or gain some useful information  and consequently  they will  remember us. Now,  in these tutorial, I will show the steps on how to make a recent post widget that scrolls automatically, with mouse hover effect on image, and each snippet contains the post title,   post date, and the no of viewers who gave comments.

scrolling recent post widget

Live Demo

Auto Scrolling Recent Post Widget in Blogger


Step 1. Go to Blogger Dashboard >> Template >> Edit HTML

self scrolling recent post

Step 2. Find the code </head>, and just above it paste the code below,
<script src='http://ajax.googleapis.com/ajax/libs/jquery/1.4.2/jquery.min.js' type='text/javascript'></script>

Note: Skip this step (2) if you have already installed a Jquery library on  your Blogger Template for it will not scroll if you have more than one (1) Jquery library.
Step 3. Save your template


Adding the Gadget in your Blogger Lay-out Page


Step 4. Copy the set of code below,

<style type="text/css" media="screen">
<!--

/* ========== Scrolling Recent Posts Widget By helperblogger.com ======== */

#helperblogger-widget {
    overflow: hidden;
    margin-top: 5px;
    padding: 0px 0px;
    height: 385px;
}

#helperblogger-widget ul {
    width: 295px;
    overflow: hidden;
    list-style-type: none;
    padding: 0px 0px;
    margin: 0px 0px;
}

#helperblogger-widget li {
    width: 282px;
    padding: 5px 5px;
    margin: 0px 0px 5px 0px;
    list-style-type: none;
    float: none;
    height: 80px;
    overflow: hidden;
    background: #fff url(https://lh6.googleusercontent.com/-A6a829gqfDQ/T-3xppy6MlI/AAAAAAAACFE/RrOao4P11Uk/s1600/helperblogger.com-post.jpg) repeat-x;
    border: 1px solid #ddd;
}

#helperblogger-widget li a {
    text-decoration: none;
    color: #4B545B;
    font-size: 15px;
    height: 18px;
    overflow: hidden;
    margin: 0px 0px;
    padding: 0px 0px 2px 0px;
}

#helperblogger-widget img {
    float: left;
    margin-top: 2px;
    margin-right: 15px;
    background: #EFEFEF;
    border: 0;
}

#helperblogger-widget img {
    -webkit-transition: all 0.5s ease;
    -moz-transition: all 0.5s ease;
    transition: all 0.5s ease;
    padding: 4px;
    background: #eee;
    background: -webkit-gradient(linear, left top, left bottom, from(#eee), color-stop(0.5, #ddd), color-stop(0.5, #c0c0c0), to(#aaa));
    background: -moz-linear-gradient(top, #eee, #ddd 50%, #c0c0c0 50%, #aaa);
    -webkit-border-radius: 4px;
    -moz-border-radius: 4px;
    border-radius: 4px;
    -webkit-box-shadow: 0 0 3px rgba(0,0,0,.7);
    -moz-box-shadow: 0 0 3px rgba(0,0,0,.7);
    box-shadow: 0 0 3px rgba(0,0,0,.7);
}

#helperblogger-widget img:hover {
    -moz-transform: scale(1.2) rotate(-350deg);
    -webkit-transform: scale(1.2) rotate(-350deg);
    -o-transform: scale(1.2) rotate(-350deg);
    -ms-transform: scale(1.2) rotate(-350deg);
    transform: scale(1.2) rotate(-350deg);
    -webkit-box-shadow: 0 0 20px rgba(255,0,0,.4), inset 0 0 20px rgba(255,255,255,1);
    -moz-box-shadow: 0 0 20px rgba(255,0,0,.4), inset 0 0 20px rgba(255,255,255,1);
    box-shadow: 0 0 20px rgba(255,0,0,.4), inset 0 0 20px rgba(255,255,255,1);
}

.spydate {
    overflow: hidden;
    font-size: 10px;
    color: #0284C2;
    padding: 2px 0px;
    margin: 1px 0px 0px 0px;
    height: 15px;
    font-family: Tahoma,Arial,verdana, sans-serif;
}

.spycomment {
    overflow: hidden;
    font-family: Tahoma,Arial,verdana, sans-serif;
    font-size: 10px;
    color: #262B2F;
    padding: 0px 0px;
    margin: 0px 0px;
}

/* ========== Scrolling Recent Posts Widget By helperblogger.com ======== */

-->
</style>

<script language='JavaScript'>
imgr = new Array();
imgr[0] = "https://lh6.googleusercontent.com/-kPPx1sCN4Pg/T-3xq72pLeI/AAAAAAAACFM/IdO7GsyUvGM/s1600/no-thumbnail.png";
imgr[1] = "https://lh6.googleusercontent.com/-kPPx1sCN4Pg/T-3xq72pLeI/AAAAAAAACFM/IdO7GsyUvGM/s1600/no-thumbnail.png";
imgr[2] = "https://lh6.googleusercontent.com/-kPPx1sCN4Pg/T-3xq72pLeI/AAAAAAAACFM/IdO7GsyUvGM/s1600/no-thumbnail.png";
imgr[3] = "https://lh6.googleusercontent.com/-kPPx1sCN4Pg/T-3xq72pLeI/AAAAAAAACFM/IdO7GsyUvGM/s1600/no-thumbnail.png";
imgr[4] = "https://lh6.googleusercontent.com/-kPPx1sCN4Pg/T-3xq72pLeI/AAAAAAAACFM/IdO7GsyUvGM/s1600/no-thumbnail.png";
showRandomImg = true;
boxwidth = 255;
cellspacing = 6;
borderColor = "#232c35";
bgTD = "#000000";
thumbwidth = 50;
thumbheight = 50;
fntsize = 15;
acolor = "#666";
aBold = true;
icon = " ";
text = "comments";
showPostDate = true;
summaryPost = 40;
summaryFontsize = 10;
summaryColor = "#666";
icon2 = " ";
numposts = 10;
home_page = "http://www.bloggingtipsandtrix.blogspot.com/";
limitspy=4;
intervalspy=4000;
</script>

<div id="helperblogger-widget">
<script src='http://code.helperblogger.com/recent-posts-spy.js' type='text/javascript'></script>
</div>

Step 5.  Again go to  Blogger Dashboard, click Lay-out then select Add a Gadget,
Step 6. Scroll Down and select HTML/Javascript,
Step 7. In the empty box, paste the code that you have copy from Step 4,
Step 8. Hit the Save button and you have now a new recent post widget with self scrolling effect

Short Customization:
a. Replace  80 to adjust the individual height/box of the widget.
b. Replace  385 to customize/adjust the whole height of the widget.
c. Replace http://www.bloggingtipsandtrix.blogspot.com/ with your own blog URL.
d. Replace 10 with your desired number of posts to scroll in the widget.
e.  Replace 4  with your desired number of post to appear in widget. 
f.  Replace 4000  . Increase value will slow down the appearance/scrolling  of the next post. Decrease value will make the scrolling effect a  faster.

If you some questions regarding this post, we would highly appreciate to hear it. Please leave you comments at the comment box or to my contact page.
More Blessings to all bloggers! 
Source: helperblogger

Adding Texts Below "Post a Comment" Version 1

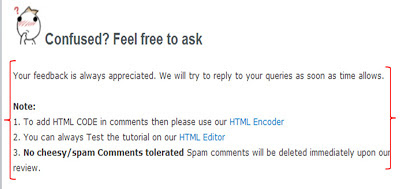
Normally if we  make a  posts then publish it and viewers come on it and enjoy or being unsatisfied  they often leave some comments. Sometimes readers published a spam comments to your article and not good to read especially to your other viewers. In order to minimize those type of situations, you, as the administrator will give some sort of directions in posting a comments in order to maintain a good and healthy blog commenting. Today, In this tutorial, I will share  you how to add texts or directions just below the line "Post a Comment". Please take look at the photo below and at the end of this page article for a live demo.

Also Read: How to Add Texts below Post a Comment Version 2 

adding text below post comment


Adding Texts or Direction Below "Post a Comment"


Step 1.  Go to Blogger Dashbord >> Template (Back- up your Template) >> Edit HTML

Step 2. Find/Control F the code below,


<p><data:blogCommentMessage/></p>

Step 3.  Insert your texts or  notes before   the tag </p>   ( or after the tag <data:blogCommentMessage/> ) as shown in the blockquote below.
<p><data:blogCommentMessage/>Your text/note here</p>

Note:
Your texts/note must be in HTML mode 

Example of a texts in  HTML  mode

Your feedback is always appreciated. We will try to reply to your queries as soon as time allows.
<br/>
<br/>
<b>Note:</b>
<br/>
<b>No cheesy/spam Comments tolerated Spam comments </b>will be deleted immediately upon our review.
<br/>
<br/>
Regards,
<br/>
<br/>
Your Name
Functions:
<br/> -  to have a  break or space between your first line and to the next line of your  texts
<b></b>  -  to make text bold

To put a link in the word reply  in the  note above, write it  in this manner,


Your feedback is always appreciated. We will try to  <a href="Your Post URL Here" rel="nofollow">reply</a>  to your queries as soon as time allows.


Step 3.  Click Preview to see the initial effect then Click Save Button.

Enjoy Blogging and Peace out!!!!