Showing posts with label How to. Show all posts

How to Add Author's Profile Picture Below Post In Blogger

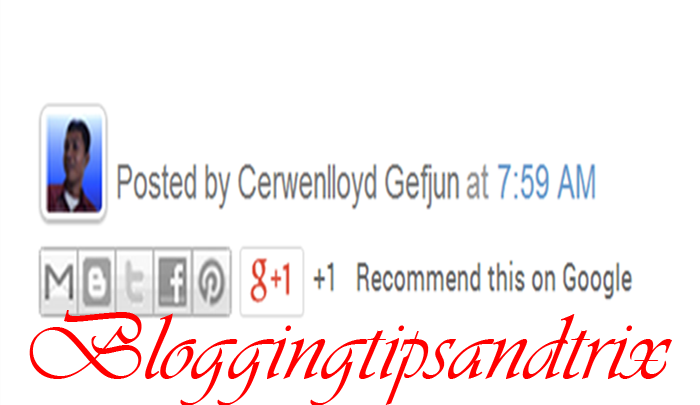
adding author profile picture below post title
Having a problem on how to add your (author) profile picture beside the line "Posted By"in your Blogger blog? You are not wrong in landing this page since I will tell you you the details on how to do that. Just follow the four steps below.Click here for the demo first.

Note:

This tutorial will not take effect if you uncheck your blog post to have a "Posted By". See the screenshot shot below to know what  I mean.
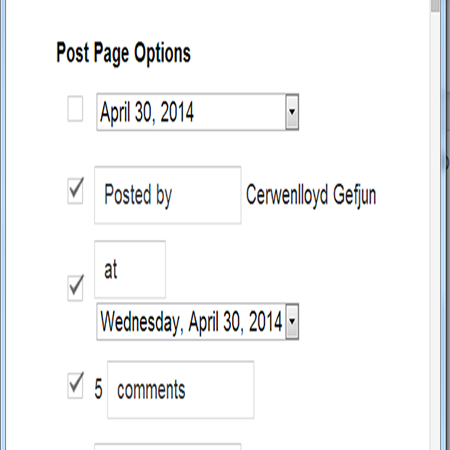


Adding Author's Profile Picture Below Post In Blogspot


Step 1. Go to Blogger Dashboard >> Template >> Edit HTML (Back-up your Template)

Step 2. Find the code below using the Control F. Please select the second occurrence of that code.
<div class='post-footer-line post-footer-line-1'>
Step 3. After finding the code in step 2, please paste the code below just  after it.
<b:if cond="data:post.author == &quot;Cerwenlloyd Gefjun&quot;">
<span class="author"><a href="https://plus.google.com/110772451841046895789/about"><img src="http://4.bp.blogspot.com/-s7omNra0EFc/Ur2GWB60gYI/AAAAAAAAB9E/To8_ASb-O1A/s1600/cerwen+profile+pic.png" style="border: 1px solid #d0d0d0; height: 28px; margin-top: -12px; margin-bottom: 0px; margin-right: -13px; padding: 2px; width: 28px;" /></a></span>
</b:if>


Customization:


  • Replace the red bold text with your own profile name. It must be the EXACT name of your profile name  as it appears in the Blogger profile.

  • Replace the orange bold texts with your Google  plus profile ID.

  • Replace the pink bold texts with your image URL. Click here for help in getting your  image link.

  • And lastly adjust the css which is responsible of the appearance of picture.

         border size and color- increase in number will make your border bigger also.
         height- this your image size
        margin- I set it with top 10px, bottom 0, and right 13px
        padding- which set by 2px
        width- this is the image width

Step 4. Save your Template and you're done.
If you have some questions regarding this post , try to drop some comments at the comment box below.
Thanks for the your valauble time with us!

How to Add Borders to Images in Blogger

add borders to images in blogger
Inserting or adding  images  to Blogger  is necessary to emphasize more of what we are going to deliver to  our rreaders. And in order to make this photo more proffessional in looks and be different from others, we will add borders on it.  Here, in this article I will share to you how to add border(s) to an individual image using HTML .
Before we will go to the steps, let me show you first the different border attributes or styles namely: dotted, dashed, solid, double, groove, ridge, inset and outset. See the demo below:

Dotted
Dashed
Solid
Double
Groove
Ridge
Inset
Outset

Now you have seen those different border styles, it is now time to proceed to the tutorial. Please follow the steps below:

How to Add Borders to Inserted Images in Blogger


Note:

You must have to know first how to get the  image link (url) of your uploaded images  in Blogger before you can apply this trick. Please click this link for assistance.

Step 1. Go to Blogger Dashboard
Step 2. Select a certain post or  you may choose some published posts with images that you want to add borders on it.
Step 3.  Copy the HTMLcode below and paste it in your Blogger Post Editor page. (Your page editor must be switched to HTML Mode).
<img src="http://2.bp.blogspot.com/-YfeHiEQ9oTQ/UxiIwApRJ9I/AAAAAAAACH8/KXBGtzcNT2g/s1600/add+borders+to+blog.png" style="background-color: white; border: 3px dashed orange; margin-left: auto; margin-right: auto; padding: 1px;" />

Customizations:


- Replace the black bolded texts w ith image link (url) of your photo.
- Background color is white, you may change it according to your blog's color.
- Border attributes here are 3px which the size, greater numerical value will mean a larger size also. Dashed is the border style, you can change it with the different border styles as  shown in the demo above.  And orange for the color of the border.
- For the padding, greater numerical value will make your borders to pull out from your image. See the demo below


Note:

The first image has a padding of 10px while the second one has only 1px.

Step 4. Publish or update  your post and you are done. Congrats! :-)
Peace Buddies!!!

How to Remove Showing Posts With Label in Blogger

The "Showing posts with label" notification  always shows  above the posts everytime time you click on a label link. I know some of  us don't want to show it in our blogs since it is quiet useless and just occupy additional space in our post. If that is the case, this article is useful for you.
how to remove showing post with label

Removing "Showing post with label...show all posts" (Version 1)


Step 1. Go to  BloggerDashboard >> Template >> Edit HTML (always back-up your template)
Step 2. Click anywhere inside the template code, then search - using CTRL+F -  and find the code below:
<b:includable id='status-message'>
Step 3. After you have found it, click on the sideways arrow before to it, to expand the rest of the code.

Step 4. Below is this code that you need to remove,
<b:includable id='status-message'>
      <b:if cond='data:navMessage'>
      <div class='status-msg-wrap'>
        <div class='status-msg-body'>
          <data:navMessage/>
        </div>
        <div class='status-msg-border'>
          <div class='status-msg-bg'>
            <div class='status-msg-hidden'><data:navMessage/></div>
          </div>
        </div>
      </div>
      <div style='clear: both;'/>
      </b:if>
    </b:includable>

Step 5. Remove all that set of code and  replace it with the code below,
<b:includable id='status-message'>
<b:if cond='data:navMessage'>
<div>
</div>
<div style='clear: both;'/>
</b:if>
</b:includable>

Step 6. Save your template and you're done. Enjoy!  : >)

Removing "Showing post with label...show all posts" (Version 2)


Here is another way of removing it from your blog using only a simple  css on it. Please follow  the steps below:
Step 1. From your Blogger Dashboard, go to  Template and click Edit HTML.
Step 2. Search the code below
]]></b:skin>

Step 3.  Just above the code in step 3, add the css  below,
.status-msg-wrap{
display:none;
}
Step 4. Save your template and say Bravo!

How to Hide Site/Blog From Google Search Engine Result Page?

Do you want to hide your blog  from Google Search Engine Result Page? Sounds Weird! But for your blog who is designed for private use only, then  this tutorial is the answer! Although displaying your blog in search engine results page (SERP) is important to bring more organic traffic and money on it  but   through Blogger.com settings you can now hide it  by  just following the few easy steps below.


Step 1. Go to Blogger Dashboard
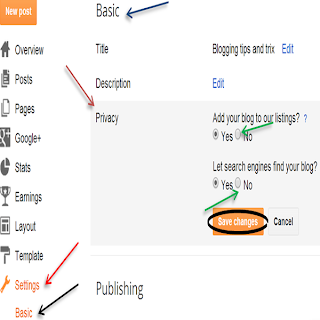
Step 2. Click  Settings >> Basic
Step 3. After clicking the Basic button, click  now the "Edit" link in  your Privacy settings.

Note: There are two settings (which are listed below) under privacy settings with corresponding  "Yes" and "No" options.

1.Add your blog to our listings


A Listed blog may be linked to from Blogger.com, such as the Blogger home page and Next Blog. If you select "No" your blog will not appear in these places, but it will still be available on the Internet. This blog will still be displayed on your profile unless you hide it.

2. Let search engines find your blog


If you select "Yes" blogger will include your blog in Google Blog Search and ping Weblogs.com. If you select "No", everyone can still view your blog but search engines will be instructed not to crawl it. If there are links to your blog from other websites, search engines may still suggest your blog in response to queries.
hide blog from google search


Check "No"  buttons for both above settings and click "Save changes".
You have now successfully hide (put your blog in a more private settings) from search engines in blogger listings.

How to Add Translate Widget with Flags or Banner in Blogger

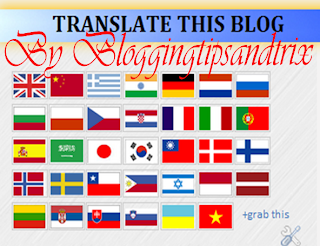
Adding a translate widget in Blogger seems to be old but still have a big impact  on your user's experience once they read your contents. I believe others prefer to read content online with their own language  and today I  gonna share to you on how to add this kind of widget in two simple manner. Without any adieu! Let us now start with the process.
add translator widget


How to Add Translate Widget with Flags or Banner in Blogger


You can install this widget directly to your sidebar by clicking this link
Step 1. Go to Blogger Dashboard
Step 2. Click Lay- out
Step 3. Hit the Add a Gadget button
Step 4. Scrool down and select HTML/Javascript button
Step 4. Copy the code below and paste it inside the blank page in your HTML/Javascript button
<style type="text/css">.w2bgft{padding:5px;}.w2bgft input{padding:1px;margin-left:1px;border:1px solid #ccc;}.w2bgft input:hover{border:1px solid #ff0000;}</style><div class="w2bgft"><!--Google Flag Translator by  Bloggingtipsandtrix.blogspot.com--><form action="http://www.google.com/translate"><script language="JavaScript">document.write ("<input name=u value="+location.href+" type=hidden>")</script><noscript></noscript><input value="en" name="hl" type="hidden"/><input value="UTF8" name="ie" type="hidden"/><input value="" name="langpair" type="hidden"/><input onclick="this.form.langpair.value=this.value" title="English" value="auto|en" type="image" height="20" src="http://www.google.com/images/flags/uk_flag.gif" width="30" name="langpair"/><input onclick="this.form.langpair.value=this.value" title="Chinese Simplified" value="auto|zh-CN" type="image" height="20" src="http://www.google.com/images/flags/cn_flag.gif" width="30" name="langpair"/><input onclick="this.form.langpair.value=this.value" title="Greek" value="auto|el" type="image" height="20" src="http://www.google.com/images/flags/gr_flag.gif" width="30" name="langpair"/><input onclick="this.form.langpair.value=this.value" title="Hindu" value="auto|hi" type="image" height="20" src="http://www.google.com/images/flags/in_flag.gif" width="30" name="langpair2"/><input onclick="this.form.langpair.value=this.value" title="German" value="auto|de" type="image" height="20" src="http://www.google.com/images/flags/de_flag.gif" width="30" name="langpair"/><input onclick="this.form.langpair.value=this.value" title="Dutch" value="auto|nl" type="image" height="20" src="http://www.google.com/images/flags/nl_flag.gif" width="30" name="langpair2"/><input onclick="this.form.langpair.value=this.value" title="Russian" value="auto|ru" type="image" height="20" src="http://www.google.com/images/flags/ru_flag.gif" width="30" name="langpair2"/><input onclick="this.form.langpair.value=this.value" title="Bulgarian" value="auto|bg" type="image" height="20" src="http://www.google.com/images/flags/bg_flag.gif" width="30" name="langpair2"/><input onclick="this.form.langpair.value=this.value" title="Polish" value="auto|pl" type="image" height="20" src="http://www.google.com/images/flags/pl_flag.gif" width="30" name="langpair2"/><input onclick="this.form.langpair.value=this.value" title="Czech" value="auto|cs" type="image" height="20" src="http://www.google.com/images/flags/cz_flag.gif" width="30" name="langpair2"/><input onclick="this.form.langpair.value=this.value" title="Croatian" value="auto|hr" type="image" height="20" src="http://www.google.com/images/flags/hr_flag.gif" width="30" name="langpair2"/><input onclick="this.form.langpair.value=this.value" title="French" value="auto|fr" type="image" height="20" src="http://www.google.com/images/flags/fr_flag.gif" width="30" name="langpair"/><input onclick="this.form.langpair.value=this.value" title="Italian" value="auto|it" type="image" height="20" src="http://www.google.com/images/flags/it_flag.gif" width="30" name="langpair"/><input onclick="this.form.langpair.value=this.value" title="Portuguese" value="auto|pt" type="image" height="20" src="http://www.google.com/images/flags/pt_flag.gif" width="30" name="langpair"/><input onclick="this.form.langpair.value=this.value" title="Spanish" value="auto|es" type="image" height="20" src="http://www.google.com/images/flags/es_flag.gif" width="30" name="langpair"/><input onclick="this.form.langpair.value=this.value" title="Arabic" value="auto|ar" type="image" height="20" src="http://www.google.com/images/flags/sa_flag.gif" width="30" name="langpair2"/><input onclick="this.form.langpair.value=this.value" title="Japanese" value="auto|ja" type="image" height="20" src="http://www.google.com/images/flags/ja_flag.gif" width="30" name="langpair"/><input onclick="this.form.langpair.value=this.value" title="Korean" value="auto|ko" type="image" height="20" src="http://www.google.com/images/flags/kr_flag.gif" width="30" name="langpair"/><input onclick="this.form.langpair.value=this.value" title="Chinese (traditional)" value="auto|zh-TW" type="image" height="20" src="http://www.google.com/images/flags/tw_flag.gif" width="30" name="langpair2"/><input onclick="this.form.langpair.value=this.value" title="Danish" value="auto|da" type="image" height="20" src="http://www.google.com/images/flags/dk_flag.gif" width="30" name="langpair2"/><input onclick="this.form.langpair.value=this.value" title="Finnish" value="auto|fi" type="image" height="20" src="http://www.google.com/images/flags/fi_flag.gif" width="30" name="langpair2"/><input onclick="this.form.langpair.value=this.value" title="Norwegian" value="auto|no" type="image" height="20" src="http://www.google.com/images/flags/no_flag.gif" width="30" name="langpair2"/><input onclick="this.form.langpair.value=this.value" title="Swedish" value="auto|sv" type="image" height="20" src="http://www.google.com/images/flags/se_flag.gif" width="30" name="langpair2"/><input onclick="this.form.langpair.value=this.value" title="Catalan" value="auto|ca" type="image" height="20" src="http://www.google.com/images/flags/cl_flag.gif" width="30" name="langpair2"/><input onclick="this.form.langpair.value=this.value" title="Filipino" value="auto|tl" type="image" height="20" src="http://www.google.com/images/flags/ph_flag.gif" width="30" name="langpair2"/><input onclick="this.form.langpair.value=this.value" title="Hebrew" value="auto|iw" type="image" height="20" src="http://www.google.com/images/flags/il_flag.gif" width="30" name="langpair2"/><input onclick="this.form.langpair.value=this.value" title="Indonesian" value="auto|id" type="image" height="20" src="http://www.google.com/images/flags/id_flag.gif" width="30" name="langpair2"/><input onclick="this.form.langpair.value=this.value" title="Latvian" value="auto|lv" type="image" height="20" src="http://www.google.com/images/flags/lv_flag.gif" width="30" name="langpair2"/><input onclick="this.form.langpair.value=this.value" title="Lithuanian" value="auto|lt" type="image" height="20" src="http://www.google.com/images/flags/lt_flag.gif" width="30" name="langpair2"/><input onclick="this.form.langpair.value=this.value" title="Serbian" value="auto|sr" type="image" height="20" src="http://www.google.com/images/flags/rs_flag.gif" width="30" name="langpair2"/><input onclick="this.form.langpair.value=this.value" title="Slovak" value="auto|sk" type="image" height="20" src="http://www.google.com/images/flags/sk_flag.gif" width="30" name="langpair2"/><input onclick="this.form.langpair.value=this.value" title="Slovenian" value="auto|sl" type="image" height="20" src="http://www.google.com/images/flags/si_flag.gif" width="30" name="langpair2"/><input onclick="this.form.langpair.value=this.value" title="Ukrainian" value="auto|uk" type="image" height="20" src="http://www.google.com/images/flags/ua_flag.gif" width="30" name="langpair2"/><input onclick="this.form.langpair.value=this.value" title="Vietnamese" value="auto|vi" type="image" height="20" src="http://www.google.com/images/flags/vn_flag.gif" width="30" name="langpair2"/><span style="float:right;margin:3px 5px;font-size:10px;"></span></form>< !-- Widget Flag Translator by  Bloggingtipsandtrix.blogspot.com Powered by Google--></div>

Step 5. Save your Template and you are done!

Visit your blog with a new widget that translate content to different languages throughout the globe.
Happy Blogging To Everybody!