Showing posts with label How to. Show all posts

How to delete Facebook uploaded pictures ( with illustrations)

Just recently I was told by my very close friend to make a fan page of her for her to store all her pictures exclusively in that  page. It so happened that  one of the photos   that I  had uploaded was quite not so beautiful so she decided that  I am going to delete that. In this article article I will share you how to delete pictures in Facebook completely.

How do I delete a photo in Facebook?


Note: Keep in mind that once a photo is deleted, you won't be able to get it back. To remove your photo from Facebook:


Click the photo to open it
how to delete pictures in facebook

Click Options on the menu bar below the photo
delete photo in facebook


After clicking Options, select Delete This Photo and click Confirm

Final Words:


You can only delete photos that you've uploaded. If you want someone else's photo removed from Facebook, ask the person who posted it to take it down.

How to Add Fireworks Effects to Blogger

Hello buddies, hope you are  all right there. Christmas season is here already and New Year is quiet approaching. Before this season will end, let me share you a widget related to this very special season by decorating your blog with a fireworks effects. This widget is from mf2fm. Hope you will like this.
add fireworks display in blogger

This script has been tested on and shown to work with the following browsers:
Internet Explorer version 7 and above
Google Chrome version 4 and above
Mozilla Firefox version 2 and above
Apple Safari version 5 and above
Opera version 9 and above (including Opera mobile)
Android Browser version 3

AddingFireworks Effects to Blogger


Step 1. Go to Blogger Dashboard >> Template >> Edit HTML
Step 2. Look for the code below
<head>

Step 3. Just below that code, paste the code below
<script type="text/javascript">
// <![CDATA[
var bits=80; // how many bits
var speed=33; // how fast - smaller is faster
var bangs=5; // how many can be launched simultaneously (note that using too many can slow the script down)
var colours=new Array("#03f", "#f03", "#0e0", "#93f", "#0cf", "#f93", "#f0c");
//                     blue    red     green   purple  cyan    orange  pink

/****************************
*      Fireworks Effect     *
 *Bloggingtipsandtrix.blogspot.com*
****************************/
var bangheight=new Array();
var intensity=new Array();
var colour=new Array();
var Xpos=new Array();
var Ypos=new Array();
var dX=new Array();
var dY=new Array();
var stars=new Array();
var decay=new Array();
var swide=800;
var shigh=600;
var boddie;

if (typeof('addRVLoadEvent')!='function') function addRVLoadEvent(funky) {
  var oldonload=window.onload;
  if (typeof(oldonload)!='function') window.onload=funky;
  else window.onload=function() {
    if (oldonload) oldonload();
    funky();
  }
}

addRVLoadEvent(light_blue_touchpaper);

function light_blue_touchpaper() { if (document.getElementById) {
  var i;
  boddie=document.createElement("div");
  boddie.style.position="fixed";
  boddie.style.top="0px";
  boddie.style.left="0px";
  boddie.style.overflow="visible";
  boddie.style.width="1px";
  boddie.style.height="1px";
  boddie.style.backgroundColor="transparent";
  document.body.appendChild(boddie);
  set_width();
  for (i=0; i<bangs; i++) {
    write_fire(i);
    launch(i);
    setInterval('stepthrough('+i+')', speed);
  }
}}

function write_fire(N) {
  var i, rlef, rdow;
  stars[N+'r']=createDiv('|', 12);
  boddie.appendChild(stars[N+'r']);
  for (i=bits*N; i<bits+bits*N; i++) {
    stars[i]=createDiv('*', 13);
    boddie.appendChild(stars[i]);
  }
}

function createDiv(char, size) {
  var div=document.createElement("div");
  div.style.font=size+"px monospace";
  div.style.position="absolute";
  div.style.backgroundColor="transparent";
  div.appendChild(document.createTextNode(char));
  return (div);
}

function launch(N) {
  colour[N]=Math.floor(Math.random()*colours.length);
  Xpos[N+"r"]=swide*0.5;
  Ypos[N+"r"]=shigh-5;
  bangheight[N]=Math.round((0.5+Math.random())*shigh*0.4);
  dX[N+"r"]=(Math.random()-0.5)*swide/bangheight[N];
  if (dX[N+"r"]>1.25) stars[N+"r"].firstChild.nodeValue="/";
  else if (dX[N+"r"]<-1.25) stars[N+"r"].firstChild.nodeValue="\\";
  else stars[N+"r"].firstChild.nodeValue="|";
  stars[N+"r"].style.color=colours[colour[N]];
}

function bang(N) {
  var i, Z, A=0;
  for (i=bits*N; i<bits+bits*N; i++) {
    Z=stars[i].style;
    Z.left=Xpos[i]+"px";
    Z.top=Ypos[i]+"px";
    if (decay[i]) decay[i]--;
    else A++;
    if (decay[i]==15) Z.fontSize="7px";
    else if (decay[i]==7) Z.fontSize="2px";
    else if (decay[i]==1) Z.visibility="hidden";
if (decay[i]>1 && Math.random()<.1) {
  Z.visibility="hidden";
  setTimeout('stars['+i+'].style.visibility="visible"', speed-1);
}
    Xpos[i]+=dX[i];
    Ypos[i]+=(dY[i]+=1.25/intensity[N]);

  }
  if (A!=bits) setTimeout("bang("+N+")", speed);
}

function stepthrough(N) {
  var i, M, Z;
  var oldx=Xpos[N+"r"];
  var oldy=Ypos[N+"r"];
  Xpos[N+"r"]+=dX[N+"r"];
  Ypos[N+"r"]-=4;
  if (Ypos[N+"r"]<bangheight[N]) {
    M=Math.floor(Math.random()*3*colours.length);
    intensity[N]=5+Math.random()*4;
    for (i=N*bits; i<bits+bits*N; i++) {
      Xpos[i]=Xpos[N+"r"];
      Ypos[i]=Ypos[N+"r"];
      dY[i]=(Math.random()-0.5)*intensity[N];
      dX[i]=(Math.random()-0.5)*(intensity[N]-Math.abs(dY[i]))*1.25;
      decay[i]=16+Math.floor(Math.random()*16);
      Z=stars[i];
      if (M<colours.length) Z.style.color=colours[i%2?colour[N]:M];
      else if (M<2*colours.length) Z.style.color=colours[colour[N]];
      else Z.style.color=colours[i%colours.length];
      Z.style.fontSize="13px";
      Z.style.visibility="visible";
    }
    bang(N);
    launch(N);
  }
  stars[N+"r"].style.left=oldx+"px";
  stars[N+"r"].style.top=oldy+"px";
}

window.onresize=set_width;
function set_width() {
  var sw_min=999999;
  var sh_min=999999;
  if (document.documentElement && document.documentElement.clientWidth) {
    if (document.documentElement.clientWidth>0) sw_min=document.documentElement.clientWidth;
    if (document.documentElement.clientHeight>0) sh_min=document.documentElement.clientHeight;
  }
  if (typeof(self.innerWidth)!="undefined" && self.innerWidth) {
    if (self.innerWidth>0 && self.innerWidth<sw_min) sw_min=self.innerWidth;
    if (self.innerHeight>0 && self.innerHeight<sh_min) sh_min=self.innerHeight;
  }
  if (document.body.clientWidth) {
    if (document.body.clientWidth>0 && document.body.clientWidth<sw_min) sw_min=document.body.clientWidth;
    if (document.body.clientHeight>0 && document.body.clientHeight<sh_min) sh_min=document.body.clientHeight;
  }
  if (sw_min==999999 || sh_min==999999) {
    sw_min=800;
    sh_min=600;
  }
  swide=sw_min;
  shigh=sh_min;
}
// ]]>
</script>

Step 4. Save your template and you're done.

Short Customization:


Just change the color in bold above to change the colors of fireworks above.

If you have encontered any problem related to this fireworks effects widget to Blogger, just leave a comment or message  below. I will help you.
Merry Christmas and Happy a New Year!

How to Add an Auto Scrolling Scrollbar in Blogger

In the past we have as of now demonstrated to you best practices to tweak your scrollbar in blogger with diverse styles, colors and customization. As of late, one of our clients asked us how to include auto scrollbar in blogger that naturally scrolls the page from the through and through. Making your scrollbar scroll naturally is an immaculate approach to marginally constrain your perusers to experience the entire page before leaving your site. In this article, we will demonstrate to you proper methodologies to include an auto scrolling scrollbar in blogger
add auto scrolling scroll bar in blogger

What is a Scrollbar?


A Scrollbar is a GUI (graphical control component) which controls components like content, pictures, features and else other possibilities accessible on the site page. In other straightforward words, its a long thing bar spotted at the right half of your screen by which a component can be scrolled with the assistance of a mouse.

It additionally has of two upwards and downwards bolts that helps you to span up or down the page. It is for pages as well as discover them on other programming like Word, Windows, Apple OS and so forth.

The most effective method to include Auto Scrolling Scrollbar in Blogger?


The primary thing you'll be obliged to do is to first login to your blogger account and select a site on which you'll like to include auto parchment bar. Presently go to Template &gt;&gt; Edit HTML &gt;&gt; scan for the completion  label (you will discover it the end of the codes). In the wake of discovering  just above it glue the accompanying code:

<script>
    /*<![CDATA[*/
    var div = $('body');
    setInterval(function() {
            var pos = div.scrollTop();
            div.scrollTop(pos + 2);
        }, 10)
        /*]]>*/
</script>

<style>
    body {
        overflow-y: scroll;
    }
</style>


You can increase the scroll speed by reducing the 10 in the above code.  While, increasing 10 to 100 or 1000 would make the scroll work slowly.

This technique can also be applied to a div, if you want to scroll only a certain element on your site. All you need to do is to replace the body to a div name from the above code.

 Like for <div id=”test”> the first line of the code would become  var div = $('#test'); and vice versa.

Once everything is done, save the template by pressing “Save Template” button located at the top of your screen. Congratulations, you have successfully installed the auto scrolling page feature in blogger. If you want to limit this scroll to certain pages then check out how to show or hide a widget on certain URLs in blogger.

We hope this article has helped everyone in learning how to add a auto scrolling scrollbar in blogger.  Share your thoughts about this small but useful tip in the comment section below. If you have any suggestion or requests feel free to write us using our contact us page.

How to Create Custom Webkit Scrollbar in Blogger Blog

Would you like to upgrade the Scroll bar of your site? Parchment bar shows up at the right half of the screen and, it permits clients to span down the page at whatever point they drag there mouse up or down the page. To give an easy to understand experience to your guests, it is fundamental to have a Smooth Scroll bar. On the other hand, there is probably Custom Scroll bar does the employment liberally, yet it is not great. Few days back, our peruser educated us about the brilliant Webkit Scrollbars that he has seen on distinctive sites. Besides, he additionally asked for us to create a comparable one. Thus, in this article we will figure out How to Create Customize Webkit Scrollbar in Blogger Blog? Please take a look at my scrollbar for a live a demo.


Instructions to Add Webkit Scrollbar in Blogger Platform? 


In all honesty, there is no intricacy in this excercise on the grounds that we should do nothing more than to embed a CSS to our topic, and it would do the employment easily. To introduce Webkit Scrollbar in your blogger format consider the accompanying directions.

Step 1. Go To Blogger.com >> Templates >>EDIT HTML >> Proceed.
Step 2. Now in the theme Search for ]]></b:skin> and above it Paste the Following CSS Coding.
/* --- Bloggingtipsandtrix CUSTOM WEBKIT SCROLLBAR IN BLOGGER BLOG --- */
::-webkit-scrollbar {
background:#ddd;
width:10px;
}
::-webkit-scrollbar-thumb {
-webkit-box-shadow: inset 0 0 6px rgba(0, 0, 0, 0.5);
background-image: -webkit-linear-gradient(top, #158aee 20%, #158aee 60%);
}
::-webkit-scrollbar-thumb:hover {
-webkit-box-shadow: inset 0 0 6px rgba(0, 0, 0, 0.5);
background-image: -webkit-linear-gradient(top, #168eca 20%, #168eca 60%);
}
::-webkit-scrollbar-track {
}


Short Customization:


Replace #ddd to change the background of your scrollbar. You can use our color code generator.
Then replace #158aee with the color that you want to see in the scrollbar and the hexadecimal
168eca for its hover effect.
Step 3. After doing all the customization just press the Save button. Now Visit your site and we are sure it wouldn’t let you down. By using the same technique, we can customize many elements of a website. We will soon release their tutorial too so stay tuned with BTAT

How to Uninstall Deep Freeze In my Computer

Here is the very simple steps to uninstall the software Deep Freeze. We will divide this steps into two ways. First, it must first be disabled (put deep freeze software in a thawed state  and then  second, it must be uninstalled.
how to uninstall deep freeze in my computer

To Disable (thawed state) Deep Freeze:


Step 1. Hold down the shift key and double-click on the Deep Freeze icon. Alternatively, you can press Crtl-Alt-Shift-F6. You should now see a password dialog.
Step 2. Enter your password and click OK. If you have not yet entered a password you should be able to click OK without entering anything. You should now see a dialog with boot options.
Step 3. Select "Boot thawed" and click OK. This will disable Deep Freeze on the next reboot.
Reboot your machine. After the machine reboots you are ready to uninstall Deep Freeze.

To Uninstall Deep Freeze:


Step 1. Locate the installation file you used to install Deep Freeze to this machine. By default the name of this file is called "DF5Std.exe" for versions 5.X and "DF6Std.exe" for versions 6.X.
Step 2. Run the installation file (DF5Std.exe or DF6Std.exe).
Step 3. Select the option to "Uninstall"

Note: The software should uninstall and reboot the machine. When the machine reboots, Deep Freeze should be uninstalled.
If you are licensed for deep freeze 'standard' and have forgotten your password, you can email technical support at "support@faronics.com" for further information.

If you are running the 'evaluation' version of Deep Freeze and have forgotten the password, restart the computer and enter the system BIOS settings. Advance the clock by at least 60 days and then restart, this will disable the software.
After the system has started, run the Deep Freeze installation program to uninstall Deep Freeze.
After the computer reboots, re-enter the BIOS and reset the clock to the current date.
You can then re-install Deep Freeze after restarting.

(All 60-Day evaluations stop functioning after 60 Days.
Once the software has expired it can be uninstalled.)

Uninstalling Deep Freeze Via Control Panel


Step 1. Go to Control Panel >>  Add/Remove Programs.
Step 2.  From there select  Deep freeze  program . There will be two options there, Change/Remove. Step 3. Click remove. The program should uninstalled.

How to Add Professional Text and Image Slider In Blogger

Marquee is one of the best tools to use if you want to make a text and image slider in your Blogger blog. In this post I will show on how to use this marquee tool in two different ways. First is we will make your texts slide from right to left and pause it as the mouse passes over (hover) it. Second is we will use images that slide  from right to left, pause it when mouse hover at the center part of the frame and it moves fast upon putting the mouse cursor near at the left side of the frame.
 professional text and image slider for blogger

Demo: Make Text and Image Slider Using Marquee

You may also browse some of  the posts that talks on Image Slider:

How to Make  Text Slider Using Marquee In Blogspot


Step 1. Go to Blogger Dashboard >> Template (back-up) >>Edit HTML
Step 2. Look for the code below,

</head>

Step 3. Just above that code in step 2, place the code below

<script src="https://bloggingtipsandtrix.googlecode.com/svn/marquee_slider.js" type="text/javascript">

Step 4. Save your template and your partly done
Step 5. Go back  to Blogger Dashboard >> Post or New Post
Step 6. Switch your Blogger Post editor page to HTML mode and then paste the code below for the text slider style,


<div class="slider_text" id="marqueetext"> Bloggingtipsandtrix is happy to serve you. Bloggingtipsandtrix  is happy to serve you.  Bloggingtipsandtrix  is happy to serve you. Bloggingtipsandtrix  is happy to serve you. Bloggingtipsandtrix  is happy to serve you.
</div>
<script type="text/javascript">
marqueeInit({
 uniqueid: 'marqueetext',
 style: { //style object for this marquee container (use quotes on both sides of the : as shown)
    'width': '100%',
    'height': '1.6em',
    'color': '#fff',
    'background-color': '#158aee',
    'font-family': 'sans-serif',
    'margin': '0 auto'},
      inc:1, //speed - of marquee slider.
 });

</script>

Step 7. And for the image slider, copy the code below and paste it in your Blogger post editor's page (HTML mode)
<div class="marquee_slider" id="marqueeimage">
<a href="##########" target="_blank"> <img src="***** " /> </a>
<a href="##########" target="_blank"> <img src="*****" /> </a>
<a href="##########" target="_blank"> <img src="***** " /> </a>
<a href="##########" target="_blank"> <img src="*****" /> </a>
<a href="##########" target="_blank"> <img src="***** " /> </a>
<a href="##########" target="_blank"> <img src="*****" /> </a>
<a href="##########" target="_blank"> <img src="***** " /> </a>
<a href="##########" target="_blank"> <img src="*****" /> </a>
</div>
<script type="text/javascript">
marqueeInit({
 uniqueid: 'marqueeimage',
 style: { //style object for this marquee container (use quotes on both sides of the : as shown)
    'width': '400px',
    'height': '100px',
    'color': '#fff',
    'border-top': ' 5px dashed white',
    'border-bottom': ' 5px dashed white',
    'border-left': ' 0px dashed white',
    'border-right': ' 0px dashed white',
    'background-color': '#158aee',
    'font-family': 'oswald',
    'margin': '5px auto'},
 inc:1, //speed - of marquee slider
 mouse: 'cursor driven', //mouseover behavior ('pause' 'cursor driven' or false)
 moveatleast: 4,
 neutral: 150,
 savedirection: true
});
</script>

Customization:

Replace the sign ########### with the link (url) you desired
Change the sign *****  with your image link.
Change 400px  and 100px with your preferred  image width  and height
Replace #158aee with another hexadecimal color.
Change border styles with your own and its numerical value, the bigger the number the larger its size
Change 1 to much higher number to speed up the movement of the slides.

Step 8. Save your work and your done pal. Congrats!


How To Host Javascript Files on Google Code For Free


Google Code is one of  the best sites who can host project  files like Javascript and CSS with Greater Bandwidth. Even though it is possible to include JavaScript Files into Blogger itself but sometimes while editing ,due to Blogger's habit to Escape Code automatically it can become a bit frustrating. Today, I will share to you how to host project files to Google Code. Please follow the simple steps below.

How to Host JS Files to Google Code


Step 1. First you need a (Google) gmail account.
Step 2. Log in to code.google.com and click create a new project as shown in the screenshot below
how to host js files to googlecode.com
Step 3. Give your Project a name without spaces. Now fill all blank spaces with your blog title or as it requires.

hosting js files to googlecode.com
Note: Make sure you set the Version control system as Subversion & the Source code license as Mozilla Public License 1.1 (this is suited for general use)

Step 4. After creating the name of your project, you will be redirected to the Home Screen of your Project which is explained in more detail in the Image below.

how to host js and css files to googlecode
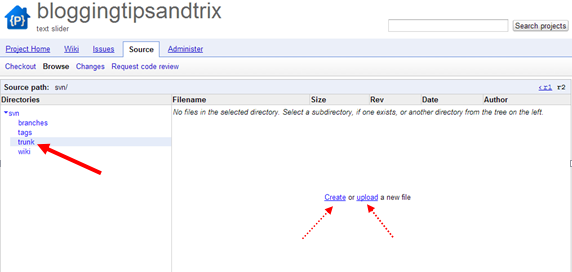
Step 5.  To start hosting your JS files, click  Source >> Browse >> svn >> trunk >> Create or Upload
submit js files to googlecode.com
Note: You can copy and paste your CSS or JavaScript codes into the box directly.

Step 6. After creating or uploading js files  to be hosted to google code , write a  brief description of what its about and then click the Commit button. Type the name for your file, including its extension. (If your file is about JavaScript, then end the name with .js. If it’s a CSS file, add .css extension at the end of the path). Again no space will be left unwritten.

hosting javascript to googlecode.com
Step 7. After the above step, you will be redirected to a Page with the whole code of your project file , there in the right side you will see View raw file particularly at the bottom , click it and copy the URL in the Address bar. This is the exact URL of your JS file.
how to host js files to googlecode


Step 8. Copy and  paste the URL of the JS file that you have copied  step 7 in behalf of the link (highlighted with pink color)     in the script tag below.
<script src="https://bloggingtipsandtrix.googlecode.com/svn/marquee_slider.js" type="text/javascript"></script>


Final words:


The best thing of hosting JS files to Google Code is to make our tutorial pretty and more simple in looks. It saves the loading time of your widgets because the script is located on Google servers. In the other hand, you can save Javascripts on Blogger too but it is advisable to keep your template uncluttered if possible.

How To Add Widget Inside Post Body

Recently I have  a tutorial on how to add adsense code (or any widget) just above post body area in order to increase the click through rate of your adsense ad. Now in this post, I will teach you how to add any widget, it may an ad or any code(recent  comment widget, facebook like box,popular posts widget and the like) that you want to put just beside your written article or  post body section of your blog/site. Have a look at the image below.
how to add widget beside post body section

1. Adding Widget Beside Post Body Individually


Step 1. Go to Blogger >>New Post or (select another post)
Step 2. Copy the code below and paste it  above  your written post/article (it should be in the top most corner) .
<div class="widget-beside-post" style="clear: left; display: inline-block; float: left; height: 400px; margin: 12px 20px -50px 0px; width: 234px;">
Your widget/ad code here....Your widget/ad code here....Your widget/ad code here....Your widget/ad code here....
</div>
Example:

<div class="widget-beside-post" style="clear: left; display: inline-block; float: left; height: 400px; margin: 12px 20px -50px 0px; width: 234px;">
<iframe src="//www.facebook.com/plugins/likebox.php?href=  https://www.facebook.com/pages/Bloggingtipsandtrix/533310753378603?ref=hl&amp;width=234&amp;height=400&amp;colorscheme=light&amp;show_faces=true&amp;border_color&amp;stream=false&amp;header=true&amp;" style="background: #fafafa; border: 0 solid #ddd; height: 337px; overflow: hidden; width: 234px;"></iframe>
</div>


In the above example, I used my facebook like box widget to appear beside my written article.

Step 3. Save/Publish/Update  your work.

2. Adding Widget/Ad To All Your Written Articles/Posts Automatically


Step 1. Go to Blogger Dashboard >> Template >> Edit HTML ( have a back-up of your template) 
Step 2. Find the code below, choose the third occurrence of the code

<data:post.body/>

Step 3. Just above the code in step 2, paste the code below

<b:if cond='data:blog.pageType == &quot;item&quot;'>
<b:if cond='data:blog.pageType != &quot;static_page&quot;'>
<div class="widget-beside-post" style="clear: left; display: inline-block; float: leftheight: 400px; margin: 12px 20px -50px 0pxwidth: 234px;">
Your widget/ad code here....Your widget/ad code here....Your widget/ad code here....Your widget/ad code here....
</div></b:if></b:if>


Step 4. Save your Template and your  done!

Simple customization:


  • Change left to right if you want to position the widget in the right side of your post.

  • Adjust the width  "234px" and the height" 400px" of your widget depending on your likeness.

  • Change the numerical value of the margin by following the standard  sequence which is top "12px", right  20px",bottom " -50px", and left " 0px".

Easy and Simple! isn't it?
If you have problems encountered in following this tutorial, you can leave your comment below. Your thoughts are highly valued here in BTAT.
Always Say A Prayer!

How to Change Width of Body, Post and Sidebar in Blogger

Changing  the width of  body, post and sidebar in Blogger blog is a must in order to make some changes that would be advantageous to your part. First in line is you can put a  wider stuffs/widgets on your sidebar  especially for  your Adsense ad to increase its click through rate (CTR). Secondly, you can add a  larger image size  in your posts which gives your blog a better and professional looks.
change width of body post and sidebar


I had tried to search the tag like " #Outer-Wrapper " ,  "#main-wrapper " and  " #sidebar-wrapper" but none of these code is present in my Blogger's Template so I decided to use the most easy way in changing the width of  my blog's body  and sidebar through  Blogger Template Designer. This technique is safe and more comfortable to use. Without much words to say let us now follow the very simple steps below.

Changing Width of Body and Sidebar in Blogger


Step 1. Go to your Blogger Dashboard >> Template >> Back-up
Step 2. Click Customize
Step 3. Hit  the Adjust widths button. Here, you can adjust the width of your entire blog and its sidebar depending upon your likeness.
change width of post body snd sidebar

Step 4.  Now hit the Apply to Blog button
change width of blog post body snd sidebar


Adjust the width of post by putting CSS


Copy the code below and paste it above the code ]]></b:skin>

.post { background: #fff; margin: 0px 0px 35px;
width:680px;
padding: 10px 15px 10px 10px;
-webkit-border-bottom-right-radius: 10px;
-moz-border-radius-bottomright: 10px;
border-bottom-right-radius: 10px;
box-shadow: 1px 3px 4px rgb(188, 188, 188);
}
Note: 
In my own blog which has an entire width of 1100px and a sidebar of 320px, the most  fit post width is 680px. Just change the value 680px depending upon your entire blog's width. You can immediately see the effect since the preview page is located  in the bottom part of it.

Let me hear your thoughts about this article on how to change width of body, post and sidebar in your blog?
Happy Blogging Buddies ;-)

How to Add ZIP, RAR and Other Files to Blogger via Sites.Google.Com

Sharing files to  our users sometimes need other parties (sites) to host our files exclusively. Blogger doesn't support direct uploading of our files like rar, zip etc.. But don't worry because Google offers us  a tool called  Google Sites as part of their Google Apps productivity suite for anyone to be able to create a team-oriented site where multiple people can collaborate and share files. Here in this tutorial, I will share to you how to put zip,rar and other files to blogger through integrating sites.google.com. Please follow the simple steps below.
Click first the link to see a live demo.

Adding Files to Blogger and Make it Downloadable via Sites.Google.com


Assuming that this is your first time to visit site.google.com
Step 1. Go to sites.google.com >> Create
how to put rar and zip files to blogger

Step 2. Then put your site name as shown in the screenshot below (in yellow arrow) and type the captcha word  then hit the create site (in red arrow) or hit enter.
how to upload files to blogger
Step 3. You will be directed to your  site.google.com homepage. In your hompepage, click the new page icon and type your page name .Hit now the create button.  It is in this page where you are going to store your uploaded files.

store data to blogger through site.google.com

store files to blogger
Step 4. In that page start adding files by clicking the Add Files button.
upload files to site.google.com

Step 5. Now in order to make  this file downloadable to your Blogger site is you will get the link of it by putting your mouse cursor above the arrow pointing down and then right click and click the tab named Copy link address. See the screenshot below.

upload files to blogger
Step 6. Select a post in your blog where you want to put this URL. Adding this link is simply the same as you put  link in your Blogger post editor.
upload files to blogspot via site.google.com

Hope this tutorial answers your query buddies! If you have some questions and suggestions about how to upload files to Blogger  via site.google.com, simply leave it at our comment box.
Happy blogging and enjoy your day pal!

How to Add Hover Effect to Images in Posts

Hi guys!, Today, I will share you  a simple trick on how to add hover effect to all blog images by  adding/putting only a simple css to your template. I know images will add life to your posts and help your article to rank more in search engine result page. And to be more professional, we will add a soft touch on it.
Have your mouse cursor touch the image below for the live demo.
add hover effect on post images

Also Read:
How to Add Different Hover Effects on Blogger Images
How to Put Alt Tag In Blogger Images-Increase Traffic

Putting Hover Effect To All Post Images


Step 1. Go to your Blogger Dashboard >> Template >> Edit HTML
Step 2. Look or find the code below
]]></b:skin>
Step 3. Just above or after the code above, paste the code below

.post-body img {
opacity:0.7;
-webkit-transition: all 0.2s;
-moz-transition: all 0.2s;
-ms-transition: all 0.2s;
-o-transition: all 0.2s;
transition: all 0.2s;
border:5px solid #ddd;
border-radius:10px;
background: #ffffff;
}
.post-body img:hover {
opacity:1.0;
}

Customization (Optional)


  • Change the opacity (0.7) of the image (in no hover effect state).  You can set it as "0" which is completely transparent and "1" is not tranparent.
  • Change the transition speed of the hover effect ( 0.2s). The bigger the value(.5, .6, .7, .8, .9, 1 and so on) the slower it will undergo the hover effect and the lower the value (.4, .3, .2, .1,) the fastest the hover effect is.
  • You can also edit the value of the border which are:
    5px- The bigger the value the bigger is the its border
    solid- There are different border styles  where you can choose here
    #ddd- This the color of your image border. You can select here other (hexadecimal) colors
  • And finally, change the opacity "opacity:1.0" of the opacity  of the post image when the mouse hover is applied on it.
Step 4. Save your template and Congratulations!

Your comments and suggestions are always welcome. Please drop it at our comment box below.
Peace! #: )

How to Recover Files From Your Infected Flash/USB Drive

Recovering files from your infected flash drive is a big a problem especially if you had stored on  it some of your data about your blogging activities. This is what happened to one of  my friends and   me as well. Here, I  am going to show you what I have done in order to recover those hidden files caused by viruses through command prompt in windows operating system.


Recover Files/Data From Your Infected Flash Drive


Step 1. Insert your Flash/USB drive which is infected and open it.
Step 2. Click Start Button (this is the windows icon) . Then type CMD in the blank provided and hit or click the cmd button. See the screenshot below.
recover files from infected flash drive
Step 3.Find the drive letter for your connected USB (infected) drive. For Example, E:
Step 4. In command prompt, type
E:
recover data from  virus attacked usb

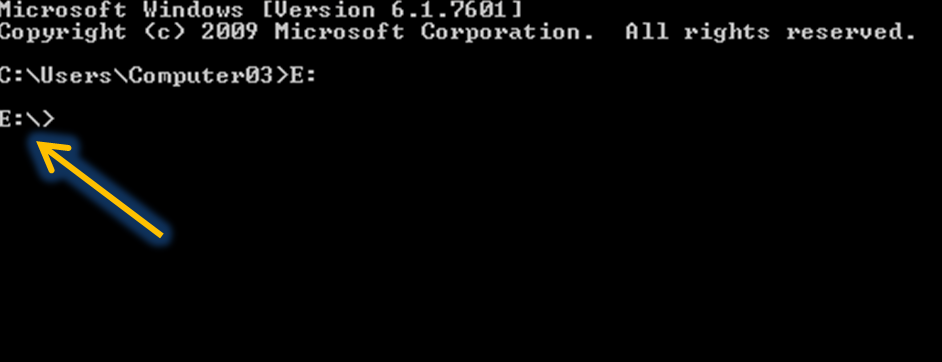
Step 5. Then click enter. Command Prompt will show E:\>
restore files from infected usb

Step 6. Then type the set of letters next to it.

attrib -s -h /s /d *.*

retrieve files from infected usb
Note: Make sure that you put space between each elements in the code.

Step 7.  Hit enter and wait for few seconds.
Let me know if you have some questions regarding this post.That's all budies! * :-)

How To Create Professional Image Slideshows with Jquery In Blogger


Having a stunning image  slideshow is not only for  the one who runs an image blog.  It can be also used to improve your user's experience and in return will increase blog traffic. Furthermore, it will boast your readers to discuss or comment since people will be more interactive if they will not only read texts but also see  images. Search engine robot will appreciate more to your post which lead to a better  position in search engine results page. I've learned this trick from MBT and do some changes on the script,css and the HTML to have a difference. Before we will go the tutorial, please see first the live demo.
image slideshow in blogger

Make Stunning Image Slideshow With Jquery For Your Blogger Blog


Step 1. Go to your Blogger Dashboard >>  Post  or any post you want
Step 2. Copy the  the code below and paste it in your Blogger Post editor page  ( be sureto  switch it to HTML mode).


<script src="http://ajax.googleapis.com/ajax/libs/jquery/1.4.2/jquery.min.js" type="text/javascript"></script>
<script src="http://s3slider-original.googlecode.com/svn/trunk/s3Slider.js" type="text/javascript"></script>
<script type="text/javascript">
    $(document).ready(function() {
   $('#BTT-slider').s3Slider({
      timeOut: 3000
   });
});
</script>
<style>
#BTT-slider {
   width: 590px; /* Keep it 20px-40 px greater than ACTUAL Image size */
   height: 335px;
   position: relative;
   overflow: hidden;
   margin-left: 0;
}
#BTT-sliderContent {
   width: 590px;
   position: absolute;
   top: 0;
   margin-left: 0;
}
.BTT-sliderImage {
   float: left;
   position: relative;
   display: none;  top: 0;
   border:1px solid #ddd;
}
.BTT-sliderImage span {
position: absolute;
    font: 10px/15px sans-serif,Arial, Helvetica;
    padding: 10px 10px;
    background-color: #000;
    color: #fff;
    filter:'alpha(opacity=70)';
    -moz-opacity: .5;
    -khtml-opacity: .5;
    opacity: .5;
    text-align:justify;
}
.BTT-sliderImage span a {
text-decoration:underline;
color:#FE6602;
}
.clear {
   clear: both;
}
.top {
    top: 0;
    left: 0;
    width: 570px !important;
    height: 70px;
}
.bottom {
    bottom: 100px;
    left: 0;
    width: 570px !important;
    height:70px;
}
.left {
    left: 0;
    top: 0;
    width: 100px !important;
    height: 335px;
}
.right {
    right: 30px;
    bottom: 90px;
    width: 100px !important;
    height: 335px;
}
</style>

<br />
<div id="BTT-slider">
<ul id="BTT-sliderContent">
<li class="BTT-sliderImage"> 
<a href="http://www.bloggingtipsandtrix.blogspot.com/"><img src="IMAGE URL HERE" /></a>
<span class="top"><h3>
FIRST HEADING HERE</h3>
DESCRIPTIONS HERE</span>
</li>
<li class="BTT-sliderImage">
<a href="http://www.bloggingtipsandtrix.blogspot.com/"><img src="IMAGE URL HERE" /> </a>
<span class="right"><h3>
SECOND HEADING HERE</h3>
DESCRIPTIONS HERE</span>
</li>
<li class="BTT-sliderImage">
<a href="http://www.bloggingtipsandtrix.blogspot.com/"><img src="IMAGE URL HERE" /></a>
<span class="bottom"><h3>
THIRD HEADING HERE</h3>
DESCRIPTIONS HERE</span>
</li>
<li class="BTT-sliderImage">
<a href="http://www.bloggingtipsandtrix.blogspot.com/"><img src="IMAGE URL HERE" /> </a>
<span class="left"><h3>
FOURTH HEADING HERE</h3>
DESCRIPTIONS HERE</span>
</li>
<div class="clear BTT-sliderImage">
</div>
</ul>
</div>
<br />


Note: Remove the (code in red bolded texts ) jQuery library in the first line of this set of code if you had already added a jQuery library in your template.


Customization


Replace the link "http://www.bloggingtipsandtrix.blogspot.com/"with your own URL.
Change "IMAGE URL HERE"with the URL of your image. See here how to get the image url of the image.
Replace the Italic bold texts "FOURTH HEADING HERE and DESCRIPTIONS HERE" with your heading and descriptions respectively.
If you want to see the appearance of the slider from left and so on , write it at the first span class and the next position as well.
Change the   timeOut: 3000 to your prefered lapse time of the slider to appear. The higher the number the slower it to appear and the lesser the time is the more fast the next image slide  to appear.


How to Add Another Image Slide to the Slider


Simply add the code below above the line <div class="clear BTT-sliderImage">
<li class="BTT-sliderImage">
<a href="http://www.bloggingtipsandtrix.blogspot.com/"><img src="IMAGE URL HERE" /> </a>
<span class="left"><h3>
FOURTH HEADING HERE</h3>
DESCRIPTIONS HERE</span>
</li>
Step 3. Save your work and cheers ;-)

How to Disable Copying Content In Your Blogger Blog

It takes a lot of time to make post and publish it the same. But it is depressing when some people try to copy it very easy and worst if they don't give any credits to you as the maker of it. In this post, I will share to you how to  make your blog content not be copied from  others. Please follow the steps below:

Prevent Copying Content From Your Blog


Step 1. Go to your Blogger Dashboard >> Template
Step 2. Click Edit HTML (always back -up your template)
Step 3. Find the code below in your Blogger template editor's page
]]></b:skin>
Step 4.  Just above the code in step 3, paste the code below
.post {-webkit-user-select: none; -khtml-user-select: none; -moz-user-select: -moz-none; -ms-user-select: none; user-select: none;}
Note: The code (step 4) above is responsible for enabling all the texts of your post not to be copied by your readers.


Step 5. Save your template and relax ;-)

Now, if you're sharing a set of codes to your readers like what I am doing in this blog and want  only to enable my readers to copy the set of codes inside the blockquote. Then use the code below.
-webkit-user-select: text; -khtml-user-select: text; -moz-user-select: text; -ms-user-select: text; user-select: text;}

Note: Paste the above code inside your blockquote code, see example below
.post blockquote {
background: #f2f1f1 url(https://blogger.googleusercontent.com/img/b/R29vZ2xl/AVvXsEiXe_Xq6WfuP0pNM1Y9zdOTKe7KD0VeL1xXaodBIHlnK1tj13ZL0BhUw1xUMvSzmc2lw_vihS8LqVZcN2RKBT5En24L6H1jPoNqELH_rtfLMNygqE9m_crB9b2j7ZviQnBDQqeEUq0z5vY/s620/blockquote+2.png)no-repeat bottom center;
background-position: ;
margin: 0 5px;
padding: 10px 14px 51px 45px;
font-size: 0.5em;
font: normal 0.8em "Verdana",Arial, Georgia,Times, serif;
border-top: 1px solid #158aee;
border-right: 1px solid #158aee;
border-left: 1px solid #158aee;
border-bottom: 1px solid #158aee;
-webkit-user-select: text; -khtml-user-select: text; -moz-user-select: text; -ms-user-select: text; user-select: text;
}
Note: Still you need to paste the code in step 4 in order to disable copying the texts in your post but with the exception of  the code/texts inside your blockquote.

If you have questions or suggestions in this article, please leave it at ou comment box below
Peace Buddies! :-}


How To Add Texts Below Post Comment Updated!

In my prevoius tutorial about "How to Add Texts Below Post a Comment section Version 1", it was stated there that you can add texts or direction for your your readers to have direction  in writing  there comments in order to avoid spam or chessy comments from them. But the problem is, if there's someone who already added a comments at the comment box, those lines of texts or direction will automatically disappear. Here in this tweak, I will show the steps on how to add texts in your template in order to display it even if someone has already added a comments on your post. Please follow the very easy steps below.

Also Read: Changing "Post a Comment" With Image and Text

Add Texts Below "Post A Comment" Updated!


Step 1. Go to your Blogger Dashboard >> Edit HTML (then click Back-up/Restore for your reference).
Step 2. Find the code below by clicking first anywhere  inside your template editor's page then  use the  Control F (in your mouse).
put texts below post a comment

<h4><data:post.commentLabelFull/>:</h4>
Note: Choose the second occurrence of the code.
 Step 3. Just after or below that code in step 2. is the place where you will add the your texts or direction
Here is the sample of texts:

<br/><br/>
    <b><span style="color: red;"><u>Read Comment Policy</u></span></b><br/><br/>
Your feedback is always appreciated. We will try to reply to your queries as soon as time allows.
<br/>
<br/>
    <b><span style="color: red;">Note:</span></b>
    <br/><br/>
    <b>No Cheesy or spam comments.</b>
<br/>
<br/>
 Best Regards,
<br/>
<br/>
  Your Name Here
Step 4. Now, if you want to add texts just beside the number of comments for example (1 comment)
Simply look the symbol ":" with no (quotation). You can found this symbol just above the code in Step 2. Please your texts just after it. Please see the sreenshot below.
add texts below post a comment

put texts beside the comments

Step 4. Save your Template and you're done!
If you have some questions or suggestions regarding this article, please drop it at our comment box below.
Happy Blogging pal ; )

How To Customize Blogger Blog Using Template Designer

Adding css to our template makes our blog more pretty to look but sometimes we face encounter especially if we are new in using the new Blogger template design. We find difficulty in searching this
code ]]></b:skin>.  But don't worry because there is still another and more easy way of putting the css code in your template and that this through Template Designer.

Also Read: How to Use the New Blogger Template

(Supposing that you are going to add borders to your sidebar and below is the set of code).

.sidebar h2 {

border-top:1px solid #000000;
border-right :1px solid #000000;
border-bottom :1px solid #000000;
border-left :5px solid #000000;

margin- top;0
margin- right;0
margin- bottom;0
margin- left;0
padding:0 0.2em;
line-height:1.5em;
}
Simply follow the steps below.
Step 1. Go to your Blogger Dashboard >> Customize
add css through template designer

Step 2. Click Advanced then scroll down and select  Add CSS

Step 3. At the right side is a blank field, this is intended for the css area. Paste the css code above in this place.

Step 4. And finally click the Apply to Blog button

Note:

  • You can only access or edit those CSS using this technique whom you added manually in your Blogger Template,meaning not the default one.
  • There's  no need to put the tag <style> you css here</style>.
  • If you replace or change a new template on your blog, all the css that you  have added will be automatically be deleted.

Hope  this tutorial is helpful to you in some other ways. God Bless Pal!

How To Add Advertise Here In Blogger Blog

The most interisting part of our blogging career is we know how to monetize our blog contents. In this tutorial, I will show you how to put "Advertise Here" widget anywhere in your blog like above or below  your post, sidebar, above post title,or in your footer section. Have a look first at the demo below.
DESCRIPTION-OF-AD
 DESCRIPTION-OF-AD
 DESCRIPTION-OF-AD
 DESCRIPTION-OF-AD

Adding Advertise Here (125 x 125) In Your Blog


Also read:


How To Add Table In Your Blogger Blog 
Customize Tables in Blogspot

To put Ad slots  like above sample, just copy the below code  and paste it where ever you want to display Ad Slots on your blog as long as it is in good looking area.
<div align="center">
<table bgcolor="#ffffff" border="0" cellpadding="2" cellspacing="6" style="width: 250px;">
<tbody>
<tr>
<td><center>
<a href="ADVERTISER'S LINK HERE" rel="nofollow"><img alt="AD DESCRIPTION" border="0" height="125" src="IMAGE-BANNER-URL" width="125" /></a></center>
</td>
<td><center>
<a href="ADVERTISER'S LINK HERE" rel="nofollow"><img alt="AD DESCRIPTION" border="0" height="125" src="IMAGE-BANNER-URL " width="125" /></a></center>
</td>
</tr>
<tr>
<td><center>
<a href="ADVERTISER'S LINK HERE" rel="nofollow"><img alt="AD DESCRIPTION " border="0" height="125" src="IMAGE-BANNER-URL " width="125" /></a></center>
</td>
<td><center>
<a href="ADVERTISER'S LINK HERE" rel="nofollow"><img alt="AD DESCRIPTION" border="0" height="125" src=" IMAGE-BANNER-URL " width="125" /></a></center>
</td>
</tr>
</tbody></table>
</div>

Customization:


  • Replace ADVERTISER'S LINK HERE with the website link of your advertiser.
  • Replace AD DESCRIPTION with the corresponding short snippet/description of the advertiser's ad.
  • Replace IMAGE-BANNER-URL with the image link of your advertiser's ad.
  • And finally replace 250 ( this is responsible for the distance between ad slots) according to your preference.

Now if you want to use a 250 x 250 ad slot in your blog as shown below, you can can use the   HTML code below:
DESCRIPTION-OF-AD
<div align="center">
<table bgcolor="#ffffff" border="0" cellpadding="2" cellspacing="6" style="width: 265px;">
<tbody>
<tr>
<td><center>
<a href="ADVERTISER'S LINK HERE" rel="nofollow"><img alt="AD DESCRIPTION" border="0" src="IMAGE-BANNER-URL" height="250" width="250" /></a></center>
</td>
</tr>
</tbody></table>
</div>

If you use another ad size like 90 x 480, please use the HTML code below:
DESCRIPTION-OF-AD
<div align="center">
<table bgcolor="#ffffff" border="0" cellpadding="2" cellspacing="0" style="width: 265px;">
<tbody>
<tr>
<td><center>
<a href="ADVERTISER'S LINK HERE" rel="nofollow"><img alt=" AD DESCRIPTION" border="0" src="IMAGE-BANNER-URL" height="90" width="480" /></a></center>
</td>
</tr>
</tbody></table>
</div>


Note:


Simply change the height and the width of your ad slot depending on your need.
Then don't forget to save your work.

Hope this will help you attract more sponsors in your blog
Happy Blogging to all of us!