How To Add Multiple Author Profile Image Below Post Title In Blogger

Previously, I have posted a tutorial about how to add an author profile image just below post title for a single author blog.  Today, I am going to show you how to add an author profile picture in a multi-author blog. This post is almost the same with that previous tutorial, the only difference is, we need another HTML code to make the profile pic of your co-members to appear just below your post title.  See the screenshot below and the live demo here.

This is necessary if you are running a blog with team of few members (i.e., multi-author blog), then you may get confused about adding an author box for each author or contributor. Displaying the author profile image  by adding the HTML code is a common practice followed by several bloggers. But it is a pretty irritating job to add  an author profile pic every time when they post the article on your blog. So, if you are looking for a solution for it, then today you are at right place. You can add an author bio widget for each team member to your blog by adding HTML code just once in your template.  Without so much word  to say, Let's check out by following the simple steps  below.

Also Check: How To Add Guest  Author Box In Blogger

Step 1. Go to Blogger Dashboard >> Template >> Edit HTML (back- up your template, this is necessary for your reference)
Step 2. Find the code below but choose the second one.
<span class='post-author vcard'>
Step 3. Below that code in step 2 is a code which may look like this:

<b:if cond='data:top.showAuthor'>
          <data:top.authorLabel/>
            <b:if cond='data:post.authorProfileUrl'>
              <span class='fn' itemprop='author' itemscope='itemscope' itemtype='http://schema.org/Person'>
                <meta expr:content='data:post.authorProfileUrl' itemprop='url'/>
                <a class='g-profile' expr:href='data:post.authorProfileUrl' rel='author' title='author profile'>
                  <span itemprop='name'><data:post.author/></span>
                </a>
              </span>
            <b:else/>
              <span class='fn' itemprop='author' itemscope='itemscope' itemtype='http://schema.org/Person'>
                <span itemprop='name'><data:post.author/></span>
              </span>
            </b:if>
        </b:if>
<span class='post-timestamp'>
        <b:if cond='data:top.showTimestamp'>
          <data:top.timestampLabel/>
        <b:if cond='data:post.url'>
          <meta expr:content='data:post.canonicalUrl' itemprop='url'/>
          <a class='timestamp-link' expr:href='data:post.url' rel='bookmark' title='permanent link'><abbr class='published' expr:title='data:post.timestampISO8601' itemprop='datePublished'><data:post.timestamp/></abbr></a>
        </b:if>
        </b:if>
      </span>
Step 4. Delete all that code in step 3.
Step 5. Next is find the code below but again please choose the second one.
.<div class='post-header-line-1'/>
Step 6. Just below that code, paste the code below.

<span class='post-author vcard'>
<b:if cond='data:post.author == &quot;AuthorName&quot;'>
<span class='author'><a href='Author-Profile-URL'><img src='https://blogger.googleusercontent.com/img/b/R29vZ2xl/AVvXsEiYAS7NywmEOZ-z_8YX5eAZraE7H-b-_dXf837BD3KuczrnzHUP3EFTrXPYOMJpi0Fctw_oJA8XQTB-Gm87iVibwX2jVi91fvvy-JTR5F9b2ph4JpXJdI3mVFGeCxOk9SUBZbRvNnHeQnE/s1600/cerwen+profile+pic.png' style='margin-bottom: -3px; margin-right: 1px; padding: 2px; height: 24px; width: 24px; border:1px solid #d0d0d0; '/></a></span>
</b:if>
        <b:if cond='data:top.showAuthor'>
          <data:top.authorLabel/>
            <b:if cond='data:post.authorProfileUrl'>
              <span class='fn'>
                <a expr:href='data:post.authorProfileUrl' itemprop='author' rel='author' title='author profile'>
                  <data:post.author/>
                </a>
              </span>
            <b:else/>
              <span class='fn'><data:post.author/></span>
            </b:if>
        </b:if>
      </span>

<span class='post-timestamp'>
        <b:if cond='data:top.showTimestamp'>
          <data:top.timestampLabel/>
        <b:if cond='data:post.url'>
          <meta expr:content='data:post.canonicalUrl' itemprop='url'/>
          <a class='timestamp-link' expr:href='data:post.url' rel='bookmark' title='permanent link'><abbr class='published' expr:title='data:post.timestampISO8601' itemprop='datePublished'><data:post.timestamp/></abbr></a>
        </b:if>
        </b:if>
      </span>

Customization of the above code:


1. Replace the blue bold text with your own image url. Click here on how to get the image url of your image.
2.To change your image size, just edit or replace 24 px

Step 7.
 Now, if you have another author(s) that contribute to your blog, simply add the code below just above <b:if cond='data:top.showAuthor'>

<b:if cond='data:post.author == &quot;junjun candol&quot;'>
<span class='author'><a href='https://www.blogger.com/profile/17436144636923330521'><img src='https://blogger.googleusercontent.com/img/b/R29vZ2xl/AVvXsEhJjepSawZ6klomevv6cfzcziZcal_bv5VOH_mOXvHR5XbVKiB-wKWyWNCO2xXrR4r3xBUBD5l34HI5dWEhfWKJxSkxfY3iVHwmGkDABYOw4i_rUhlxIT5Y3jVXuXsDLXAHOMatQisVEi7G/s1600/love.jpg' style='margin-bottom: -5px; margin-right: 3px; padding: 2px; height: 28px; width: 28px; border:1px solid #d0d0d0; '/></a></span>
      </b:if>

Note:

1. Replace jun-jun candol with the correct author profile of your co-member.
2. Change https://www.blogger.com/profile/17436144636923330521  with his author profile.
3. Replace https://blogger.googleusercontent.com/img/b/R29vZ2xl/AVvXsEhJjepSawZ6klomevv6cfzcziZcal_bv5VOH_mOXvHR5XbVKiB-wKWyWNCO2xXrR4r3xBUBD5l34HI5dWEhfWKJxSkxfY3iVHwmGkDABYOw4i_rUhlxIT5Y3jVXuXsDLXAHOMatQisVEi7G/s1600/love.jpg with his image link respectively.

Hope you liked this complete tutorial on 'how to add multiple author profile below post title'. Let me know your valuable feedbacks about this guide and also share this article with your friends. For more updates, like us on Facebook and subscribe us. Thank You pal!

How to Add Author's Profile Picture Below Post Title In Blogger

Adding author's profile image below post title or above post body is quiete professional in looks since your reader will see or know first who wrote such particular article in your blog.This tutorial will  not be applicable if your blog is run with multi authors but don't worry because I have a separate  tutorial on that topic.
You can see it above this post for the live demo.
add author image above post body


Also Read:

How to Add Author's Profile Pic Beside Post Title
How To Add Author's Profile Picture Below Post In Blogger

Adding Author's Profile Image Just below Your Post Title


Step 1. Go to Blogger Dashboard >> Template >> Edit HTML (back- up your template for your reference)
Step 2.  Find the code below by using the Control F of your keyboard.

Note: There are two occurrences of the code, please choose the second one.
<span class='post-author vcard'>
Step 3. Next to the code in step 2 is a set of codes which may look like the code below:

<b:if cond='data:top.showAuthor'>
          <data:top.authorLabel/>
            <b:if cond='data:post.authorProfileUrl'>
              <span class='fn' itemprop='author' itemscope='itemscope' itemtype='http://schema.org/Person'>
                <meta expr:content='data:post.authorProfileUrl' itemprop='url'/>
                <a class='g-profile' expr:href='data:post.authorProfileUrl' rel='author' title='author profile'>
                  <span itemprop='name'><data:post.author/></span>
                </a>
              </span>
            <b:else/>
              <span class='fn' itemprop='author' itemscope='itemscope' itemtype='http://schema.org/Person'>
                <span itemprop='name'><data:post.author/></span>
              </span>
            </b:if>
        </b:if>
<span class='post-timestamp'>
        <b:if cond='data:top.showTimestamp'>
          <data:top.timestampLabel/>
        <b:if cond='data:post.url'>
          <meta expr:content='data:post.canonicalUrl' itemprop='url'/>
          <a class='timestamp-link' expr:href='data:post.url' rel='bookmark' title='permanent link'><abbr class='published' expr:title='data:post.timestampISO8601' itemprop='datePublished'><data:post.timestamp/></abbr></a>
        </b:if>
        </b:if>
      </span>

We should remove the code above because that is responsible for line " Posted By" with the corresponding date of the post. You can see this line just below your post or article written. See the screenshot below.
show author profile image below post title


Step 4.  After deleting the code above the next  thing is you are going to find the code below. Again choose the second occurrence of the code.
<div class='post-header-line-1'/>
Step 5. Just below it, paste the following code:
<span class='post-author vcard'>
<b:if cond='data:blog.pageType == "static_page"'>
<b:if cond='data:post.author == &quot;AuthorName&quot;'>
<span class='author'><a href='Author-Profile-URL'><img src='https://blogger.googleusercontent.com/img/b/R29vZ2xl/AVvXsEiYAS7NywmEOZ-z_8YX5eAZraE7H-b-_dXf837BD3KuczrnzHUP3EFTrXPYOMJpi0Fctw_oJA8XQTB-Gm87iVibwX2jVi91fvvy-JTR5F9b2ph4JpXJdI3mVFGeCxOk9SUBZbRvNnHeQnE/s1600/cerwen+profile+pic.png' style='margin-bottom: -3px; margin-right: 1px; padding: 2px; height: 24px; width: 24px; border:1px solid #d0d0d0; '/></a></span>
</b:if></b:if>
        <b:if cond='data:top.showAuthor'>
          <data:top.authorLabel/>
            <b:if cond='data:post.authorProfileUrl'>
              <span class='fn'>
                <a expr:href='data:post.authorProfileUrl' itemprop='author' rel='author' title='author profile'>
                  <data:post.author/>
                </a>
              </span>
            <b:else/>
              <span class='fn'><data:post.author/></span>
            </b:if>
        </b:if>
      </span>

<span class='post-timestamp'>
        <b:if cond='data:top.showTimestamp'>
          <data:top.timestampLabel/>
        <b:if cond='data:post.url'>
          <meta expr:content='data:post.canonicalUrl' itemprop='url'/>
          <a class='timestamp-link' expr:href='data:post.url' rel='bookmark' title='permanent link'><abbr class='published' expr:title='data:post.timestampISO8601' itemprop='datePublished'><data:post.timestamp/></abbr></a>
        </b:if>
        </b:if>
      </span>

Also Read:

How To Get Image link (URL) of the Uplaoded Image in Blogger

Customization:


1. Replace the Author Name with your own author name. This must your  Blogger Profile name. In my case 2. my author name  is Cerwenlloyd Gefjun.
3. Replace the image link (URL) with your image URL. Click here on how to get image url
4. And finally customize the css of your profile image:

         margin- I set it with bottom -3px, and right 1px
         padding- which set by 2px
        height- this your image size (24px)
        width- this is the image width  (24px)
        border size - increase in number will make your border bigger also
        border color- you choose another hexadecimal color here

Questions about the post above are always welcome. Please leave it at our comment box below.
Thanks pal for your time!


How to Add Author's Profile Picture Below Post In Blogger

adding author profile picture below post title
Having a problem on how to add your (author) profile picture beside the line "Posted By"in your Blogger blog? You are not wrong in landing this page since I will tell you you the details on how to do that. Just follow the four steps below.Click here for the demo first.

Note:

This tutorial will not take effect if you uncheck your blog post to have a "Posted By". See the screenshot shot below to know what  I mean.


Adding Author's Profile Picture Below Post In Blogspot


Step 1. Go to Blogger Dashboard >> Template >> Edit HTML (Back-up your Template)

Step 2. Find the code below using the Control F. Please select the second occurrence of that code.
<div class='post-footer-line post-footer-line-1'>
Step 3. After finding the code in step 2, please paste the code below just  after it.
<b:if cond="data:post.author == &quot;Cerwenlloyd Gefjun&quot;">
<span class="author"><a href="https://plus.google.com/110772451841046895789/about"><img src="https://blogger.googleusercontent.com/img/b/R29vZ2xl/AVvXsEiYAS7NywmEOZ-z_8YX5eAZraE7H-b-_dXf837BD3KuczrnzHUP3EFTrXPYOMJpi0Fctw_oJA8XQTB-Gm87iVibwX2jVi91fvvy-JTR5F9b2ph4JpXJdI3mVFGeCxOk9SUBZbRvNnHeQnE/s1600/cerwen+profile+pic.png" style="border: 1px solid #d0d0d0; height: 28px; margin-top: -12px; margin-bottom: 0px; margin-right: -13px; padding: 2px; width: 28px;" /></a></span>
</b:if>


Customization:


  • Replace the red bold text with your own profile name. It must be the EXACT name of your profile name  as it appears in the Blogger profile.

  • Replace the orange bold texts with your Google  plus profile ID.

  • Replace the pink bold texts with your image URL. Click here for help in getting your  image link.

  • And lastly adjust the css which is responsible of the appearance of picture.

         border size and color- increase in number will make your border bigger also.
         height- this your image size
        margin- I set it with top 10px, bottom 0, and right 13px
        padding- which set by 2px
        width- this is the image width

Step 4. Save your Template and you're done.
If you have some questions regarding this post , try to drop some comments at the comment box below.
Thanks for the your valauble time with us!

How To Add More Authors In Your Blogger Blog


add more authors blogger
Adding more authors in one's blog aside from guest posting is sometimes necessary especially if  one who manages the blog ( the administrator) has found busy for  some other reasons. An advantage of the administrator/owner of a team blog is he/she has the only  access to the blog's settings and template which means he/her members task is only to  make post and publish the same. But if the administrator don't want to publish such posts, he/she has  the ability to edit and delete posts made by other members of the blog. Additionally, he/she has the power to add or to  remove other team members. Any number of members can be a part of a single blog which he can accept  to help him as he like.

Adding Multiple Authors to Blogger Blogs


In this tutorial, I will show you the steps on  how to "add more co-authors or guest authors to your Blogger blog". Simple steps are enumerated below, just follow them correctly to enable this feature in Blogger.

Step 1. Sign in to your Blogger Dashboard
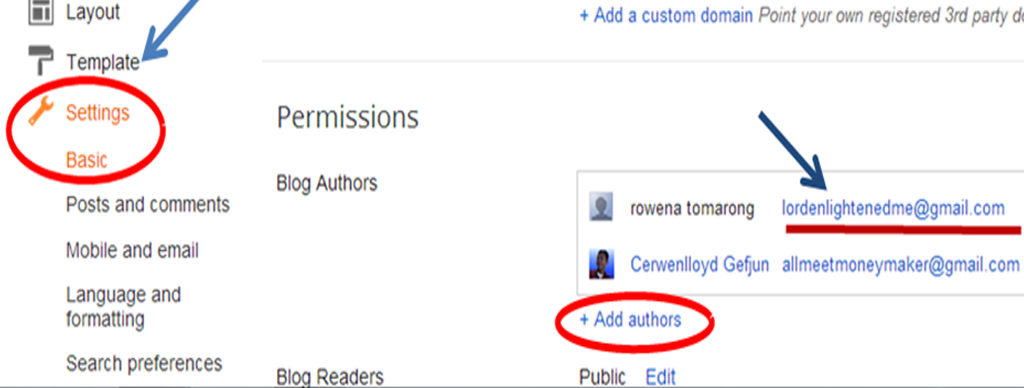
Step 2. Click Settings and look the "Permissions" section
Step 3. Then click the “Add Authors” button to add  new author(s) who can write for your blog posts.

add new authors blogger blog

Step 4. Next is you are going to invite people to write a post in your blog by typing their email addresses (inside the box provided)  separating each address with a comma. Soon, they'll receive an email with a confirmation link. Note that they must have Google Accounts, and if they don't already, they'll be prompted to create one.
Step 5. When you are ready to send the invitations, click OK.

Blogger will  send an email invitation to each person you listed in Step 4. If they agree to participate you in writing to your blog, they will  respond to the email positivelyand  Blogger does the rest for you.

Changing The Permissions Of The Author


Once the author whom you invited accepts your invitation , he can  now start writing in your blog. But as i said earlier he has only limited privileges such as editing or deleting posts written by him. He can’t delete posts written by other authors.
But if  you want anyone of the author to edit others post , then you need to grant him admin privileges ( for me this is disgusting to the part of other authors). For granting Admin privileges , go to Settings page of your blog and navigate to Permissions sub-tab. Beside the author name you will see a button ” grant admin privileges “.

Happy blogging and always take care of your loved ones!

How to Use Smartphone in WordPress Blogging


As a blogger, you frequently find yourself in the position where you want to provide an update to your readers right away. Perhaps you are in the heat of the moment. Maybe you have an idea that you don’t want to forget. In many situations, you find yourself in the situation where you want to report something live but you do not have access to your laptop. Relax as you let your smartphone handle it.
use smartphone in wordpress blogging

WordPress App


WordPress provides a free smartphone app that allows you to access your blog from anywhere you have a cellular data connection. This allows you to blog on the fly.
While you might be used to seeing people pop out their tablet on the subway to check their website and provide an update, sometimes that can even be inconvenient. That is where the WordPress smartphone app can provide the blogging edge.
You can literally open up the app and start creating a new post in just a few seconds. Imagine the possibilities.
This is obviously not a tool for the serious blogger who dives into complicated subject matter through a long post. Instead, blogging with the WordPress app gives you the opportunity to provide up-to-the-minute updates for an active blog that rapidly becomes known as the place to go for current information.

Local Source


Blogging with the WordPress app provides you with the opportunity to provide an in-person perspective to the various local events that you feature in your blog. It allows you to become less of a blogger and more of a reporter. You can observe events in the field and quickly provide updates to your readers simply by using the app.
The app does more than just let you enter text. You can upload photos and format your blog post with just a few taps of your finger. It is amazing how easy the app makes updating your blog while away from the office.

Uniform App


The WordPress blogging app works with any type of smartphone that accepts apps. Whether you use iPhone or Android, the WordPress app is an easy tool to utilize.
The amazing part of the WordPress app is that it can provide instant updates to any WordPress website. Whether you utilize free templates or  Premium WordPress themes , the WordPress blogging app will help your site become one of the most frequently updated sources that your readers visit.


Anny Solway
About our Guest Author:
Anny Solway is a dedicated writer at ThemeFuse – a leader in the WordPress premium themes  area. She likes to discover new ideas about internet marketing, social media and blogging.


Also Read:

1. How to Add Social Networking Buttons With CSS3 Style in Blogger
2. How to Get Free Do Follow Backlinks For My Site
3. How to Create Magazine Style with Post Summaries and Thumbnails on Blogger

How to Add Borders to Images in Blogger

add borders to images in blogger
Inserting or adding  images  to Blogger  is necessary to emphasize more of what we are going to deliver to  our rreaders. And in order to make this photo more proffessional in looks and be different from others, we will add borders on it.  Here, in this article I will share to you how to add border(s) to an individual image using HTML .
Before we will go to the steps, let me show you first the different border attributes or styles namely: dotted, dashed, solid, double, groove, ridge, inset and outset. See the demo below:

Dotted
Dashed
Solid
Double
Groove
Ridge
Inset
Outset

Now you have seen those different border styles, it is now time to proceed to the tutorial. Please follow the steps below:

How to Add Borders to Inserted Images in Blogger


Note:

You must have to know first how to get the  image link (url) of your uploaded images  in Blogger before you can apply this trick. Please click this link for assistance.

Step 1. Go to Blogger Dashboard
Step 2. Select a certain post or  you may choose some published posts with images that you want to add borders on it.
Step 3.  Copy the HTMLcode below and paste it in your Blogger Post Editor page. (Your page editor must be switched to HTML Mode).
<img src="https://blogger.googleusercontent.com/img/b/R29vZ2xl/AVvXsEgzArU1coZZpEOtyX6nP1EZeFnE5k7wGDLGwtXEp8b87SBnINqE9d_GsJBGdXDqMh1PRPMBJxc0zkxhgej-ArTasQanU34iyy5_dlKmX3EQjdRZqAHMDTRZY2m4WcyktxEAi0Ri3q5ZU8c/s1600/add+borders+to+blog.png" style="background-color: white; border: 3px dashed orange; margin-left: auto; margin-right: auto; padding: 1px;" />

Customizations:


- Replace the black bolded texts w ith image link (url) of your photo.
- Background color is white, you may change it according to your blog's color.
- Border attributes here are 3px which the size, greater numerical value will mean a larger size also. Dashed is the border style, you can change it with the different border styles as  shown in the demo above.  And orange for the color of the border.
- For the padding, greater numerical value will make your borders to pull out from your image. See the demo below


Note:

The first image has a padding of 10px while the second one has only 1px.

Step 4. Publish or update  your post and you are done. Congrats! :-)
Peace Buddies!!!