How To Change The Background Color/Photo Of Blogger Template

There are many ways on how to change the background image/color of your post-outer,content-outer and sidebar. You can apply Javascript, css, html codes and many others.  In this tutorial, I would share you the most easy way  to do that with or without touching any  codes of your blogger template.


How To Change The Background Color/Photo Of Blogger Template


Step 1. Go to your Blogger Dashboard  >> Template
change background theme of blogger


Step 2. Hit Customize button

change background theme of blogger


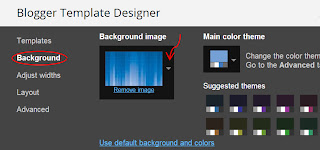
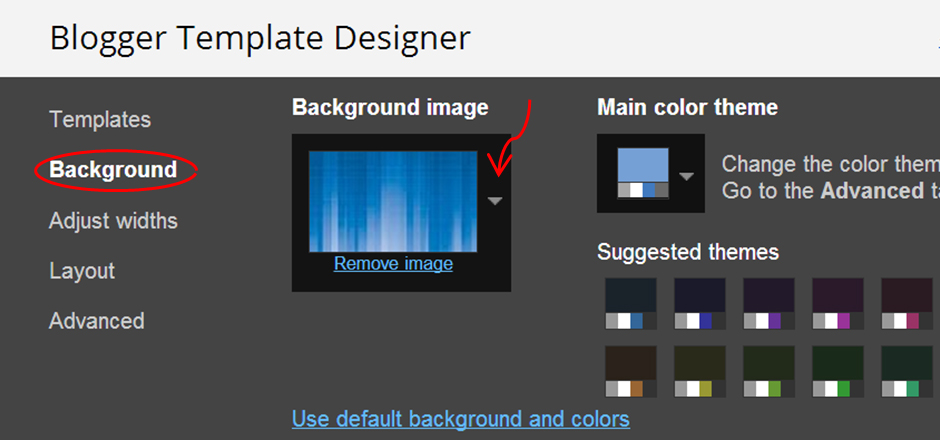
Step 3. In the Blogger Template Designer page, click Background

change background theme of blogger


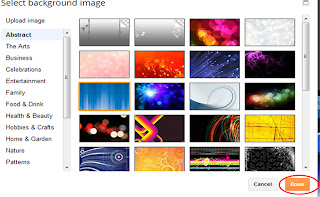
Step 4. Then choose among the background images (click the pointed  arrow from abstract to travel) that would most fit to your blog

change background theme of blogger


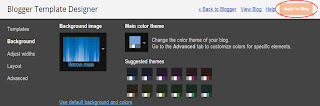
Step 5. Click done and hit Apply to Blog button.

change background theme of blogger

You may also change specifically the background color of your blog template.
See your blog with the new image that you had applied.


How to Add Background Image or Color to Sidebar


Step 1. Go to Blogger Dashboard
Step 2. Click Template
Step 3. Hit the Edit HTML button
Step 4. Search for the tag ]]></b:skin> and just above it paste the following code below:

.fauxcolumn-right-outer .fauxcolumn-inner } background-image: url(http://4.bp.blogspot.com/-kYMBW5LcaAs/T4SKihMu6JI/AAAAAAAABto/_Vq778FLVOs/s1600/background+right.png);
border-radius: 16px;
margin-left: 20px;
height:100%;
}
Short Customization (Optional):
a. Replace the orange bolded text(http://4.bp.blogspot.com/-kYMBW5LcaAs/T4SKihMu6JI/AAAAAAAABto/_Vq778FLVOs/s1600/background+right.png )  with your own image URL.
b. If you want to replace the image with a color, erase the word "image" (without the quotation sign) and replace it with a text "color" (without a quotation sign also". Then erase also the image URL including the sign (  ) and replace it with an hexadecimal color that you want.


How to Add Background Color to Post- outer

Step 1. Go to Blogger Dashboard
Step 2. Click Template
Step 3. Hit Edit HTML button
Step 4. Search for the code ]]></b;skin>, and  just  above/before it paste the code below,

.post-outer {
background-color: #FDFCFC;
border: solid 1px #a8cff0;
-moz-border-radius: 5px;
-webkit-border-radius: 5px;
border-radius: 5px;
-goog-ms-border-radius: 5px;
padding: 15px 20px;
margin: 0 -20px 20px;
}
.content-outer, .region-inner {
min-height: 0;
margin: 0 auto;
background-color: #f3f2f2;
}
Step 5. Save your template and you are done.
Thank you for your usual patience and Enjoy!


Adding Related Post Widget Via Linkwithin

Do you like your readers will stay longer in your website by clicking other related topics that they browse in your page content? Probably, no one will  give a NEGATIVE answer, right? Showing thumbnails of posts having related labels or categories at the bottom of each post  engages the reader to stay longer  and increases the page views at the same manner.  This widget  will load faster and you don't  be  worried about  the loading time because the widget codes are stored on linkwithin servers.


related post widget via linkwithin


Adding Related Post Widget Using Linkwithin


Step 1. Go to Linkwithin and  fill up the form as shown in the  screen shot below
adding post related widget


Step 2. Keep the width (refers to the number of thumbnails to appear in your related post widget)  into  three (3) if your post width is less than 500 px

Step 3. Click the Get Widget button and  and you will be taken to the next page

Step 4. In the new page, Click the Install Widget link (by clicking this link you will be brought to another page and that is the  Add Page Element
related post widget to blogger


Step 5. At the Add Page Element page  you are going to give the name of your blog and edit the Title (refers to the title of your related post widget). You may replace it with  a texts like YOU MAY ALSO LIKE: OTHER RELATED POSTS: etc

Step 6. Now click the Edit Template Link ( pointed with the yellow arrow)
Upon clicking that link, a code like this will appear
<b:includable id="main"><data:content /></b:includable>
Step 7. Replace the code above with the code below
<b:includable id='main'><b:if cond='data:blog.pageType == &quot;item&quot;'><data:content/></b:if></b:includable>

Step 8. Next, click the Edit Content Link ( pointed with the green arrow) and place the  additional code  below just before the code  that is found inside that link.
<script>linkwithin_text='Related Posts:'</script>

Step 9.  Replace the red highlighted bolded texts with your own Related Posts Titles

Step 10. Now, hit the ADD WIDGET (pointed with the black arrow in the photo in step 4button. Upon clicking the ADD WIDGET button, the Related Post Widget is now being added to your Blogger Page Elements page automatically, it means that there is no need to paste  any set of codes that you met in the previous steps.

Step 11.  Once you are taken to the  Blogger Page Elements page of your blogger account, find the box bearing the title of your related post widget (usually you can find it at the right side of your post body box) and simply drag it to the bottom part of your post body.

Step 12. Finally, click the "Save Arrangement"  button and you are done friend!
For its customization  click here.

Have peace in your mind and love in your heart!
Have a nice  day pal!
Credits goes to My bloggertricks with little modification from me.


Adding Link To Your Youtube Video Account

Sometimes as a blogger or  web developer, we need to make video(s) which are related to the topic/article that we are  posting in our blog  in one of the most popular video hosting site that is youtube that would bring  readers to your website. In this manner, your website will boast also live traffic. In this tuorial, I will show you on how to put links on your video in youtube.

Adding Link To Your Youtube Video Account


Step 1. Log in to your Youtube Account
Step 2. Click Upload
Step 3. Select what type of video you are going to upload, as shown in photo below

adding link to youtube video


Step 4. Hit the Next Button >> Upload
Step 5.  Put the title of the video
Step 6.  In the description box, you put your blog-link or website link by writing first the line below


http://www.YOUR BLOG/WEBLINK HERE


adding link to youtube video


Note. Replace the red  highlighted-bolded text above with your own URL
Example:

          http://www.bloggingtipsandtrix.blogspot.com/2013/04/how-to-put-self-animated-images-to.html

Step 6. Click Save. Enjoy!

Adding Google Custom Search Engine Box Beside Menu Bar/ Navigation Bar


In my previous article about adding google custom search engine box, we put it  in every post titles but in
this tutorial ,  we will show you how to add  Google Custom Search Engine Box beside your horizontal navigation bar, making your blog more professional in looks. Google Custom Search enables you to search within a collection of blogs or websites of your choice. So, let us now go with process!

google


Adding Google Custom Search Engine Box Beside Menu Bar/ Navigation Bar


Step 1. Create your custom search engine
 1. Go to Google Custom Search to create a custom search engine.
 2. If your are an Adsense publisher you can also use Adsense for search.
 3. Get the code  of your  search engine and pick - up your  unique ID  in the code { usually it is located at the  third line (the text in red below) of  your google search engine code}.
Example:

<script>
  (function() {
    var cx = '014987083883224014161:toggavkxnxo';
    var gcse = document.createElement('script');
    gcse.type = 'text/javascript';
    gcse.async = true;
    gcse.src = (document.location.protocol == 'https:' ? 'https:' : 'http:') +
        '//www.google.com/cse/cse.js?cx=' + cx;

Or simply click the Search Engine ID button to get your google search engine ID as shown in the photo below

google search engine ID


Step 2. Create the search box
 The following is the code of your search box.

<!-- Google custom search box Start -by Bloggingtipsandtrix.blogspot.com -->
<div class='cse' style='color:#000000;float:right;margin:6px 10px 0 0 ;'>
<form action='http://www.google.com/cse' id='cse-search-box'
target="_blank"><input name='cx' type='hidden' value='partner-pub-4409159435154980:sle4z0smh1f'/>
<input type='text' name='q' size='35' />
<input name='ie' type='hidden' value='ISO-8859-1'/>
<input type="submit" name="sa" value="Search" />
</form>
<script type="text/javascript" src="http://www.google.com/cse/brand?form=cse-search-box&amp;lang=en"></script>
</div>
<!-- Google custom search box End -->


1. Replace the value in bolded red texts in line 4 - 5 with  your Search engine unique ID from Step 1.3.
2. You can customize the search text box width by changing the value of size attribute in line 6.

Step 3. Add search box to navigation bar
1. Go to Blogger Dashboard >> Lay- out
2. Click the box where you put your menu bar/tabs codes
3. Just add the search box code right after <div id="navibar"> line of the navigation tabs code as shown  below or (you can put  the search box also above the '<ul>' tag).

<div id='bbtnavbar'>Place your search engine code here ( In Step 2)

      <ul id='bttnav'>
       <li>
          <a href='#'>Home</a>
        </li>
        <li>
          <a href='#'>About</a>
       </li>
        <li>
          <a href='#'>Contact</a>
        </li>
  <li>
           <a href='#'>Templates</a>
            <ul>
                <li><a href='#'>Hacks</a></li>
                <li><a href='#'>Downloads</a></li>
                <li><a href='#'>Advertise</a></li>
              </ul>
        </li>


      </ul>
    </div>
4. Preview before saving.

Enjoy!
Credits goes to Bloggersentral with little modification from me.

How To Put Self- Animated Images And Text To Blogger

Most of the images and texts that  we  uploaded to blogger post editor were still . In this article  I'm gonna show you  how to add spice to that still images and texts. All you need is  an image and a scrolling marquee html and finally you will  animate that  image. You can also put this code on Google Blog sidebar through adding an html gadget on it. Please see the live demo  below first. So let's now jump with the tutorial? self

Bloggingtipsandtrix

How To Put Self- Animated Images And Texts To Blogger


This is for an image file.
Step 1. Go to your Blogger Post Editor
Step 2. In an HTML mode, put the code below
<marquee>Your Image Here</marquee>
Note.  In order to upload your image,erase the text  in  red (Your Image Here). Now, while your mouse cursor is in between <marquee></marquee> click on the image icon at the top portion of your blogger editor's post and choose one of the options to upload your image to your blog.
Step 3. Publish your post.

This is for an image file.
Step 1. Go to your Blogger Post Editor
Step 2.  In an HTML mode, put the code below
<marquee>Your Image Here</marquee>
Replace the text in red  (Your Image Here) with your desired texts.
Step 3. Publish your post. Have nice day pal!
Credits goes to elizabethswikis

Adding A Nudging Effect To Links And Images In Blogger

One way of  fully customizing the styles of putting links and images to blog posts is through adding a  nudging effect to it! In this tutorial  we are going to use  CSS3 to let our links and images swing from left to right and vice versa! Let's get work into it. Take a look at the live demo below first:
Check also: How to add different hover effects on images.

Adding Floating Sharing Buttons

 blogger logo

Adding A Nudging Effect To  Links And Images In Blogger


Step 1. Go To Blogger >> Lay-out >> Edit HTML ( if necesssary backup your template)
Step 2. Search for ]]></b:skin>  and just above it paste the following code

/*--- BBT Link Nudging Effect ---*/
.bbt-nudge  {
-moz-transition: all 0.8s ease-out;
-o-transition: all 0.8s ease-out;
-webkit-transition: all 0.8s ease-out;
-ms-transition: all 0.8s ease-out;
transition: all 0.8s ease-out;
}
.bbt-nudge:hover  {
margin-left: 30px;
padding-left: 10px;
}
Note: Edit the bolded values to increase or decrease the swinging duration.
Step 5. Save your template and done!

Whenever you want to implement this styles, simply add the following code in Edit HTML mode of your Post Editor Page.

For Nudging Link, use the code below:
<a class="bbt-nudge" href="The URL Of Your Post  Here">Your Text Link Here</a>

Example:
<a class="bbt-nudge" href="http://bloggingtipsandtrix.blogspot.com/2013/03/this-is-one-of-few-social-sharing.html">Adding Floating Sharing Buttons</a>

And for  Nudging Image, use the code below:


<img alt="Your Image Description Here" border="0" class="bbt-nudge" height="200" src="The URL Of Your Image Here " width="200" />
Example:

<img alt=" blogger logo" border="0" class="bbt-nudge" height="200" src="http://3.bp.blogspot.com/-53ma9LZBEkM/UVf7-etYQMI/AAAAAAAAAJw/w2oEBR0tS5o/s1600/blogger+logo.jpg " width="200" />

Note: You may change the borders of your image by replacing  the value red bolded texts.
Enjoy : -)
Credits goes to My bloggertricks with little modification from me.