Customize Texts Beside the Image in "Post a Comment"

Please click here for the complete and updated tutorial about this post.
Yesterday, I posted an article about replacing the text "Post a Comment"  with an image or texts in order to encourage our viewers to leave a comment in our articles made. But the texts that we had put is not properly styled, so let us put some css on it to make it beautiful.
customize texts post comment

Customize Texts Beside the Image in "Post a Comment"


Click here for the tutorial if you had not yet replace an an image in your "Post a Comment" above comment box.
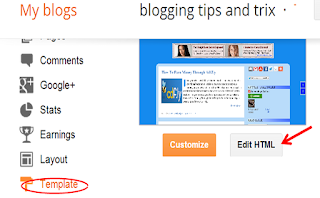
Step 1. Go to Blogger >> Template (Always Back-up Template) >> Edit HTML,


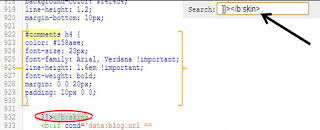
Step 2. Find/Control F the tag ]]></b:skin> and just above it paste the code below,


#comments h4 {
color: #4E555A;
font-size: 23px;
font-family: Arial, Verdana !important;
line-height: 1.6em !important;
font-weight: bold;
margin: 0 0 20px;
padding: 10px 0 0;
}

Short Customization (Optional):

1. Change #4E555A to change the color of the text beside the image. You can select hexadecimal colors here.
2.  Replace the value of font- size (23px) in order to change the size of the text.

Step 4. Always click Preview to see the initial result of the code applied then hit the Save button and you are done.
Hope you enjoy this short post and if you have some questions, don't forget to leave a comment.
Thank you and Enjoy!


Changing "Post a Comment" With Image and Text

I really made a lot of research in order to implement this kind of trick in my blog, for I want that my unique visitors will give some comments regarding my posts for the development  of my writing skills, in delivering my tutorials and to be complemented as well. So let us jump with the tutorial on how to change or replace the text "Post a Comment" with an image and some encouraging texts.

customize post a comment with text


Changing "Post a Comment" With Image and Texts


Step 1. Go to Blogger Dashboard >> Template >> Edit HTML

replce post comment with image

Step 2. Look/Control F the code below,
<h4 id='comment-post-message'> <data:postCommentMsg/></h4>
Step 4. Replace the text in blue (data:postCommentMsg) above with one of the image URL  below


replace post comment image
img src='http://2.bp.blogspot.com/-TFKoSLS0BtU/UYiyfhFXqII/AAAAAAAAAnY/lN9Pbiq5RUw/s1600/animated+comment+arrow+7.gif'
change post comment with image
img src='http://4.bp.blogspot.com/-4a-3Odt1HVU/UYiykf_bhFI/AAAAAAAAAng/Fl8wMvVX1bU/s1600/colored+comment++2.png'

customize post comment with text
img src='http://3.bp.blogspot.com/-WjVdZah6goo/UYiyo3h7sqI/AAAAAAAAAno/NjE9jUdpRQM/s1600/comment+9.gif'

substitute post comment  with image
img src='http://1.bp.blogspot.com/-Dy1ItNfWQac/UYiyr0Q6egI/AAAAAAAAAnw/MwihZrPMcl0/s1600/comment+cloud+3.png'

designate post comment image
img src='http://3.bp.blogspot.com/-TJao0dCwyLY/UYiyvUnisDI/AAAAAAAAAn4/8deFiLcGUNo/s1600/leave+a+comment+8.png'

renew post comment with image
img src='http://4.bp.blogspot.com/-5bJ7lcZkcqQ/UYiyz8AIO2I/AAAAAAAAAoA/Iuy9ZMrWR8U/s1600/comment+here+blue+4.gif'

regenerate post comment with text
img src='http://3.bp.blogspot.com/-ZeRKmwtEgE4/UYiy4yjW_cI/AAAAAAAAAoI/gErJwLflBmQ/s1600/leave+a+comment+1.png'

put post comment with image
img src='http://2.bp.blogspot.com/-CzbTH4ojep8/UYiy_Oqg0yI/AAAAAAAAAoQ/VbHlse7pR0I/s1600/comment+here+flowers+5.png'

add post comment with image


img src='http://lh4.ggpht.com/_7wsQzULWIwo/SvZuZbFMFVI/AAAAAAAACJg/GcDGjs2LOik/s800/what-question-mark.gif'
substitute post comment with image
img src='http://1.bp.blogspot.com/-dkjGDzKNQ-0/UYjCj5MiPFI/AAAAAAAAAo8/g9d0XHd67x0/s1600/thinking+man.gif'


Step 5. If you want to add some encouraging text beside your selected image, place it in behalf of the text Your Text Here

                <h4 id='comment-post-message'> <data:postCommentMsg/>Your Text Here</h4>

Step 6. Click preview to see the initial effect and then hit the Save button.


 In the above trick about replacing the texts "Post a Comment"  with an image or texts in order to encourage our viewers to leave a comment in our articles made. But the texts that we had put are not properly styled, so let us put some css on it to make it beautiful.
customize texts post comment

Customize Texts Beside the Image in "Post a Comment"


Step 1. Go to Blogger >> Template (Always Back-up Template) >> Edit HTML,


Step 2. Find/Control F the tag ]]></b:skin> and just above it paste the code below,


#comments h4 {
color: #4E555A;
font-size: 23px;
font-family: Arial, Verdana !important;
line-height: 1.6em !important;
font-weight: bold;
margin: 0 0 20px;
padding: 10px 0 0;
}

Short Customization (Optional):

1. Change #4E555A to change the color of the text beside the image. You can select hexadecimal colors here..
2.  Replace the value of font- size (23px) in order to change the size of the text.

Step 4. Always click Preview to see the initial result of the code applied then hit the Save button and you are done.To add texts below the line "Post a Comment", click here for the tutorial.
Hope you enjoy this short post and if you have some questions, don't forget to leave a comment below.
Subscribe to receive our free tutorials via email. Hope you like this post and Enjoy Blogging my friends!!!

How to Earn Money Through Adf.ly

In my previous post, I have shared an article on how to monetize your blog/website via Infolinks. Now in order to boost your earning power, why not shrink the  URL of some of your posts in the internet and at the same time  earn a revenue from it? In this section, I'm gonna show you the simple steps on how to make it.

earn revenue through adf.ly

How to Earn Money Through Adf.ly


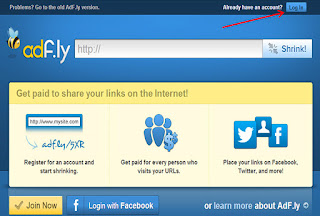
Step 1. Go to Adf.ly and log in

revenue from adf.ly

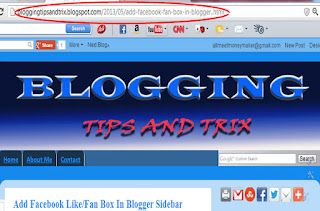
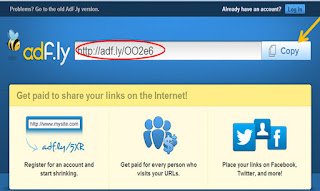
Step 2. Look for a URL/ link in your blog/site that you want to shorten as shown in screenshot below,


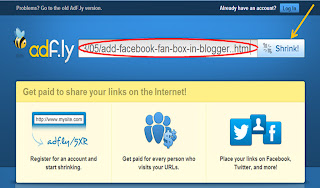
Step 3.  Paste it inside the empty box in the adf.ly box and hit the shrink button


earn money via adf.ly

Step 4. Copy the shrink link and put that in your blog posts or anywhere you want  in  behalf of the original URL.
shrink url from adf.ly

It means that every time your users click that shrink URL, they will be directed to see adds from adf.ly site.
Thank you for reading this post and hope that this answers your problem pal.
Peace on Earth  and HAPPY Blogging To All  Of  Us!!!!


Adding Sharing Buttons Enclosed in an Eggshell

I have already shared in my previous posts the different styles of putting sharing buttons in our blog i.e. below post titles and sidebar but  this time  we gonna make it more unique because we will put that inside an eggshell. Consequently, viewers will be amazed and at the same time they will share our posts to the different social media. So let's jump to the process.
sharing buttons inside eggshell

Adding Sharing Buttons Enclosed In An Eggshell


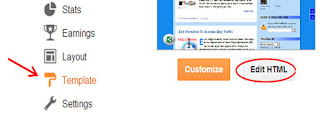
Step 1. Go to Blogger Dashboard >> Template >> Edit HTML button (Always back-up your template before editing)


sharing buttons enclosed eggshell


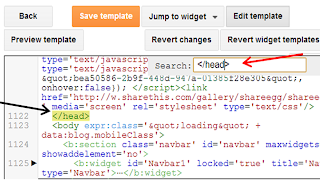
Step 2. Look (Control F) for the code </head> and just above it paste the code below,

 media sharing buttons  eggshell

<script src='http://w.sharethis.com/gallery/shareegg/shareegg.js' type='text/javascript'/><script src='http://w.sharethis.com/button/buttons.js' type='text/javascript'/><script type='text/javascript'>stLight.options({publisher: &quot;bea50586-2b9f-448d-947a-01385f28e305&quot;, onhover:false}); </script><link href='http://w.sharethis.com/gallery/shareegg/shareegg.css' media='screen' rel='stylesheet' type='text/css'/>
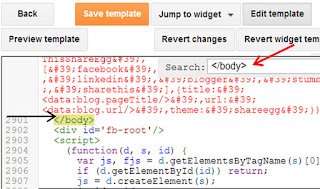
Step 4. Find the tag </body> and paste the code below just above it,

social buttons inside eggshell

<div style='position: fixed; bottom: 2%; left: 2%;'><div class='shareEgg' id='shareThisShareEgg'/></div><script type='text/javascript'>stlib.shareEgg.createEgg(&#39;shareThisShareEgg&#39;, [&#39;facebook&#39;,&#39;twitter&#39;,&#39;googleplus&#39;,&#39;linkedin&#39;,&#39;blogger&#39;,&#39;stumbleupon&#39;,&#39;sharethis&#39;],{title:&#39;<data:blog.pageTitle/>&#39;,url:&#39;<data:blog.url/>&#39;,theme:&#39;shareegg&#39;});</script>
Step 5. Click Preview first  to see the initial effect then hit the Save button. :- )

Short Customization (Optional):
1. To change the position of the "egg", replace fixed into static to make appear only at the bottom of your page.
2. Replace left to right to make visible at the right side of your blog
3. Adjust 2%  in order to adjust the vertical marginal position of the "egg". Increase value will also move the egg to the top and decrease the value will also move it to the bottom.
4.  Adjust 2% in order to  adjust the  horizontal marginal position of the "egg".  Increase value will also move the egg to the right and decrease the value will also move it to the left.

Hope that you enjoy this post and subscribe to receive our latest tutorial.
Please take of  your loved ones and Enjoy your Day Friend!!!!
Credits goes to bloggertricks with some modification from the author.

Monetize Your Blog in Infolinks

The most exciting part of being a blogger is we know how to monetize our site for us to be complemented the effort that we have made every single day of our blogging career.  There are many sites that  accept  application to publish  ads in our blogs/websites  and one of that is infolinks which is known for giving maximum revenue sharing. I'm gonna show you  the steps on how to apply infolinks 
ads publishers.


monetize blog via infolinks

Applying Infolinks Ads Publisher

Step 1.
       1.1 Go to Infolinks or log in if you have already an account,


 apply  ads infolinks publishers

    1.2  Click publishers button and select among the four ads choices/styles i.e. insearch, in text,   intag and frame to  put in your site then click the Get It button,


 earn money through infolinks


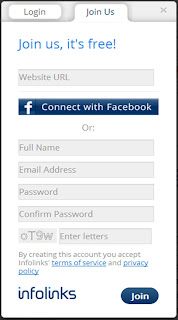
 1.3  After clicking the Get It button, you are requested to enter your website URL, Full Name, Email                 Address and its password,

 1.4  Click Join.

earn revenue by infolinks 

Step 2. Adding Infolinks Widget to your Blogger Lay- out page

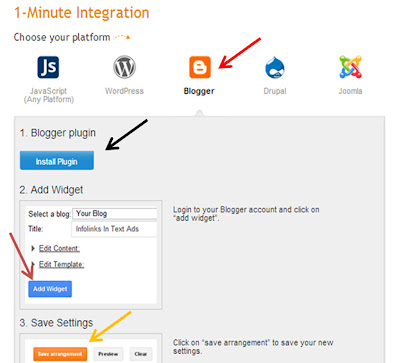
      2.1 After clicking the Join button, you will be asked what platform where infolinks ads will be integrated
 i.e. Wordpress, Blogger, Drupal and Joomla  or simply click Java Script and get the code inside the box ( this is applicable for any platform).
      2.2  If you one among the four platforms you will be directed choose Click Install Plug-in,
      2.3  Then  Add Widget,
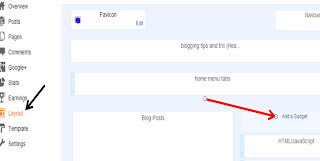
      2.4  Drag the widget to the place where you want to place the plug- in.
      2.5  Finally, click Save Arrangement  and you are done.
            the screenshot below will elaborate more the above step (2).

money problem solve infolinks


Note: Please wait for four to seven (2-3) days depending upon the process of your application and be sure to have a quality contents for infolinks will not approve duplicated and poor quality contents.
Please enter your email address in  Receive Free Updates Widget in my sidebar  to subscribe latest tweaks.
Hope you Enjoy this article and Happy Blogging to all of us !!!


Add Facebook Like/Fan Box In Blogger Sidebar

It is very important to have a Facebook Like Box in our Blogger Sidebar for it tells how many users had liked our page and at the same time encourage them to do the same in just one click without visiting our Fan Page.
facebook fan box  blogger

Add Facebook Like/Fan Box In Blogger Sidebar


Step 1
        1.1 Open your Facebook Fan Page Account,


put facebook like box

      1.2  Get the URL from the browser address bar as shown in the screenshot below,

add facebook fan box

Step 2
       2.1  After getting your face book fan page url, it is now time to configure it.
       2.2  Fill up the information needed (Facebook Page URL, width, height, show faces, color schemes, stream, border color, and  header),

facebook like box  blogger

     2.3  Get the code, there are four options i.e. HTML5, XFBML, IFRAME and URL. Among these four options, choose the third one, the IFRAME,


insert facebook like box


     2.4  
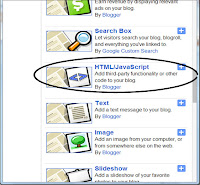
Copy the code and in your Blogger Lay-out page, click the Add Gadget Button then scroll down  and select HTML/Javascript. Paste the code  inside the empty box,


put facebook in bloggerput facebook fan sidebar


    2.5  Click Save Arrangement and you are done.
Note: According to some pro bloggers, blog with less than 100 likes should not show their Facebook  Like Box to their visitors for it discourage them to give you a "like". But anyway, the important is, we know how to install it in our blogger sidebar. Hope you find this article useful. Please take care of your love ones and happy blogging to all of us :-)