It's essential that you understand, it isn't hard to include a custom area into your blogger account. In the event that you are a blogger, its ideal in the event that you officially own your own site, it demonstrates your energy and affection for blogging and gives you opportunity to move starting with one stage then onto the next, when and in the event that you require. Additionally from clients point of view, its much simpler for them to recollect and visit your website at redid location like myblog.com than myblog.blogspot.com.
A best aspect concerning Blogger is that it doesn't push you to host your webpage with blogger. It is totally your own decision to browse both of two facilitating arrangements 'facilitating on BlogSpot' with location myblog.blogspot.com, or running with a custom area with location myblog.com.
Some Popular Web Hosting Sites:
In the event that you don't as of now have bought yourself a custom area, these are the spots that you ought to be searching for to get one:
- EasyDNS
- 1and1
- GoDaddy.com
- Yahoo! Small Business
- No-IP
- ix web hosting
- Namecheap
So now if you have bought yourself a domain, from either of these you would have an IP address and a name.
It's time to start adding a custom domain to your blogger account.
Remember:
Here we are using setup for
GoDaddy.com, the most popular domain name provider. For custom domains from other sites, the steps are almost same, so don't disappear.
Setting Up Blogger Custom Domain
Login to your Blogger account at
www.blogger.com.
Click on your blog and then go to "
Settings", choose "
Basic".
Under "Publishing" section, click "+ Setup a 3rd party URL for your blog".
Under "Third-party domain settings" next to "http://" type your domain that you just purchased and make sure that you don't forget to add the "www" prefix to the domain name.
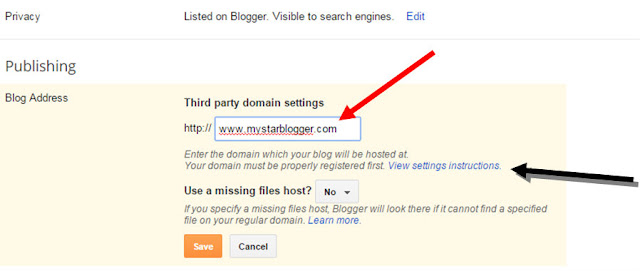
Click "View settings instructions" to get the blogger's official instructions. On the Blogger instruction page, choose the "On a top-level domain (www.example.com)" option.
Under the point 9 of instructions, 4 IP addresses will be given, copy and save all 4 of them.
Go back to your Blogger Settings and press Save. It won't get saved and an error will appear saying 'We have not been able to verify your authority to this domain. Error 12.'
Under the error, you will see two fields "Name, Label or Host Field" and "Destination, target, or Points To" field. Copy data of both rows from these fields.
Note: In case you have bought your domain from Google like Google Apps,please follow the steps below to access your domain:
Step 1. Sign in to
Google apps to access your Admin console
Step 2. Click "
More Controls" >> "
Domains"
Step 3. Click "
DNS Advanced Settings" so that you can sign in to GoDaddy to change your MX records, CNAME and other advanced DNS settings.
Step 4. You can now sign in to DNS console using the password and sign-in name provided by you by google apps.
Now log in to your
GoDaddy.com account and click on "My account" on the upper right corner > select "Manage my Domains".
Here you should see your purchased domain name > just click on your domain name.. Click on the "DNS Zone File" tab next to Settings and choose "Use Classic DNS Manager".
Under the "
CNAME (Alias)" menu, click "
Quick Add" button at the bottom of the screen (see image 1 in the below screnshoot). In the Edit box that now appeared, enter "
www" in the first box and "
ghs.google.com" in the second.
At the bottom of the page, click on the "
Save Zone File" button to save your setings.
Now go back to Blogger and try to save settings again. The registration process may takes 24-48 hours, so don't worry if you get an error again. Come again later to Blogger after 24-48 hours, repeat step 2 to 4, press Save and the error should be gone. In my case, it only took a second to redirect.
After your URL starts working, click on the "Edit" link next to domain name on setting page.Check the "Redirect... to..." checkbox below your site address to ensure that even if the visitors will miss out the www part, they will still be able to reach your site.
And that's it. Enjoy your new URL!
So this was simple, correct? Just a modest bunch of steps and we have effectively finished our central goal of including our custom area in our blogger account.
Thanks for Reading and Happy Blogging!


.png)
