I have already shared in my previous posts the different styles of putting sharing buttons in our blog i.e. below post titles and sidebar but this time we gonna make it more unique because we will put that inside an eggshell. Consequently, viewers will be amazed and at the same time they will share our posts to the different social media. So let's jump to the process.
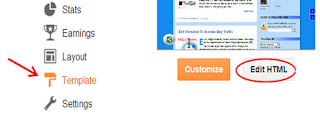
Step 1. Go to Blogger Dashboard >> Template >> Edit HTML button (Always back-up your template before editing)
Step 2. Look (Control F) for the code </head> and just above it paste the code below,
Short Customization (Optional):
1. To change the position of the "egg", replace fixed into static to make appear only at the bottom of your page.
2. Replace left to right to make visible at the right side of your blog
3. Adjust 2% in order to adjust the vertical marginal position of the "egg". Increase value will also move the egg to the top and decrease the value will also move it to the bottom.
4. Adjust 2% in order to adjust the horizontal marginal position of the "egg". Increase value will also move the egg to the right and decrease the value will also move it to the left.
Hope that you enjoy this post and subscribe to receive our latest tutorial.
Please take of your loved ones and Enjoy your Day Friend!!!!
Credits goes to bloggertricks with some modification from the author.
Adding Sharing Buttons Enclosed In An Eggshell
Step 1. Go to Blogger Dashboard >> Template >> Edit HTML button (Always back-up your template before editing)
Step 2. Look (Control F) for the code </head> and just above it paste the code below,
<script src='http://w.sharethis.com/gallery/shareegg/shareegg.js' type='text/javascript'/><script src='http://w.sharethis.com/button/buttons.js' type='text/javascript'/><script type='text/javascript'>stLight.options({publisher: "bea50586-2b9f-448d-947a-01385f28e305", onhover:false}); </script><link href='http://w.sharethis.com/gallery/shareegg/shareegg.css' media='screen' rel='stylesheet' type='text/css'/>Step 4. Find the tag </body> and paste the code below just above it,
<div style='position: fixed; bottom: 2%; left: 2%;'><div class='shareEgg' id='shareThisShareEgg'/></div><script type='text/javascript'>stlib.shareEgg.createEgg('shareThisShareEgg', ['facebook','twitter','googleplus','linkedin','blogger','stumbleupon','sharethis'],{title:'<data:blog.pageTitle/>',url:'<data:blog.url/>',theme:'shareegg'});</script>Step 5. Click Preview first to see the initial effect then hit the Save button. :- )
Short Customization (Optional):
1. To change the position of the "egg", replace fixed into static to make appear only at the bottom of your page.
2. Replace left to right to make visible at the right side of your blog
3. Adjust 2% in order to adjust the vertical marginal position of the "egg". Increase value will also move the egg to the top and decrease the value will also move it to the bottom.
4. Adjust 2% in order to adjust the horizontal marginal position of the "egg". Increase value will also move the egg to the right and decrease the value will also move it to the left.
Hope that you enjoy this post and subscribe to receive our latest tutorial.
Please take of your loved ones and Enjoy your Day Friend!!!!
Credits goes to bloggertricks with some modification from the author.


