Edit Permalink to Increase Blog Traffic

Every blogger especially newbie must have a basic  knowledge on the implementation of  Search Engine Optimazation (SEO) tips in order to  gain daily organic traffic. Although the implementation of this is not a must to some bloggers but for you as a goal- oriented type is very important one. In this article, we will show one SEO tip i.e. editing your permalink but when practice it before publishing your post, you will really gain weight little by little. Here is the logic behind that, every time you will publish post, blogger will automatically generate permalink  of your post depending upon the length of your post titles and that sounds good because you save your time doing some editing of that permalink but the problem is you can't tell if the permalink that blogger generated it is SEO friendly especially if your post titles is quite long.


customize permalink increase traffic
Have a look at the example below:

Post title: How to add multiple social media buttons

Blogger perhaps generate permalink this way:
http://bloggingtipsandtrix.blogspot.com/2013/04/how-to-add- multiple-social.html

Please note that this is just  only an example for clarification purposes.

Sometimes blogger will generate a permalink that is not rich keyword targeted  ( social media buttons ) in the above example and therefore your post has a low ranking percentage because the permalink bears the content of the article.
Now if we will change the permalink above to be SEO friendly. It will become http://bloggingtipsandtrix.blogspot.com/2013/04/add-social-media-buttons.html
Note: In some cases "How to add multiple" is also a keyword depending on the keyword you are also targeting.

Additional Informations
  • Limit your Post Title Characters including space between words not more than 66.
  • Permalink should not be more than 30 characters that would summarize your  post title/article.
  • Use Synonyms in editing your permalink to increase your visibility. Instead of using the word "Add", utilize the word "Put" in your next permalink.
  • Avoid using Underscore (_) Instead Hyphen (-)

Edit Permalink to Increase Blog Traffic


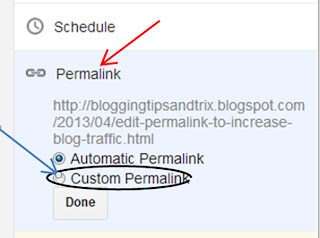
Step 1. In yourt Unpublished post, click on the permalink button at the right side of Blogger Post Editor page.
Step 2. Click the the Custom Permalink Button and type your new permalink at the box provided.

permalink increases blog traffic

seo tips optimazation


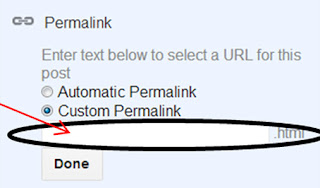
Step 3. Hit the Done button and Publish your post.

References:
Bloggersentral, Mybloggertricks and world web surfers


Putting Star Rating Widget In Blogger

As a blogger, we need to know if our post meets or answers the problem of our readers for us to enhance further our writing and research skills. Readers, sometimes don't want to give their comments of  what is their reaction after reading the post, perhaps they are in hurry of the implementation of what they have learned or just tired of thinking of what will be their message. But don't worry because through star rating widget, in just one click the readers could give us feedback to our post. In this tutorial, we will put a Star Rating-Widget just below your article.

Putting Star Rating Widget In Blogger


Step 1. Open your Blogger Account,
Step 2. Go to (Star) Rating Widget and fill up the information needed,

putting star rating widget

Step 3. Hit the Get Widget button  then you will be asked to enter your email and click the Submit button
Step 4.  After clicking the Submit Button,  your User Key and User ID will appear, then hit the Add to Blogger Button and this bring to your Blogger Add Page Element window,

adding star rating widget

Step 5. Click the Add Widget button and you will be taken to your Blogger Lay-out page,

installing star rating widget

Step 5. And finally, drag the Star Rating Widget button below post body then click Save Arrangement button.
creating star rating widget


Have a nice Day and Enjoy!

Putting Social Media Sharing Buttons Below Every Post Title

One way pushing your initial traffic is  by knowing to the world that you have a such kind of blog that is unique from the other blog. In this tutorial, we will put Facebook, Twitter, Email, Print, G-mail, Stumble upon and Add this button. But you can also add another sharing buttons of your like. So let us go with the tutorial.

sharing buttons below post titles


Putting Social Media Sharing Buttons Below Every Post Title


(Always back-up your template)
Step 1. Go to Blogger Dashboard >> Template >> Edit HTML

 sharing buttons below  titles

Step 2. Look for the code <data:post.body/> (choose the third occurrence of the code)
and  just above it, paste the code below,

                       
<b:if cond='data:blog.url != &quot;ITEM&quot;'>
                         <b:if cond='data:blog.url != &quot;ITEM&quot;'>
                                 <!-- AddThis Button BEGIN -->
<div class='addthis_toolbox addthis_default_style addthis_32x32_styles'><table border='0'><tr>
<td><a class='addthis_button_preferred_1'/></td>
<td><a class='addthis_button_preferred_2'/></td>
<td><a class='addthis_button_preferred_3'/></td>
<td><a class='addthis_button_preferred_4'/></td>
<td><a class='addthis_button_preferred_5'/></td>
<td><a class='addthis_button_preferred_6'/></td>
<td><div class='addthis_toolbox addthis_default_style '> <a class='addthis_counter addthis_pill_style'/> </div> <script src='http://s7.addthis.com/js/250/addthis_widget.js#pubid=xa-4de3b2d654f56f28' type='text/javascript'/> <script type='text/javascript'> var addthis_config = { ui_cobrand: &quot;BLOGGINGTIPSANDTRIX&quot;, ui_header_color: &quot;#ffffff&quot;, ui_header_background: &quot;#0080FF&quot; } </script></td> </tr> </table></div>
                                   <!-- AddThis Button END -->
                                          </b:if></b:if><br/>


Step 3. Click preview, then if it is okey, save your template and you are done.
Short customization:
 1. To add one or more  sharing buttons, put the tag below just above this line <td><div class='addthis_toolbox addthis_default_style '> <a class='addthis_counter addthis_pill_style'/> </div> <script bla bla bla bla.......

  
<td><a class='addthis_button_preferred _#'/></td>
 Change # sign with next number of your button.
2. Replace ITEM  with the url of the page where you want to hide this particular widget.
3. Replace BLOGGINGTIPSANDTRIX  with the name of your blog.


Putting Sharing Buttons In Your Blogger Sidebar


Step 1. Go to Blogger Dashboard >> Lay- out >> Add Gadget


Step 2. In the pop-up window, scroll down and click HTML/Javascript

adding sharing buttons in sidebar

Step 3. Inside the blank box put the code below and then click Save Arrangement button.

<!-- AddThis Button BEGIN -->
<center><div class="addthis_toolbox addthis_default_style addthis_32x32_style">
<a class="addthis_button_preferred_1"></a>
<a class="addthis_button_preferred_2"></a>
<a class="addthis_button_preferred_3"></a>
<a class="addthis_button_preferred_4"></a>
<a class="addthis_button_preferred_5"></a>
<a class="addthis_button_preferred_6"></a>
<a class="addthis_button_compact"></a></div></center>
<script type="text/javascript" src="
http://s7.addthis.com/js/250/addthis_widget.js#pubid=ra-4fdb16d133fdf909"></script>
<!-- AddThis Button END-->

Happy Blogging to all of Us Bro!!!


Different Border Styles for Various Uses

I intentionally write this article to elaborate more those different border styles that add beauty to our CSS applications.

different border styles


Below are lists of border styles:


none: Defines no border

dotted: Defines a dotted border

dashed: Defines a dashed border

solid: Defines a solid border

double: Defines two borders. The width of the two borders are the same as the border-width value

groove: Defines a 3D grooved border. The effect depends on the border-color value

ridge: Defines a 3D ridged border. The effect depends on the border-color value

inset: Defines a 3D inset border. The effect depends on the border-color value

outset: Defines a 3D outset border. The effect depends on the border-color value

Explanation:
  • Border width, style,color and padding
  • In setting the width of the borders, we will use pixels (px in short)
    For the style, select among the nine styles (none, dotted, dashed, solid, double, groove, ridge, inset & outset)
    And lastly apply padding [this explains the distance of your  elements  from the borders and this being affected by the background color)
Example:
              border: 7px outset #642880; padding: 15px;

But you can also specify what border width, style and color  to be applied in  each side. Please take a closer look at the example below.

The css that used in this example is "background-color: #adad25; border-bottom: 15px ridge #B04F6F; border-left: 10px outset #2F2D7C; border-right: 3px inset #F8F835; border-top: 20px double #981510;padding: 20px;"

Now if you want to present something (text, image or video)

in your post that is being enclosed in a border, you can use the code below.


<div style="background-color: none;border-top: 5px double #B04F6F;border-right: 5px double #B04F6F; border-bottom: 5px double #B04F6F; border-left: 5px double #B04F6F; padding: 3px;">Enter your data here </div>

Change the border style, background color, width, color of each border and padding that would match on your data presented.

Have a nice Day Bro and Enjoy!
Credits goes to w3schools with little modification from me. 

Creating a Full Width and Removing Sidebar of a Certain Page Post

This post is the answer of the questions of many bloggers including me on how to increase the width of a certain page post and remove  sidebar to make it more attractive and let the readers to focus on our post only.
creating fullwidth page in blogger

 Creating a Full Width and Removing Sidebar  of a Certain Page Post


Always have a back-up of your template before editing.
Step 1. Go to Blogger Dashboard >> Template >> Edit HTML

creating fullwidth page in blogger

Step 2. Look for the code ]]></b:skin> and just below that, paste the code below,

creating fullwidth page in blogger


<b:if cond='data:blog.url == &quot;http://bloggingtipsandtrix.blogspot.com/2014/05/html-and-css-generator-for-blogger.html&quot;'>
      <style>
        .main-inner .columns {
          padding-left: 0px !important;
          padding-right: 0px !important;
        }
        .main-inner .fauxcolumn-center-outer {
          left: 0px !important;
          right: 0px !important;
        }
        .main-inner .fauxcolumn-left-outer, .main-inner .fauxcolumn-right-outer, .main-inner .column-left-outer, .main-inner .column-right-outer {
          display: none !important;
        }
      </style>
    </b:if>


Note: Replace the red highlighted text above with your own page url.

Step 3. Click Preview first to be sure, then Save your Template!
  • Replace the red highlighted texts with the url of the post you want this tweak to take effect.
  • If in case you have another posts that you want to apply  this kind of trick, just paste the same code below or after the first code that you had just applied.

Example.
 In my case, I  created a full width and  remove the sidebar both in my About and Contact page.
(Observe the two opening <b:if  and closing </b:if>)


<b:if cond='data:blog.url == &quot;http://bloggingtipsandtrix.blogspot.com/2013/04/var-servicedomainwww.html&quot;'>
   
      <style>
.main-inner .columns {
padding-left: 0px !important;
padding-right: 0px !important;
}
.main-inner .fauxcolumn-center-outer {
left: 0px !important;
right: 0px !important;
}
.main-inner .fauxcolumn-left-outer, .main-inner .fauxcolumn-right-outer, .main-inner .column-left-outer, .main-inner .column-right-outer {
display: none !important;
}
</style>
  </b:if>
    <b:if cond='data:blog.url == &quot;http://bloggingtipsandtrix.blogspot.com/2012/12/about-me.html&quot;'>
<style>
.main-inner .columns {
padding-left: 0px !important;
padding-right: 0px !important;
}
.main-inner .fauxcolumn-center-outer {
left: 0px !important;
right: 0px !important;
}
.main-inner .fauxcolumn-left-outer, .main-inner .fauxcolumn-right-outer, .main-inner .column-left-outer, .main-inner .column-right-outer {
display: none !important;
}
</style>
</b:if>

If you have some questions feel free to write it at the comment box below and we will try our very best to satisfy you. Peace on Earth Bro !!!
Credits goes to the author of this blog and to southerspeakers


Adding Twitter Follow Buttons In Blogger Sidebar

 In my previous tutorial, I  wrote an article about putting social media buttons that float in the left side of  your blog post body section and that is really cool . Likewise,  placing a social media button specifically Twitter Button in our sidebar adds professionalism to our blog.

Adding Twitter Follow Buttons In Blogger Sidebar


Step 1. Log in to Twitter and fill up the form with all the information needed

adding twitter follow buttons


Step 2. Copy  the code  at the right side of the form and paste it in the sidebar of your blog.
             Steps in putting the Twitter Follow Button(s) codes in your sidebar.
        A. Go to  Blogger Dashboard >> Lay out >> Add Gadget

adding twitter follow buttons

        B. In the Pop-up widow, scroll down and select HTML/Javascript
adding twitter follow buttons

        C. In the blank Page, paste the code that you get in the above step

Step 3.  Finally, click Save Arrangement :-)
Credits goes to way2blogging with some modification from the author.